Download Free Nero MediaHome to Manage and Burn Media

The Nero disc burning software has come a long way since its initial release back in 1997. While it had a few competitors like Roxio, Nero was more popular. This was probably due to the “lite” version of the software being bundled together with disc burners making it more well known. If you’ve been keeping up with Nero’s progress, you’d have noticed that the software is now more bloated. It has a lot of additional features rather than just a simple and reliable disc burning software.
Nero has evolved from being solid disc burning software into a complete and powerful media management application that can burn, copy, create, edit, rip, convert, protect, play and stream media files. Most of the Nero software is shareware but they’ve always provided a free cut down version with basic burning features. Many years ago it was called BurnLite and then was renamed to Kwik Media. Not long after that, Kwik Media was again renamed to Nero MediaHome.
Even though Nero provides a free version of MediaHome, they seem intent on hiding it from the public. The official download at CNET was removed on Nero’s request and if you manage to find the official MediaHome free stub installer, it will simply download the latest trial version of Nero instead. The MediaHome full version is available to purchase from Nero’s online store, priced $29.95. There isn’t a trial version of MediaHome for you to test before deciding whether to purchase.
We hope that this article will offer some information about MediaHome and its free edition. You will also find links to download the official MediaHome Free Edition setup installer at the end of this article.
Photo and Video Management
Nero MediaHome aims to be the primary media manager on your computer that catalogues all your photos, videos, and music. By default, there are 4 library categories for photos and videos which is by timeline, faces, places and search using tags.
The Timeline category is quite self explanatory because it simply sorts the media files by date. Find is also quite easy to understand. Right click and add tags to you pictures then you can click on a tag to show all images with a matching tag.
MediaHome Faces
Faces is an interesting feature to categorize your photos. In essence, it looks at the image and if it detects a face, facial recognition will try and identify the person. Then the images can be categorized by whose face is in the picture.
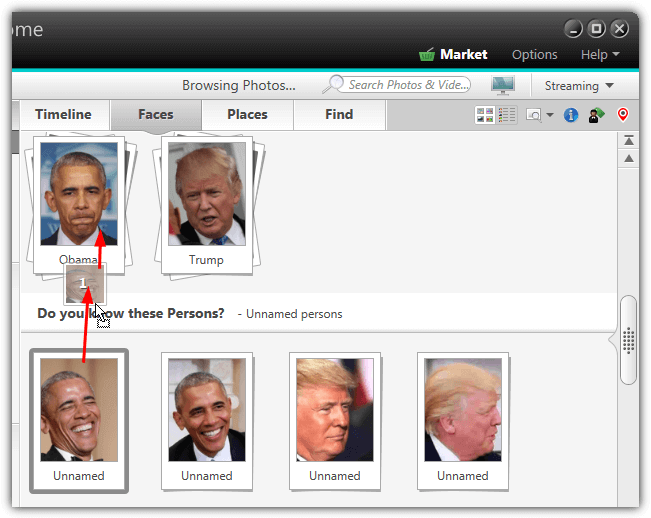
After turning the feature on, MediaHome will attempt to identify and group the faces in the library pictures together. Then you rename each group to match the face and drag the remaining Unnamed faces onto the group. Newly added photos will automatically be checked and grouped if possible. An unidentified face can be added manually by right clicking on the image and selecting Name Person and clicking Add missing Face.
MediaHome Faces is certainly not perfect and won’t identify everything. However, it’s a useful additional way to help categorize your photos.
MediaHome Places
Places is another useful feature in MediaHome. This one lets you mark a place on a map where the photo was taken. If several images were taken from the same location they will be grouped together by the name of the place, which will be identified from the map. For instance, if you pin several photos on New York, they will all appear in a category called New York.
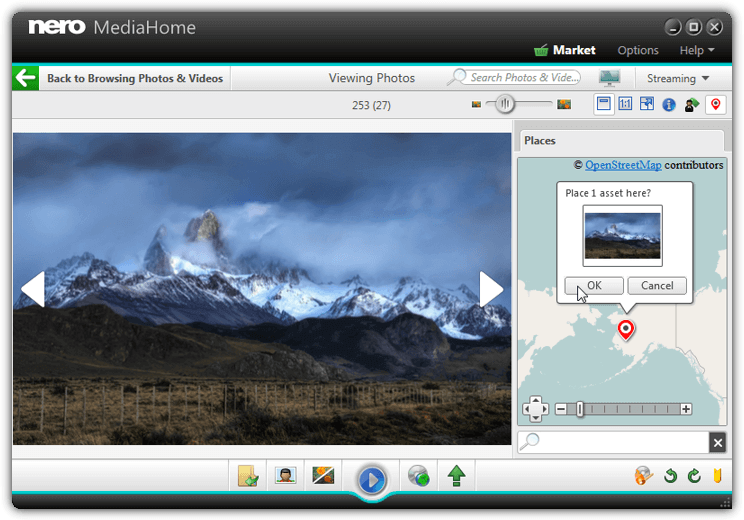
Right click on an image and select Add Place, find the location on the world map, right click and press Select, then OK to confirm. Right click on a pin to remove it from the map.
Photo Editor
There is a basic photo editor where you can enhance and lightly edit your images and photos. Select an image and press the Edit Photo button at the bottom. The Enhance tab offers the most common fixing and improvement tools, such as Auto Exposure, Auto Color (or both with Auto Enhance), Crop, Straighten and Red Eye Removal.
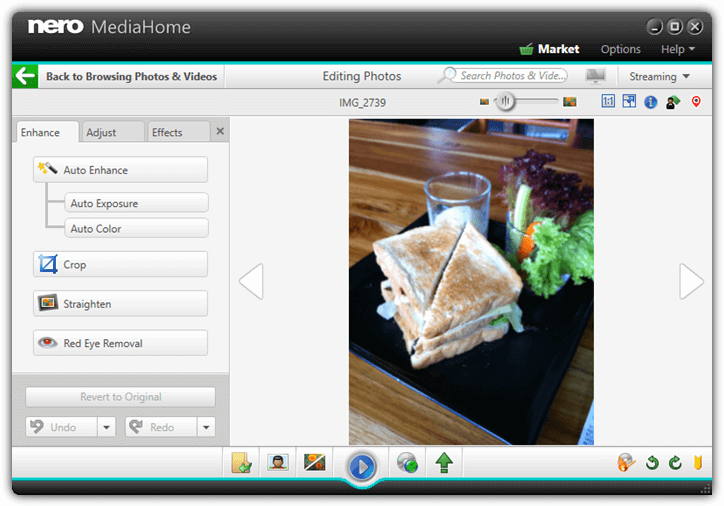
Besides that, it’s possible to manually adjust the brightness, backlight, color temperature, saturation or apply grayscale, sepia, blur, sharpen, glow, antique, vignette and frame effects to the entire image. Undo or revert the changes if you are not happy with the results.
Indexing And Importing Media From Portable Devices
If you find you have a lot of media files stored on external devices like USB flash drives, MediaHome can be asked to index and show those files when you insert the device. Files can also be imported to your computer with optional automatic conversion to MP3 and JPEG/PNG with just a few clicks.
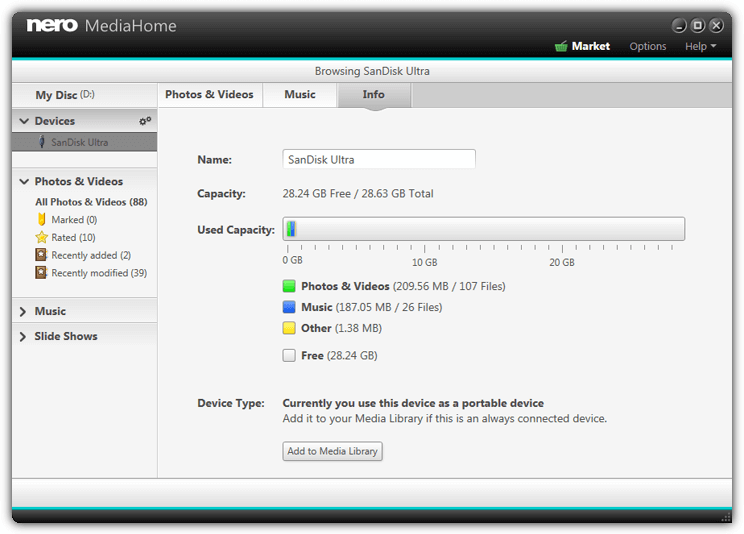
To enable the function, go to Options > Portable Devices and check the “Index connected devices automatically” and optionally “Open connected devices automatically for browsing” boxes. When you insert a device MediaHome will index and show the media files. Click Import down the bottom right to copy or move selected files onto your computer. To choose how to convert the files on import or leave them alone, click the Settings cog wheels on the Devices list top left.
Slideshow Creator
The slideshow feature comes with 3 themes that allows you to create good looking slideshows without much effort. All you need to do is pick a theme, set your opening and closing title, enable the video sound and choose whether to use the theme’s music or your own. Finally, add photos and videos to the slide show from the MediaBrowser.
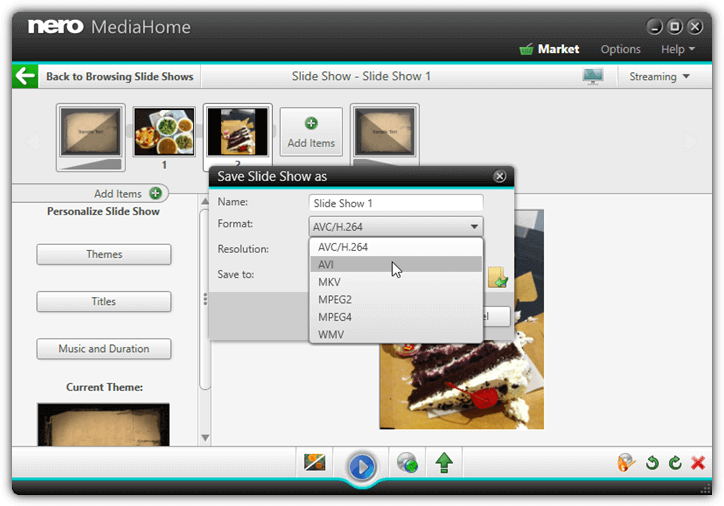
Once you’re satisfied with the newly created slide show, click on More > Save as and choose to save the slideshow as WMV. There are 5 other video formats to choose from (AVC, AVI, MKV, MPEG-2, MPEG-4) but they are either not available in MediaHome free or enable a 30 day trial of the MPEG-2 encoder.
Audio CD Player And Ripper
To play an audio CD insert a disc and a new “Audio CD” entry will appear on the left. By default, MediaHome connects to the GraceNote media database for CD track information and an album thumbnail. You can also edit the current CD information with the right click context menu. You can turn off the internet CD information function from Options.
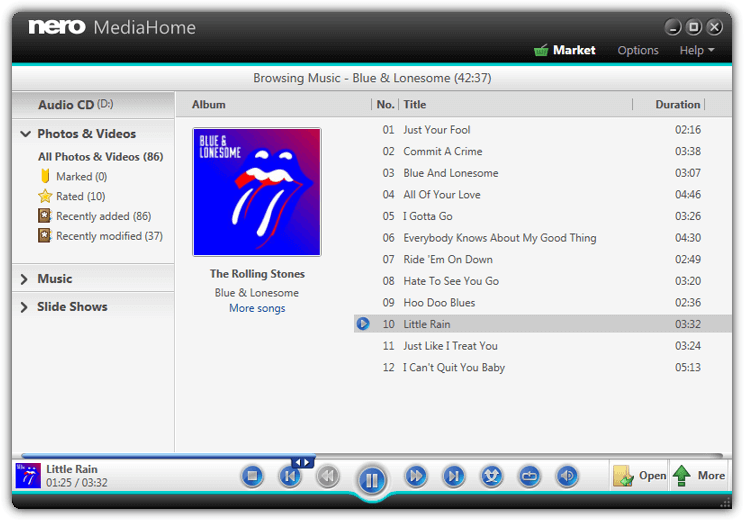
Ripping an album or individual songs to the music library is quite easy. Select one or more tracks then press the Import button to the right of the Play button. Alternatively use right click > Import. To quickly select the whole album click on the thumbnail image.
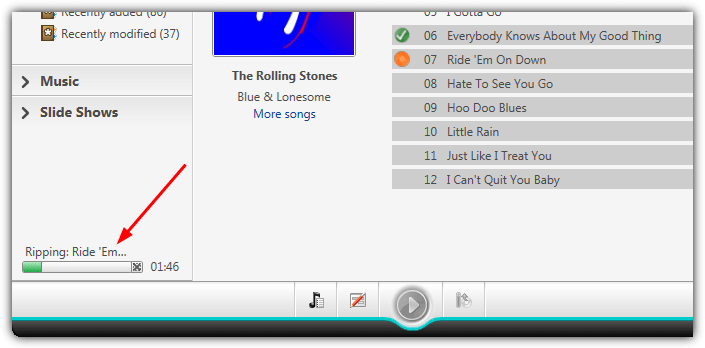
Current ripping status will appear towards the bottom left of the window. From the Options window you can control the file format (MP3, FLAC or AAC), overall quality and rip speed. Nero MediaHome includes a DVD/Blu-ray disc player and ripper but sadly those functions are not available in this free version.
Nero MediaHome Server
An interesting feature in MediaHome is streaming media to or from other compatible devices on the network. You can easily setup a media server which lets your computer act as a central hub for your media. Devices like consoles, PCs/laptops, tablets and smartphones can then directly access the files in your MediaHome library.
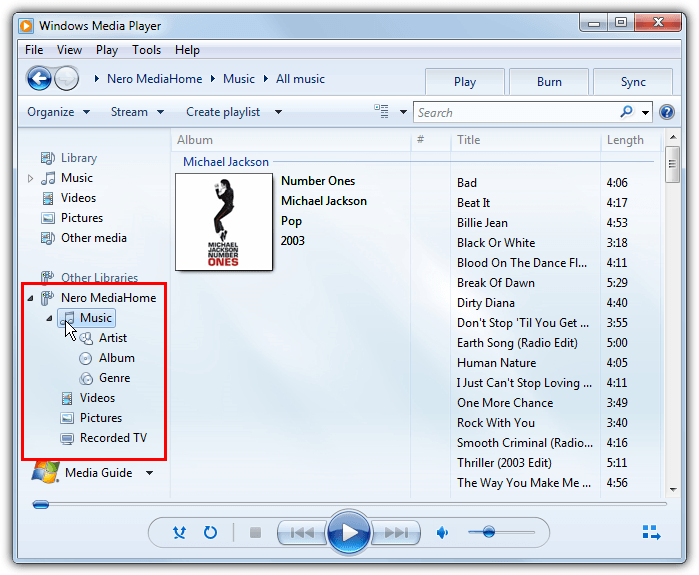
Everything is already setup to automatically create a media server on launch so you only need files in the library and an app/program on the connecting device to access the files. For Windows use something like Windows Media Player, Kodi or MediaHome. iOS and Android have many different apps available, such as Kodi, VLC or Nero’s own Streaming Player.
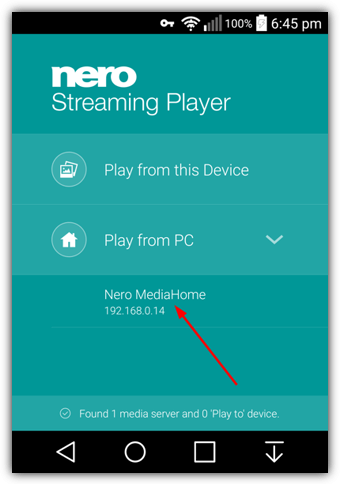
The default server name is “Nero MediaHome” and it shares photos, videos and music. You can change these settings and more, such as device access control and which port to use from the Options > Streaming window.
Streaming To Other Devices
You can stream video, music, images and slideshows from MediaHome to another device with an enabled media server. Media can be played, stopped, paused, cycled etc on the other device from the MediaHome window. Start the server on the target device then click the TV icon near the top right. Available devices will be listed, click on the one you want to stream to, browse for the media file(s) and click Play.
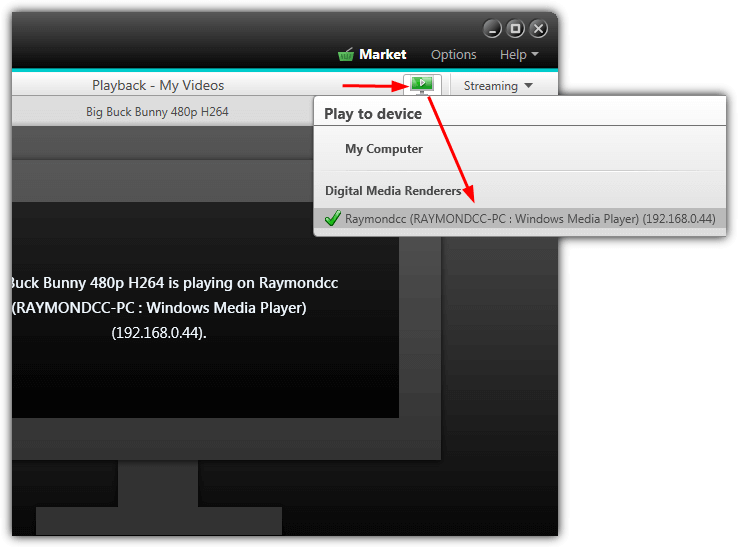
The best way to view individual images is double clicking on one and using the keyboard arrow keys to cycle through. To stream a slideshow save it as a WMV first and stream as a video file from the library. You can stream both directly to a server but it uses the 30 day trial of the MPEG-2 encoder.
If the media does not stream properly to the server press the Streaming drop down and slide the transcoding setting slider to performance. Or try with transcoding off altogether.
Media Sharing
Throughout MediaHome, a Share via button will be available which allows you to share your media directly to various services. You can upload videos and slideshows to Youtube, share images to Pinterest, the KWICK! community or via email, or send music tracks via email.
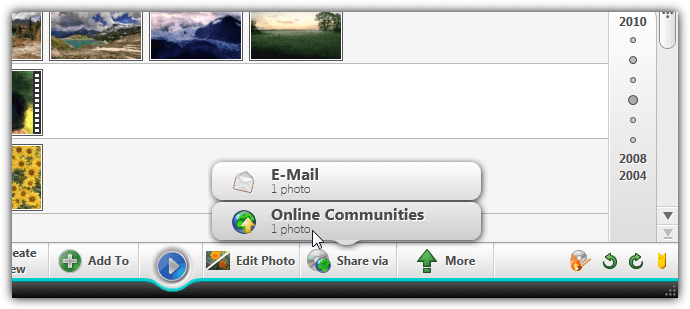
The Share via button is at the bottom and will show E-mail, Online Communities or both options at once depending where you are in MediaHome. Emailed images can be auto resized and then will be sent using your default mail client. For Youtube and Pinterest, you will need to authorize access to the relevant account before uploading.
On page 2 we’ll provide links to download MediaHome free and look at the feature what Nero is famous for, optical disc burning.
MediaHome Disc Burner
As Nero started out as a disc burning application, you will likely be interested in the MediaHome Disc Burner. You can find the burn icon tucked away at the bottom right and available burning functions differ depending on where you are in the program.
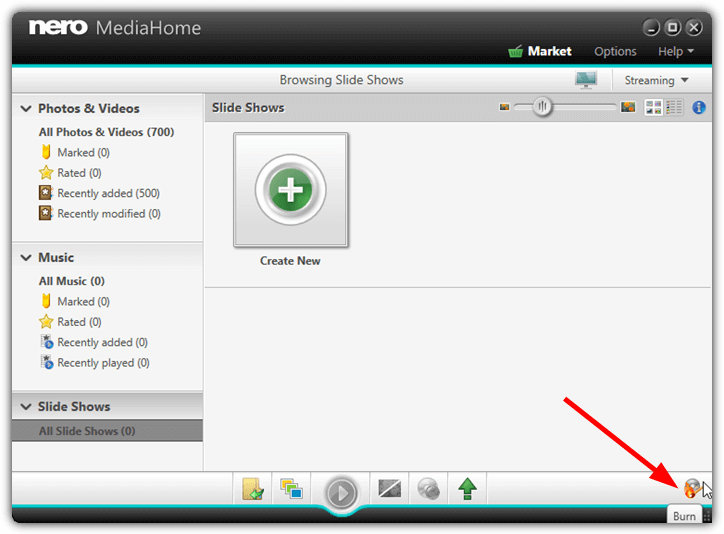
From the Photos and Videos or Slideshows library, you will be offered the chance to create and burn a DVD-Video, AVCHD, Data Disc or Copy Disc. In the Music library the top two options are replaced by Audio CD and MP3 Disc. Sadly, the options for DVD-Video and AVCHD are unavailable in the free version of MediaHome and will point you to the Nero Market to purchase Nero Platinum.
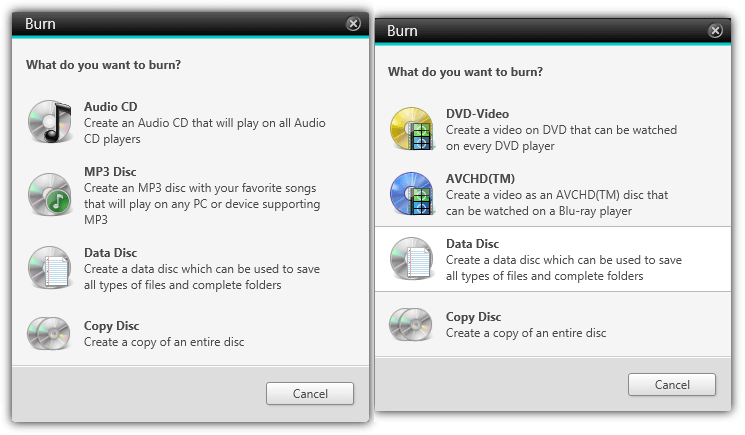
The Audio CD, MP3 Disc, Data Disc and Copy Disc options are available but have a huge problem. Burning a disc using any of those methods will only enable a 30 day trial of the Nero Burning engine. After the trial expires you cannot burn anything else from within MediaHome. Thankfully, we have found a way to extend the trial and allow data burning, copying and music disc creation indefinitely from MediaHome free. Read more about that below.
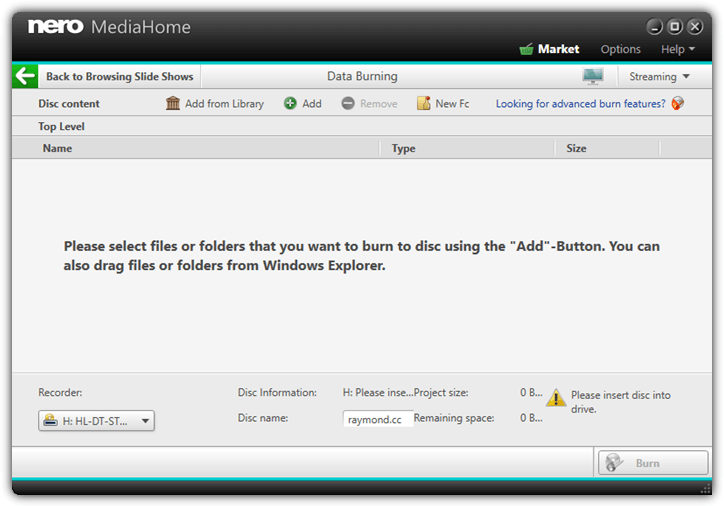
Creating a data, MP3 or music disc is easy to do. Either select the files to write before selecting the burn option, click Add or Add from Library to select the files manually or drag and drop files onto the window. Then select the recorder and click Burn. Performing a disc copy is even easier and most users will only really need to press the Copy button then swap the source disc for a blank disc half way through.
Reset The 30 Day Burning Engine and MPEG-2 Encoder Trials
As we’ve mentioned, Nero MediaHome Free does not come with any free to use burning functions at all, which is most disappointing. Once you attempt to burn a disc it will automatically start the 30 day trial of the burning engine. When you try to save a slideshow as MPEG-2 or stream slideshows and photos a separate trial for the MPEG-2 Encoder is activated.
However, to enable you to continue using the burning functions and MPEG-2 encoding, we have found a way to reset the trial periods back to 30 days. Be aware that this guide is tricky in places so some experience definitely helps, make sure you have registry backups just in case.
1. Install MediaHome and any updates but DO NOT attempt to burn a disc or stream/save a slideshow. If you have activated a trial, we’ll tell you how to remove it below.
2. Open Regedit and navigate to:
HKEY_LOCAL_MACHINE\SOFTWARE\Classes\Wow6432Node\CLSID
For 32-bit Windows users, go to:
HKEY_LOCAL_MACHINE\SOFTWARE\Classes\CLSID
3. This is the tricky part because the registry key to look for is different on every machine. We’ll tell you how to identify the key but you have to find it.
The key inside CLSID you are looking for has no sub keys so does not have a triangle beside it to expand. The key will contain a single Value Name of 8 random upper and lower case letters, the Type will be REG_BINARY and the Data will contain around 30 bytes. If the key includes a Value Name of something like AppID, it’s not the right one.
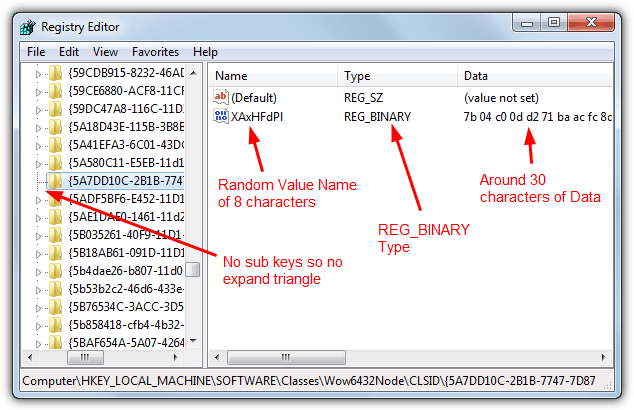
4. Once you have found the key, right click on it, select Export and save the .REG file.
Note: If you have already activated a trial, you first need to reset the trial data before exporting the key. Double click the Value Name and drag to select ALL the value data, right click and press Delete, then press OK.
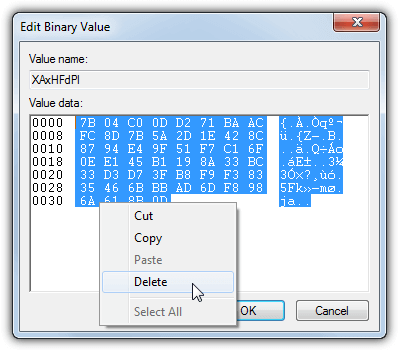
Open MediaHome and accept the new license agreement that pops up, then close it again. Go back to step 4 and export the key.
5. Now you are free to use MediaHome and the burning/MPEG-2 trials. When a trial is expiring or has expired, close the program, run the .REG file to import the data into the registry and reopen MediaHome. You will find the trial resets back to 30 days. Optionally check “Never show this message again” on the trial window to remove the nag.
Reset The Trials Automatically
If you are going to use the burning or MPEG-2 features in MediaHome a lot, the trials will have to be reset every month or so. To help with that you can create a scheduled task in Windows to run the .REG file automatically so you will never run out of trial days.
1. Open Task Scheduler by typing taskschd.msc into Start. Right click on the Task Scheduler Library and select Create Basic Task.
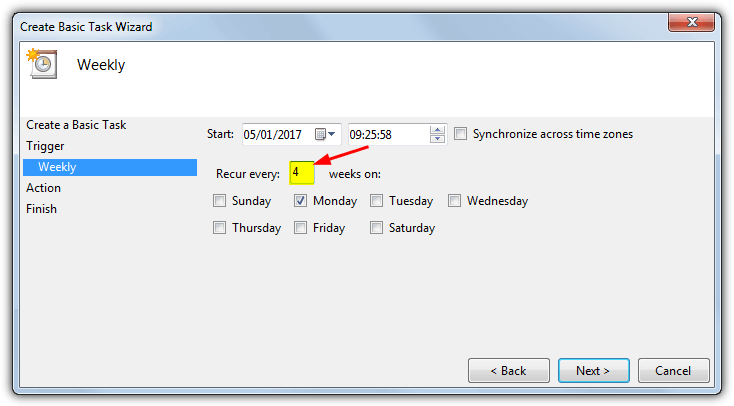
2. Enter a name such as “MediaHome Trial Reset” and press Next. Click Weekly, then Next and in the “Recur every xx weeks on” box enter 4 and check a box for any day. This will run the trial reset every 28 days. Press Next.
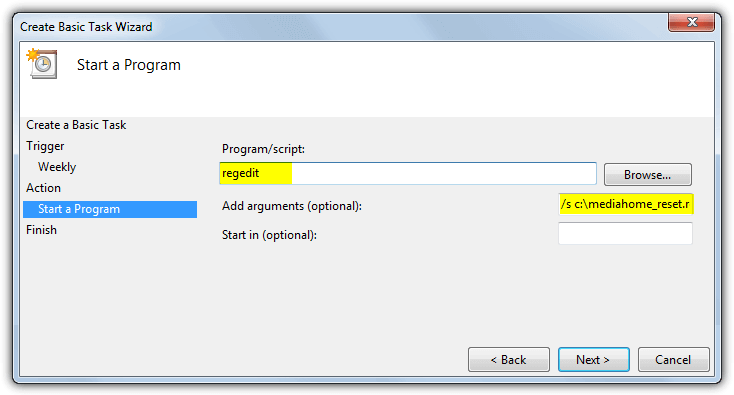
3. Click Next and in the Program/script box enter regedit. In the Add arguments box type /s followed by the path to the .REG file. For example: “/s C:\mediahome_reset.reg”. Click Next and then Finish when done.
If you are not the administrator or have UAC enabled a requester will pop up every 28 days asking for Regedit access to run the reg file, choose Yes. Optionally double click on the task and check the “Run with highest privileges” box to suppress the prompt.
All in all, Nero MediaHome free is a very useful all in one media library, player and streamer with some nice features. It’s a real shame that some of those features you might expect to be fully functional are only limited trial versions. Thankfully, our trial reset option helps removes those restrictions so you can use MediaHome free to its fullest.
Alternative link:
Download Nero MediaHome Free Samsung version
The two downloads above are similar apart from the second link leads to a page at Nero.com for a version for Samsung customers. In reality, the difference between the two applications is only a minor version number. Both have an update available but it adds nothing new to the program and removes the discontinued free online storage option.
The 41MB difference in file size is because the Samsung version includes the .NET Framework 4.0 installer which is required by MediaHome to function. If you already have .NET 4.0 or higher installed then simply use the smaller installer.



User forum
0 messages