How to Create Windows 7 Recovery USB & Download Source
Believe it or not, my old desktop computer doesn’t have an internal CD/DVD drive. I found that it is unnecessary because the 5.25″ DVD drive is too big and takes up too much space. Removing it gives more space for air ventilation. Secondly, although a DVD drive doesn’t take up much power, I know I am saving some (around 20 Watts) from not having it. I do have an external USB slim DVD writer though if I really need to use it. Everything can be run from USB nowadays such as Hiren’s BootCD, antivirus rescue discs and even installing Windows 7.
I have also started using the Windows 7 system image backup and restore feature, so there is no need to create a Windows 7 Rescue Disc in case the boot loader gets wiped off. However, seeing that I’ve already removed the internal DVD drive and try to avoid plugging and unplugging the USB slim DVD writer, I need to install the Windows 7 system recovery onto a USB flash drive. There is no easy supported method to do that from Windows itself but here are a few ways we’ve found how to do it.
Quick tip
One option I have considered is using the Restoro optimization tool. This utility software repairs and replaces all the critical system files I need to run and use my Windows device correctly. Restoro functions similarly to a Windows 7 recovery disk because it has all the tools to troubleshoot various problems. For example, Restoro allows me to restore my Windows 7 to a former state, making it possible to undo any action that may have resulted in bigger problems.
Get Restoro
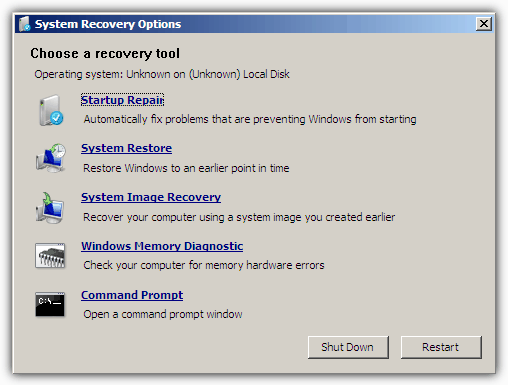
There are other options to get the recovery files on to USB such as using the Command Prompt with Diskpart or using USB bootable creation tools such as SARDU, UNetbootin, Rufus, xboot etc, but after testing we found that not all the recovery USB functions work properly. Out of the 5 recovery tools on the “System Recovery options” menu, only the last option “Command Prompt” is working while the rest are broken.
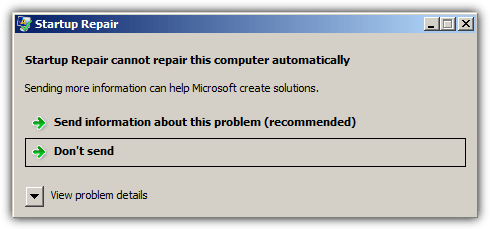
Clicking on Startup Repair shows the following error:
Startup Repair cannot repair this computer automatically.
Sending more information can help Microsoft create solutions.
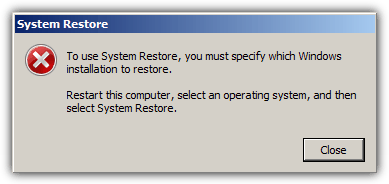
Clicking on System Restore shows the following error:
To use System Restore, you must specify which Windows installation to restore.
Restart this computer, select an operating system, and then select System Restore.
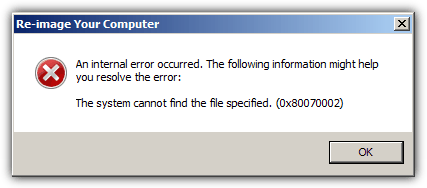
Clicking on System Image Recovery shows the following error:
An internal error occurred. The following information might help you to resolve the error:
The system cannot find the file specified. (0x80070002)
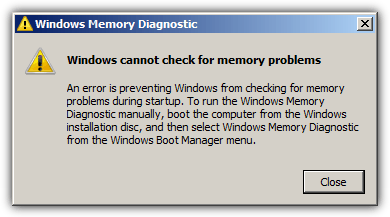
Clicking any of the 2 options in Windows Memory Diagnostic shows the following error:
Windows cannot check for memory problems.
An error is preventing Windows from checking for memory problems during startup. To run the Windows Memory Diagnostic manually, boot the computer from the Windows installation disc, and then select Windows Memory Diagnostic from the Windows Boot Manager menu.
If you are getting any of the error messages above on your current Windows 7 System Recovery image installed onto USB stick, or want to create a fully working recovery USB from the off, you should use the below methods to create it as we have found that all the recovery option functions work as intended.
Step One: Creating the Windows Recovery ISO
Before you create the recovery USB stick, you must first get yourself a standard Windows 7 System Recovery ISO which can be attained in two ways. One if you have a recovery CD already burned to disc, and the second if you have no access to an optical drive. If you have a CD-RW drive the easiest method is to run the recdisc.exe tool from the Search box in the Start menu, burn the image to a re-writable CD and then follow the first method below.
First Method: From an existing Windows 7 system recovery disc.
1. Download and install the trial version of PowerISO. If you have any other software you like that creates an ISO file from a CD such as ImgBurn etc, you can use that also. Watch out for the adware during the PowerISO install.
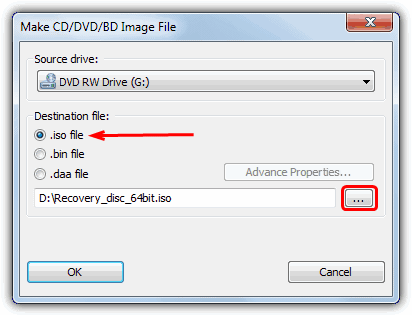
2. Start PowerISO, then go to the Tools menu -> “Make CD/DVD/BD Image File”.
3. Select the destination file as “.iso file”, then choose a location and filename for the saved file. Make sure the source drive is the correct one. Press OK when you’re ready to create.
After a minute or two, the ISO will be created ready to put onto USB.
Here’s how to create the image using another popular ISO utility called UltraISO instead if you prefer it over PowerISO:
1a. Download and install the trial of UltraISO.
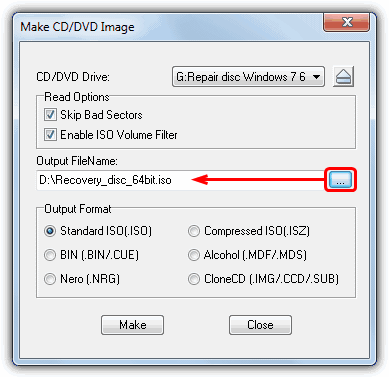
2a. Start UltraISO (right click and Run as Administrator), go to Tools menu -> “Make CD/DVD Image“ or press F8.
3a. Click the button to choose a location and filename for the output file, make sure the drive is selected that contains your disc, then click Make. The ISO Output Format should be selected by default.
On Page 2 we’ll show you how to get the Recovery ISO from a system without an optical drive and write the ISO to USB.

Improve this guide

User forum
44 messages