How to Create Windows 7 Recovery USB & Download Source
Second Method: From a Windows 7 computer without an optical drive.
1. Download and install TotalMounter. This program creates a virtual CD/DVD drive which can actually be written to, unlike programs like Daemon Tools which are read only. Administrator privileges are required to use this program.
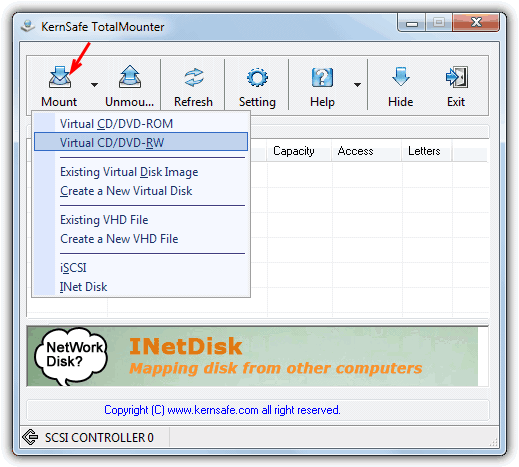
2. Run TotalMounter from the Start Menu (All Programs -> KernSafe -> TotalMounter -> TotalMounter) to bring up the main interface. Click Mount -> Virtual CD/DVD-RW.
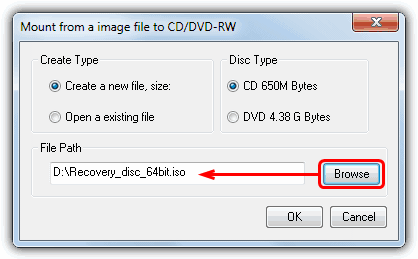
3. In the next window, click the Browse button to select a location and file name for the ISO you will create. Leave Create Type and Disc Type alone, then click OK. A new device will appear in the TotalMounter main window, make a note of the letter the drive has been given.
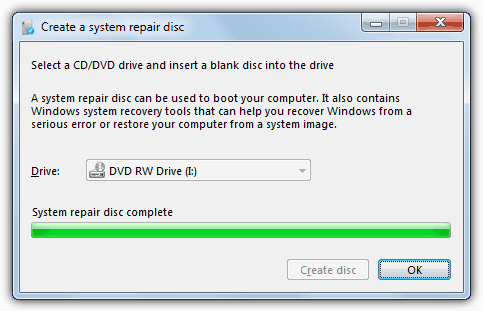
4. Run the Windows system repair disc creator by going to Start and typing recdisc into the search box. Once loaded, select the drive letter you noted from step 3 and click Create Disc.
5. Go back to the TotalMounter window, right click on the drive in the window to select it, then click Unmount. An ISO will now be created at the location and with the name you gave in step 3.
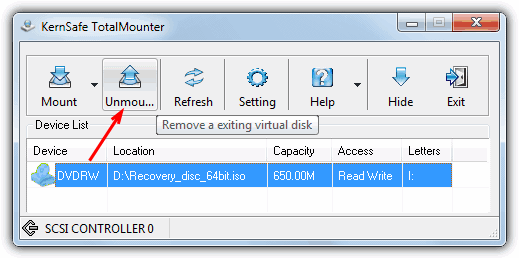
The 32-bit recovery ISO will be around 143MB and the 64-bit will be around 165MB. TotalMounter can be uninstalled if you don’t want it anymore.
Step Two: Writing the ISO to USB
1. If you never used the first method from above, download and install the trial version of PowerISO.
2. Start PowerISO and then go to the Tools menu -> “Create Bootable USB Drive”. Administrator privileges are required for this function and the program will restart if it needs to elevate itself.
3. In the Create Bootable USB Drive window, all you have to do is click the button and find your ISO image you made from step one, make sure the Destination USB drive is correct, and then click Start.
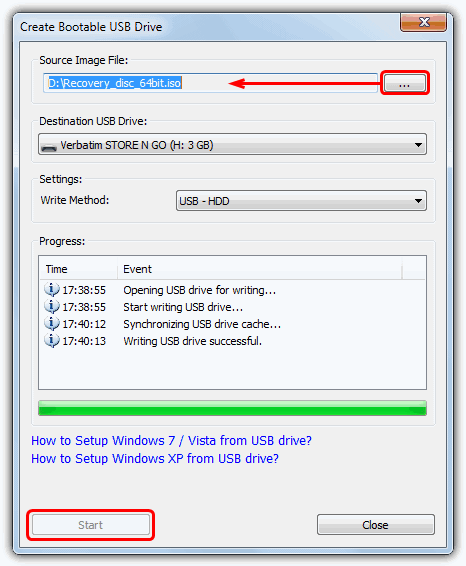
After the process has finished, the USB stick is ready to be booted from.
As with step one, UltraISO can be used instead of PowerISO if you prefer, Here’s the create USB instructions for it:
1a. Download and install the Trial of UltraISO if you haven’t already.
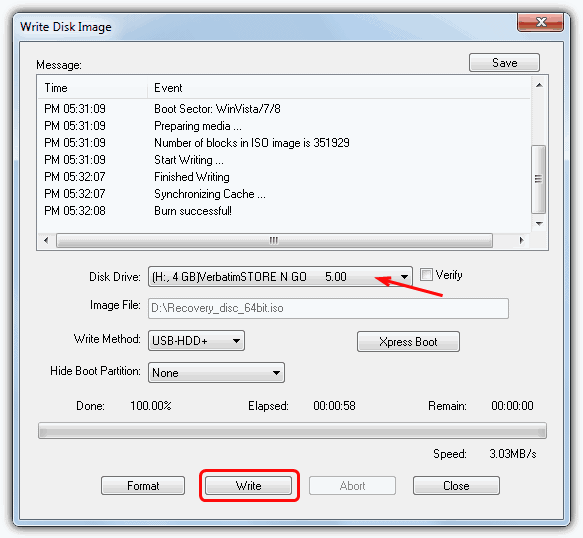
2a. Start UltraISO , then go to File -> Open or press Ctrl+O and open the recovery ISO image you have previously created. Once loaded, go to the Bootable menu -> “Write Disk Image”
3a. All that’s required here is to make sure the correct USB drive is selected and then click the Write button. No other settings need changing.
Remember that these repair and recovery discs made through Windows 7 are architecture specific. A recovery disc made from a 32-bit Windows will only work on 32-bit, and 64-bit will only work on 64-bit etc.

Improve this guide

User forum
44 messages