System Restore Explorer Tools & How to Use

Ever since Windows ME a feature has been present in Windows that can help recover your system in the event of an error, crash or malfunction. System Restore works by simply backing up all important files on the system at a given point in time, whether it’s before a software install, before installation of drivers or Windows updates, or even manually creating restore points yourself. If things go wrong on your system it can be rolled back to the time the restore point was created by replacing damaged or corrupt files with those that were backed up, hopefully fixing your issues.
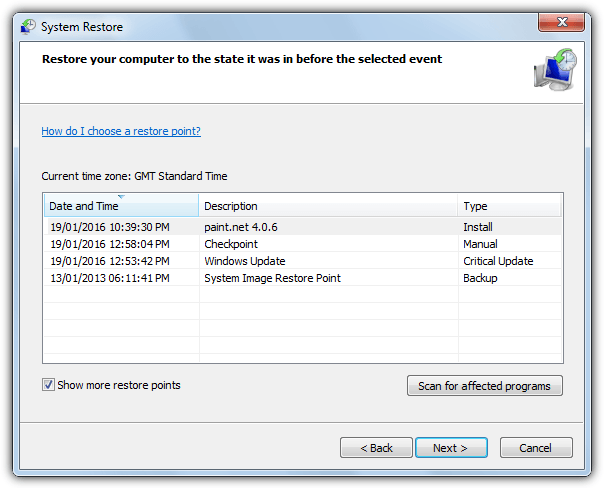
Because System Restore can backup registry files, system files, program files and also files from user profiles it can be used to recover specific files using the Previous Versions tab in Explorer. If a personal document or image for example, has become corrupted, you can simply look for a previously backed up version in the System Restore snapshots and recover it.
If you want to recover several files or folders from a Restore point it becomes more problematic using the previous versions option, and actually running System Restore to restore the point is maybe something you don’t want to do. Another option is viewing the contents of the restore point so you can copy files out without having to restore it, but Windows has no built in ability to do that.
Thankfully, because Windows uses the built in shadow copying function to create Restore points, their contents can easily be viewed by dedicated third party programs. Here we show you 2 tools that allow you to view all the files contained within Restore points, ready to be copied out if needed.
1. System Restore Explorer
System Restore Explorer is a tool that has been designed specifically for the task of viewing and copying files from System Restore points without the requirement of having to restore the whole set of backed up files. If you want to only extract one or two files from the restore point it’s not a problem. The program works by mounting the selected restore point as a virtual folder using the Volume Shadow Copy Service, from which you can then view and copy files. Administrator privileges are required to use System Restore Explorer.
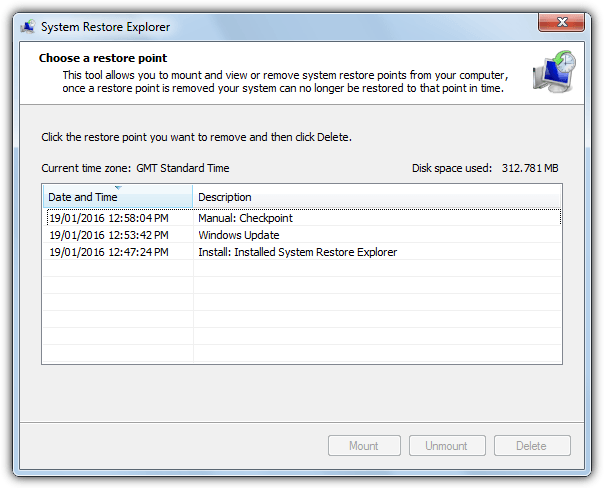
Although the easiest way to use System Restore Explorer is to simply install it from the MSI installer, more advanced users can extract the installer with Universal Extractor and use the program as a portable version. The user interface strongly resembles the Windows System Restore interface and it shows all created restore points. To mount and view the restore point files click and highlight the required point and then click the Mount button. This will create a shortcut to the Restore point in C called HarddiskVolumeShadowCopy and automatically open an Explorer window to view it.
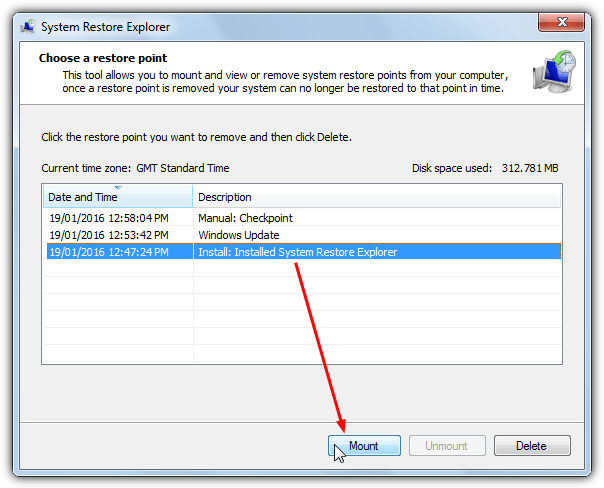
Obviously you cannot edit, move or delete files as they are still part of the protected restore point but can view, copy and paste or drag and drop. When you’re done highlight the same restore point and click Unmount (not highlighting the point first will likely give an unhandled exception error). A useful option is the Delete button which is able to delete unused or unrequired restore points. System Restore Explorer also works on Windows 8/8.1 and 10 although .NET Framework 3.5 will need to be installed from Programs and Features > “Turn Windows features on or off”.
Download System Restore Explorer
2. ShadowExplorer
As the name suggests, ShadowExplorer is a tool specifically designed to view and explore files created by System Restore points which are backed up using the Shadow Copy service. Unlike System Restore Explorer, ShadowExplorer doesn’t need you to mount the Restore point and instead it shows all the files and folders automatically from each selected point in its main window.
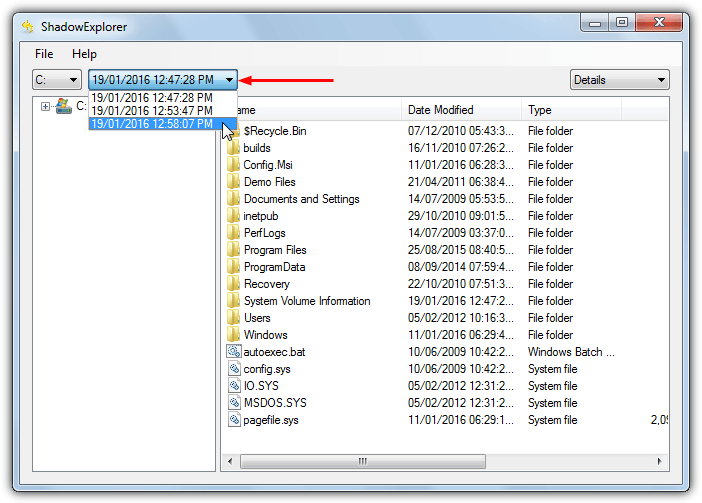
Usage is very easy and after running the program (administrator privileges are required), make sure drive C is selected in the drop down, then click the drop down to its right which displays all restore points by date and time. If you are not sure which restore point you want to access because there are no names in this list, run rstrui.exe from Start or the Run box to open the System Restore tool where you can see what names relate to which restore point times and dates.
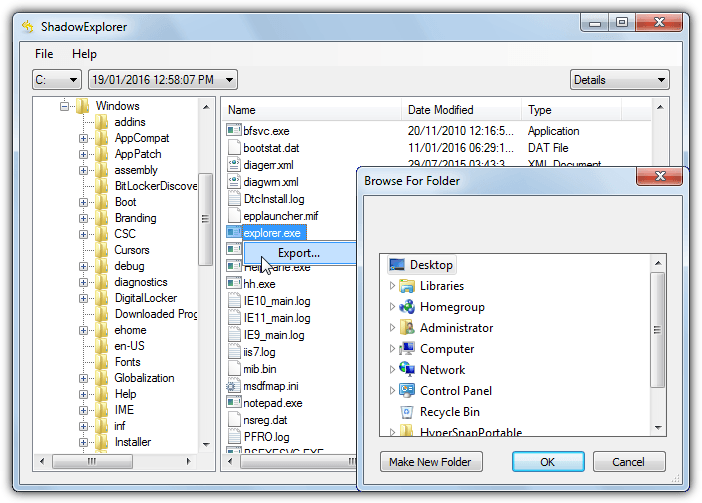
Navigate using the Explorer style interface to find the files and/or folders you are looking for, right click and select Export. Then browse for the target folder to save everything to. Multi selection is possible with Shift+click or Ctrl+click. ShadowExplorer also works on Windows 8.1 and 10 although you will be prompted to install .NET Framework 3.5 before the program will run. A portable version of ShadowExplorer is also available.


User forum
4 messages