How to Clear Dirty Bit on Windows without CHKDSK
One mystery that has gone unsolved for the longest time now is the dirty bit on hard drive volumes. Basically a dirty bit is just a 1 hex value located somewhere hidden on the hard drive that Microsoft has never reveal until recently. Windows will check the dirty bit to determine if a volume can contain corrupted files due to hard resetting your Windows computer with files that are still opened or when you unplug a USB flash drive that is in the midst of copying a file.
When the computer boots up with the dirty bit enabled on a hard drive, you will be asked to check the disk for consistency before Windows is loaded. You can skip the disk checking by pressing any key but it will come back again the next time you start up your computer. This will usually keep happening until you let the drive be scanned or alternatively you can tell Windows to stop checking the specific drive. This method doesn’t clear the dirty bit on the drive though and simply forces Windows not to scan a drive on boot.
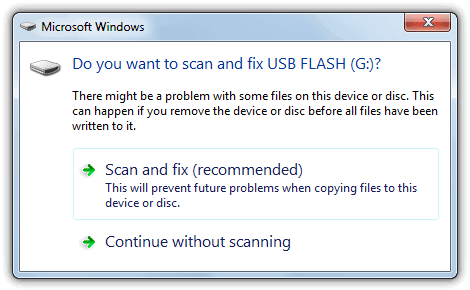
As for a USB flash drive or portable hard drive with the dirty bit enabled, plugging the drive into a Windows 7 computer will prompt a window that asks:
Do you want to scan and fix Removable Disk (G:)?
There might be a problem with some files on this device or disc. This can happen if you remove the device or disc before all files have been written to it.
If you close the popup or select “Continue without scanning”, then this popup will continue to haunt you until you decided to click the recommended Scan and Fix option.
There are guides on how to disable the scan and fix window by disabling the Shell Hardware Detection service but that really isn’t a viable solution since you’re telling Windows to ignore the problem rather than fixing the problem itself.
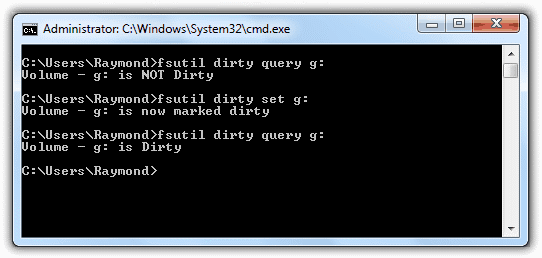
There is a tool called fsutil.exe in Windows which can be used to check if a volume is dirty and can even be used to manually set a drive as dirty which will force the requests to scan it, but weirdly it cannot be used to clear the dirty bit. Someone has already reverse engineered the fsutil.exe to confirm it.
So there seems to be 2 solutions to clear the dirty bit which is to trust the Microsoft disk checking utility by completing a check disk OR you can move the data away from the volume, format the drive and then move it back. Going with the first option would risk losing some of your files when the scan disk decides to turn them into CHK files. The second option is safer but takes a lot of time if you have a lot of files to move.
Here is a third method, and we’ve spent several hours locating the dirty bit on NTFS and FAT16/32 file systems so that we can manually reset or clear the dirty bit with a hex editor that supports disk editing. As we said earlier, the dirty bit is simply 1 hex value on the disc volume that needs to be reset and is easy to change again in future once you know how.
We’ve tried a total of 13 different hex editors which are wxHexEditor, HxD, 010 Editor, CI Hex Viewer, iBored, HexEdit Pro, Hackman Suite, DMDE, Hexprobe, FlexHEX, ADRC Hard Disk Hex Editor, WinHex and Hex Workshop. Only DMDE, WinHex and Hex Workshop were the editors able to write the data back to the disc but the last two are shareware tools. HxD is certainly one of the easiest tools to use and can make the needed changes but is a bit slower because it needs to manually search the drive for some values.
On Page 2 we’ll show how to clear the dirty bit for NTFS, FAT32, FAT16 and locked volumes.
Special Note: After testing it seems none of the hex editors will edit the system volume (C: drive) or any volumes currently in use and locked by the system, although some of them claim to be able to do so. There is a solution to this problem which we mention at the bottom of the article.
Clear the Dirty Bit for an NTFS Volume
1. Download the DMDE GUI for Windows tool and extract the zip file, it’s free and portable.
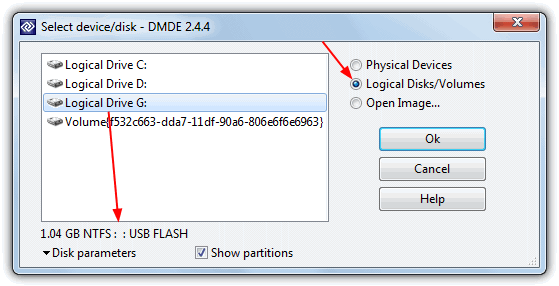
2. On running the DMDE.exe you will be asked to select a drive for editing, clicking on “Logical Disk/Volumes” will give the drive letter to help recognize the correct drive for editing. Partition size and label for the current selection will be underneath.
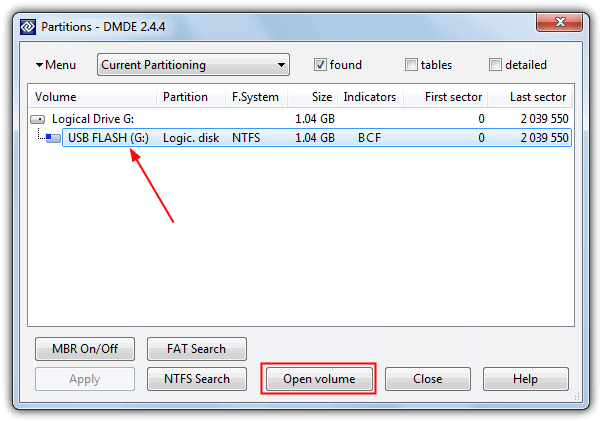
3. On the Partitions screen click the volume on the logical drive, then Open Volume. Click Open on the next window. In the edit window click the expand icon on the bottom right window to expand the MFT view.
4. Press Alt+C to bring up the volume cluster selection (or Editor -> Volume Cluster), just press OK or enter in the window.
5. Now in the Hex editor press Ctrl+S or go to Tools -> “Search String in Object”. In the Hex box enter the following string and click OK:
03 01 01 00 00 00 00 00 80 00 00 00 18
For some odd reason Windows 8 has slightly changed this value when it sets the dirty bit and the values to look for are different. For a fixed drive look for the following hex string:
03 01 01 01 00 00 00 00 80 00 00 00 18
For a USB flash drive in Windows 8 look for this:
03 01 81 01 00 00 00 00 80 00 00 00 18
Note the bits in bold that are different to Windows 7 and below.
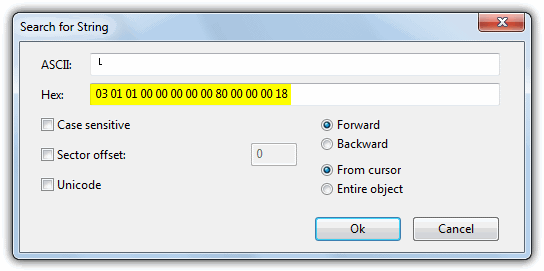
6. Instantly the program will find the string as it’s close by. Everyone will have different offset addresses for this string which is to be expected.
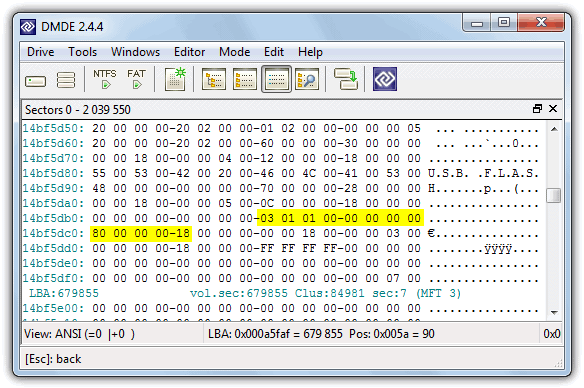
7. The dirty bit itself is not the whole string and the second (and third in Windows 8) 01’s in the search string are all that needs to be edited, so:
03 01 01 00 00 00 00 00 80 00 00 00 18 (or 03 01 01 01 for Win 8)
will turn into this to clear the dirty bit:
03 01 00 00 00 00 00 00 80 00 00 00 18
Click on the 01 to be edited and press Ctrl+E (or Edit -> Edit Mode) which will make the cursor flash. Change the 01 to 00. If this value is already 00 then the dirty bit is not currently set.
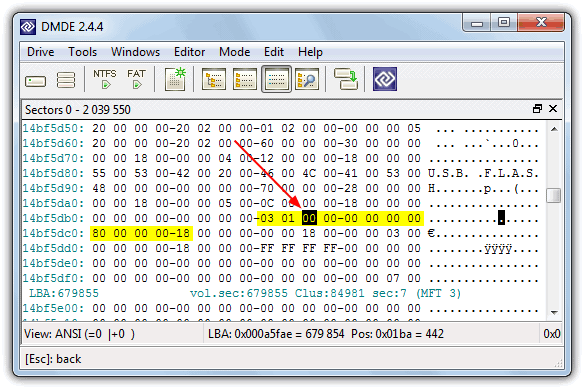
8. When you’re ready, press Ctrl+W or Edit -> Write Changes to commit the change to the disc and close DMDE.
The offset location of the dirty bit is different on every NTFS volume. If you try to locate the dirty bit using a search for 03 01 01 00 00 00 00 00 80 00 00 00 18 from the start of the drive, you will likely find another match within the first 20 or 30 sectors. Changing this value will NOT clear the dirty bit. So far the dirty bit offset hex patterns are the same on Windows XP and Windows Vista and 7 when installed in an NTFS partition, only 8 seems to be different. Manually resetting the dirty bit on NTFS takes effect immediately on Windows 7 and Windows 8 but on XP, it requires a restart.
Clear the Dirty Bit for a FAT32 Volume
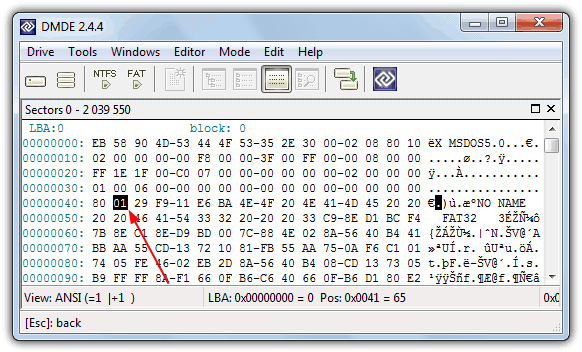
Finding and clearing the dirty bit for a FAT32 file system is far easier than NTFS because it’s located right at the start of the volume and is always at the same offset location. Here’s how to clear it.
1. Download DMDE GUI for Windows and follow steps 1 and 2 above to load the program and select the drive volume to edit.
2. On the Partitions screen change nothing and select Close.
3. The dirty bit for FAT32 is located at offset 41 (5 down, 2 across) and if set this will be 01. Click on it, press Ctrl+E to edit, change 01 to 00 and then press Ctrl+W to commit the changes.
Clear the Dirty Bit for a FAT(16) Volume
As for a FAT(16) volume, the procedure is exactly the same as for FAT32 apart from the offset to change the value is slightly different. When you’re working in DMDE, look at the offset of 25 and if necessary change the dirty bit value of 01 to 00. Use Ctrl+E, edit the value and then Ctrl+W to commit the changes.
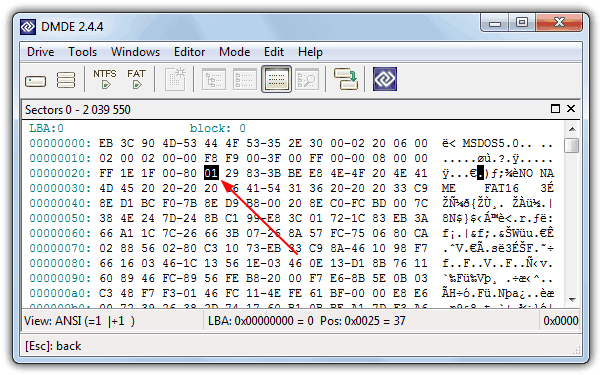
Unfortunately we didn’t manage to locate the dirty bit for the exFAT file system which seems to be harder to trace and edit.
Changing the Dirty Bit on Locked/System volumes
If you’re trying to clear the dirty bit on your C drive you will probably find using any hex editor will not solve the problem and you will get a locked error in a similar way to when you need to run Chkdsk and it cannot run until you reboot the system.
However, there is a way around this problem which is not to boot from the C drive because doing that will break the lock and allow you to edit it with a hex editor. This can be achieved with the help of a bootable live CD, and we would highly recommend Hiren’s Boot CD for the task because HxD is already included in the Mini Windows XP.
1. Download Hiren’s Boot CD and burn it to CD or write it to USB.
2. Boot the system with the CD/USB flash drive and choose Mini Windows XP at the menu.
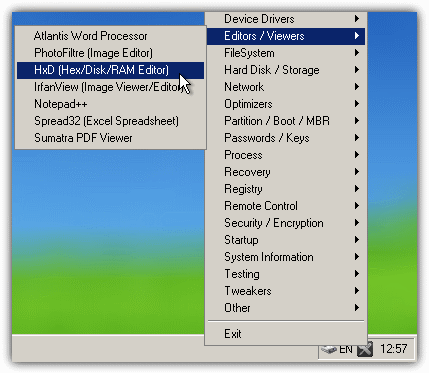
3. Once Windows has loaded, click on the tool icon in the tray and select “Editors / Viewers” -> HxD. This will load the HxD editor.
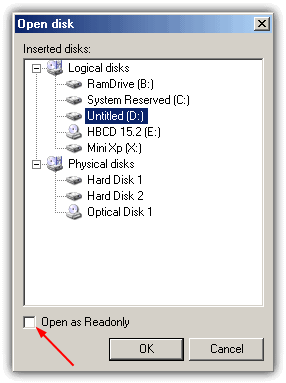
4. Go to the Extras menu, select Open disk and choose the drive you can’t edit. Make sure to untick the Read Only box before pressing OK and accepting the warning.
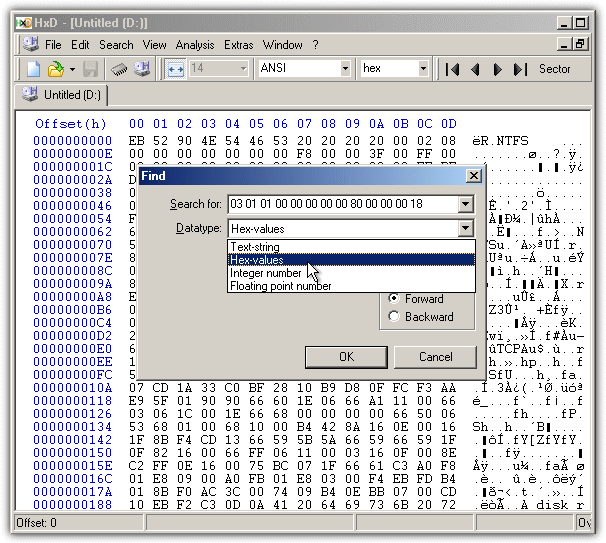
5. Now simply search for the strings depending on the file system you want to edit from above. Ctrl+F will bring up the search window and choose a Datatype of Hex from the drop down, then enter the hex string.
6. Once you’ve done editing click the Save icon or press Ctrl+S. You obviously need to be very sure what you’re doing here because changing wrong values could render the computer unbootable.
Very helpful, for convert large HDD to ntfs.
Thanks for this. I have discovered that this process is different for large NTFS volumes created using WIndow’s “Manage Storage Spaces” tool. As these are usually very large like 10TB, doing the hex search method can take days. Also the search string “03 01 01 00 00 00 00 00 80 00 00 00 18” doesn’t seem to exist. Microsoft might have a different method for these types of drives.
You guys are real super heroes this was so helpful I finally managed to convert my fat32 HDD to ntfs changing that damn dirty bit
Fixed it for me, Thank you!
great, it worked here well thanks man
Is the hex string to be located on Windows 10 Pro the same as given above for Windows 8: 03 01 01 01 00 00 00 00 80 00 00 00 18?
when you get an answer please post here, im sitting with the same problem. dmde cant find any of the 3 strings provided.
same for me . Did you eventually fix that?
Just follow exactly Neil M (3 years ago)’s simple steps.
You can just run Windows Startup Repair from a recovery disk, or from the troubleshooting menu at startup.
To get to the troubleshooting menu in Windows 8 or Windows 10, hold down the Shift key while selecting Restart.
.
Then select Troubleshoot.
Then Advanced Options.
Then Startup Repair.
This fixed it for me
THANK YOU
YEAH thanks, that finally fixed it as windows went into disk repair.’
Took a while to find, but C: is no longer dirty \o/
You are a saviour dude. Its so frekin ez this way.
Thanks for the invaluable comment!!
Bro thank you very much! This worked for me. Thanks a lot!
You are a legend!!!! TY!!!
Thank You Brother. You saved my life and my laptop. People like you is the reason i have faith in humanity.
THIS WORKED FOR ME AFTER SO MANY HOURS TRYING EVERYTHING!!!!!!!!
Did the whole chkdsk guides, spent hours. Did not anything.
Startup repair fixed it in two minutes!!!!! You are my hero of the day!
Neil M thank you so much worked a treat.
I have been through this drill with a dirty bit on a drive installed in Windows 10 Pro machine. One could run chkdsk on this drive in various ways until the “cows come home”” and the dirty flag will not be cleared or repaired.
The first challenge was the fact that the miscreant drive was an installed boot device. Once in use, it would lock and not permit any writing to the drive. First, I tried using vanilla Windows PE disk running chkdsk but chkdsk would not see the dirty bit here either. FSUTIL also reported clean. I then tried using Hiren’s BootCD PE which is pretty impressive. Its Hex Editor search function is a bit slow but it works. Problem was that the strings the Hex Editor found were not exactly like the ones in the article. Similar, but not the same. Bein the novice that I am at Hex editing, I was loath to edit them for fear of turning the drive into a brick.
Finally, I removed the dirty drive and installed it in a USB enclosure. This worked well with DMDE. I could locate and edit the string and save the changes to the drive. But I soon encountered problem #3. Everything worked great at first. I could see the formerly dirty drive in Windows Explorer and defrag it. But after a few re-boots, the drive was showing dirty again and forcing CHKDSK at each reboot.
My next step is to restore a backup using a state that predates the dirty bit problem, I’ll lose a bit of data but the chkdsk logs show some clean ones in August, I’ll post something with the results. Bottom line for me is that the approaches outlined in the article are good and will work for some but not all. If the drive Is actually dirty. Reformat and reinstall from a clean backup, if you have one. One final note, the interface for later versions of DMDE are different from those shown here. But anyone with some IT experience can figure it out.
I’m not an expert but from my previous experience I’d say that if the dirty bit keeps returning it sounds like your drive may be failing and needs to be replaced.
I had a similar issue where my C drive kept getting marked as dirty. Eventually after either running or skipping chkdsk several times over a few months CrystalDiskInfo flagged a warning for pending sectors. WD Data Lifeguard then confirmed bad sectors. I had just enough disk health left to backup vital files before the drive completely failed. The drive was completely inaccessible after this so it’s a good job I retrieved my valuable files first.
A few years before I had the same issue on a USB HDD. Unfortunately I didn’t manage to back it up in time and ended up having to pay nearly £400 for data recovery.
The moral of the story is: NEVER IGNORE A RECURRING DIRTY BIT!
stuck in the same hell…lesson for next time ex-fat behaves like your ex wife leave it alone. get Fat32 long as 4gb wont harm you or else ext4 and move to linux
I can edit my windows 10 drive OK using Windows 8 hex address. but can not apply changes because drive C is locked. what’s the solution? safe mode, boot to PE environment, mount drive on another machine, force dismount? .
EXCELLENT advice to fix a recurring ‘scan and fix’ dialog every time I connect my android tablet. I used to disable WIA, but that disabled my scanner as well. Your solution resolved the issue for good, kudos :-)
Quick solution if you have a Mac.
I use an external hard drive to transfer assets between my Windows 7 machine and my Mac. The drive exFAT.
When I ran into the dirty drive issue on my Windows 7, I simply:
1. Disconnected it from the Windows PC, and
2. connected it to my Mac.
3. Once the Mac Recognized the drive, I ejected it. Apparently, during the ejection process, the Mac clears the dirty bit.
4. I then plugged it back to my Windows machine and didn’t receive the dirty bit message and was able to write to it as normal.
Hope this helps.
Similar fix for me using Linux (Mint) – mount / unmount in Linux system & plug back to Windows PC = Good again. I then deleted the last file that was coping during failure & continue…
Just cleared it for exFAT. sans.org/reading-room/whitepapers/forensics/reverse-engineering-microsoft-exfat-file-system-33274 Per 5.2, 100 is the volume serial number 4 bytes, which is 64 in hex. That gets to 68h 00 01 for the File System Revision. Next is the volume flags, bit 1 is the Volume Dirty flag, so the value was 02. Changed it to 00, wrote as per the other guides, and then on reboot volume wasn’t dirty. Of course use at your own risk, anything could happen depending on what was actually in the middle of being written when the write was interrupted. If it was the FAT, you could easily lose files/folders etc if you start doing things to the drive. Also note there is a second VBR at 0ffset 12 that could be the active one, instead of the first VBR. Just a pointer to where the bit is, back up your data if it’s important before you start editing.
Got a full hex string to search for on this? Trying to do it with a 4 TB exFAT drive that won’t take any writes until I clear this and chkdsk gives an unspecified error.
Thanks a mill, HAL9000!
Followed the procedure, as depicted in ‘Clear The Dirty Bit For An NTFS Volume’, to the letter. Used it on my newly installed Windows 10 ver 1703 (OS bld 15063.138) by way of ‘DMDE GUI for Windows’ (dmde-3.2.0.692-win32-gui.zip).
Once found (on logical disk e:)
03 01 01 01 00 00 00 00 80 00 00 00 18
changed it to
03 01 00 00 00 00 00 00 80 00 00 00 18
without much ado (had to force-lock the volume, though).
After a cold boot, I found everything in place on vol e:, and running ‘fsutil dirty query e:’ confirmed that dirt was history.
Running the whole thing on a system drive may need some additional steps, but should deliver the same result.
Cheers again,
Ernest
I want to share an experience that might be beneficial to someone else someday. Recently I plugged a 500 GB HDD into Windows 7 Pro and the “Checking file system … ” message appeared, so I let it run. Having a 3.5 GB/s processor and my OS on an M.2 SSD, the display moved so rapidly I could barely read more than something about “orphans,” but I was terrified that I was losing all my data. When it finally finished and announced satisfaction, I checked several folders/files and started breathing again. A few days later I decided to use that drive for movie storage, so I transferred all the data off it, with the intention of formatting it to NTFS again, but with 64 KB cluster size. Just before I started the format procedure, I noticed a huge disparity between the drive size and space available; in fact, 125 GB. After forcing the showing of hidden operating system files, I discovered three .chk files. The top two were “empty,” but the bottom one contained 125 GB of folders and thousands of files. I opened several and they were perfectly intact. I moved all of them to another drive and proceeded with the formatting, breathing “thanks” to God for wisdom. Then came a sick feeling with the memory of several years ago having this same experience with some other drive, and losing 176 GB, in my ignorance at the time thinking that the chkdsk operation was a virus that corrupted/destroyed all that data. There were some precious irreplaceable files (since I had not previously been impressed with the necessity of backing-up data) hidden in a .chk file that probably could have been recovered as easily as I did this time, had I known what really happened. I still get a little sick thinking about it.
This “dirty bit” was really getting on my nerve it took me quite a bit of time for finding a solution to cure this problematic “dirty drive” for my Windows 7 Ultimate. Tried everything including this Hiren’s Boot Mini WinXp and HxD editor method. Found the supposed to be the dirty bit, edited it, sadly it doesn’t work for me.
One peculiar problem it seems there was an invisible windows 7 hand that disabled chkdsk cmd before it can even proceed processing at every boot! It doesn’t matter what “check disk cancelled”! I figure out may be the issue why my Windows 7 could not cure itself!
Finally after searching in the internet found a solution that works for me.
Here the solution to my problem:
1) First thing to check msconfig. On the boot tab and make sure that “no GUI boot” is NOT checked! Save but do not reboot yet.
2) Next go to a (administrative ) command prompt execute the following cmd:
a) chkntfs /d
b) chkntfs /t:0 <this sets the timer to 0 seconds…so ensuring things will run before they can be cancelled.
c) chkntfs /c C:
d) chkdsk /r
e) fsutil dirty set c:
That was it – it took a while for windows to go through with all the five steps. At last that dammed “dirty bit” on my C drive gone! What a relive now back to normal , Diskeeper works now!
Hey… I have a problem that my dirty disk cannot run chkdsk (at the end of process “chkdsk unable to set ran once flag” appears). And its looping because after that process my laptop restart and start chkdsk again..
And I am stupid that I followed your procedure. Now, there is no countdown to cancel chkdsk process and thats made my laptop “unstartable”. How to redo your procedure? At least until there is 10 seconds countdown to cancel chkdsk process again.
And to add my misery, my laptop cannot boot safe mode (I dont know why. It happens after I found my laptop had dirty drive).
How did you overcome your problem ? Im in desperate need of some help.
Oh my! Finally a solution. Thank you Thank you Thank you.
Irhmy’s solution solved it for me on a C drive on a Server 2016 Core Hyper-V VM running as a domain controller.
In my situation, chkdsk was not reporting any errors, yet I wasn’t able to clear the dirty bit. I think my system was in some sort of gray area state where there was no fault, yet the dirty bit couldn’t be cleared.
I think the magic of the above solution is it forces a dirty state, and then after chkdsk runs, it’s able to clear it correctly.
It should be noted that step f is reboot your computer. You should notice a different screen than before.
When it finally boots back to Windows, you should be able to run ‘chkntfs c:’ and it should report that it is ‘not dirty’.
thnks buddy thnku very much
Besides the mentioned Win7 and XP, this “false dirty bit” problem is even more of a problem on Windows 10. Besides never clearing the dirty bit (if you even once ask it to run chkdsk on next reboot the OS will never clear the bit), Windows 10 also *_will not truly shut down_* unless you hold down the shift key while clicking Shutdown. As others have done I had to find other ways to clear that bit. Using a hex editor on the partition table would not be my top choice — what worked for me is the “gparted” partition editor, available under the GNU licensing agreement.
Some folks have mentioned Hiren’s Boot CD, which — at least the version I have — includes the “gparted” (oddly I found it under “DOS Programs” on Hiren’s boot menu). Another way to get to it is with dual-boot Linux (which was my situation), or a Live CD. When you run gparted, highlight the partition of interest — presumably an NTFS or FAT filesystem — then right-click and choose “Check”. At the end of the checking it will (assuming the filesystem is in fact clean, which is often the case) clear the dirty bit (yes!). Once again, if you’re on Windows 10, be sure you held down the shift key while clicking Shutdown.
You can just run Windows Startup Repair from a recovery disk, or from the troubleshooting menu at startup.
To get to the troubleshooting menu in Windows 8 or Windows 10, hold down the Shift key while selecting Restart.
.
Then select Troubleshoot.
Then Advanced Options.
Then Startup Repair.
This fixed it for me.
Awesome! This helped with a Windows 10 VDI deployment where disks (drive C:) of some machines were reportedly “dirty”… actually, the repair action was pretty quick (a minute or so), after reboot everything fine again (no chkdsk boot, no dirty disk anymore)! Thx a lot
Dear friens, I’ve the same issue with windows 10. Proud to have identified the reason/matter now, but I do not dare to follow the guide above – sorry, I am just a standart user without any programming knowledges. So, may I ask if one of the advanved useres here is able and willing to create an automated fixing tool or something like that? Would be great!
@tenbensel One such automated fixing tool is “gparted” — please see boisecoder’s Sept 27, 2016 comment above, especially the special Shutdown tip. You can obtain Hiren’s Boot CD here…
hirensbootcd.org/download/
… or by googling <>. On Dell computers, I expect that the NTFS partition containing Windows 10 will be named “/dev/sda3” but see tip #3 below for more help.
Tip #1 With Win10 the very first step is to TRULY shut it down by holding the Shift key down while clicking Shutdown. Otherwise, Win10 will Hibernate instead — leaving the file system unavailable.
Tip #2 Proceed with caution: gparted is powerful and thus potentially dangerous so don’t mess around with it, simply run the “check” functionality, which you will find by right-clicking a partition. Such checking is FAR LESS dangerous than other approaches (such as directly editing the partition table with a hex editor).
Tip #3 gparted will show you the filesystem type (ie, “ntfs” or “fat32” or whatever) and the size of each partition — please use that information and your good thinking in order to assure that the partition you’re checking (and marking as clean) is the troubled (and relatively large) NTFS partition.
you can just run Windows Startup Repair from a recovery disk, or from the troubleshooting menu at startup.
To get to the troubleshooting menu in Windows 8 or Windows 10, hold down the Shift key while selecting Restart
.
Then select Troubleshoot.
Then Advanced Options.
Then Startup Repair.
Neil M,
Thank you so much for this simple fix – it was doing my head in!
Shift + Restart
Troubleshoot
Advanced Options
Startup Repair
I had a ‘dirty’ Samsung SSD (850 PRO) with Win 10 and I couldn’t work out how to reset the bit and stop windows calling for a disk check on each reboot.
Now Win10 tells me its ‘Not Dirty’!
You are a sanity saver!
Many thanks for this excellent guide. Were there any changes with Windows 10? Can’t find any of those strings… (on a non-boot F: drive)
Thank you very much! This article really helped! Even though chkdsk said everything was all right, conversion of my disc to NTFS file system did not want to start, until I applied your method. Thanks again!
This is extremely great information, however, once I ran it on C drive using Hiren’s Boot CD, I found and changed the 01 to 00 using HxD. Then I boot back into C and it came up with the disk check and I still could not defrag. Checked via DMDE and it showed it had *not* changed the bit to 00 – it was still at 01. Went back to the boot CD and it was still changed to 00 according to HxD. Went back 2nd time into Windows 7, and it was still showing it was not changed. Trying to figure why the discrepancy. I double-checked to make sure I had selected the correct volume and that my string was typed correctly. :`(
Not sure what is left that I can do except reimage the computer.
Lifesaver! The only solution it worked! I have a Samsung external drive and the dirty bit was driving me crazy… Now, after following the steps above, it works like a charm! Thanks again! So helpful!
tried Hiren’s Boot CD v15.2, I receive “No PXE Stack Commands …. not sure what I did wrong
It could mean your computer is a) not setup to boot from CD or USB, or b) you have Secure Boot enabled which won’t allow Hiren to boot.
Raymond,
This is an amazing piece of investigative work! Would you be able to help fix an exFAT external drive?
I have a Silicon Power 1 TB external drive that fsutil.exe confirms is “dirty”. After downloading DMDE 3.0.6 to my Windows 7 laptop, in the Partitions dialog box when I select this drive and click on “Open Volume”, there is a pop-up box saying:
“There are errors found while opening Root directory”
It shows two radio button options: ‘Auto detect FAT parameters’ and ‘Continue with these parameters’.
If I choose ‘auto detect’ it opens a “Scan Parameters” dialog box with a search option; when I click Search, it goes into a full scan that seems to progress painfully slowly (still at 0% after 10 mins).
I tried simply closing the Partitions dialog box and searching for the string “03 01 01 00 00 00 00 00 80 00 00 00 18”, but after 15 mins the search is still at 2%. Does it always take this long or have I missed some steps?
I’m at a loss on how to proceed further. Any help would be greatly appreciated. Thanks!
Cheers,
Nani
Try with a defragment of the disk.
2 times I have had problems with the dirty bit –
1. xp always starting with a black screen and later a white progress bar and finally after 5-10min it started up normally. Defragment solved the problem. The progress bar I expect to be a very early disk check.
2. computer always did a disk check at boot and I could not remove/change the dirtybit. Defragment solved the problem.
Thank you for this excellent article on the dirty disk topic.
any advice/information for exFAT filesystem (XP SP3)?
it takes more than 35 hours on my 1Tb HHD to chkdsk command to finish without error… I will be happy to clear the dirty bit and save lot of time!
Amazing dude…was strugging with the problem to bakup some really large files on my fat32 based external drive.
Unset the dirty bit using DMDE that was set to ’02’ to ’00’ and voila!!
Thanks a Ton!!
I am checking a winxp computer using the Hiren’s Boot CD. It can’t find the string 03 01 01 00 00 00 00 00 80 00 00 00 18
I find 03 01 01 01 but the other numbers aren’t the same.
Should i change that one? If the computer won’t run coorectly after changing, and I remember the Offset (h) and change the numbers, can i go back and return to 03 01 01 01 ?
Thanks.
Phil
I have two (2) 2 TB IBM XIV SAN volumes, for storing data only, with the “Dirty bit set”.
Run ChkDsk many time and could not reset the dirty bit on volume.
Downloaded DMDE 2.10.2 Free Edition and following instructions to found the hex string “03 01 01………”. After edited third hex digit to “00” to disc and tried to save the modification to disk volume,
DMDE 2.10.2 returned the following alert:
“Could not lock unmarked volumes. ATTENTION! Ignoring may cause file system damage or write access may be denied. Force dismounting will cause the loss of all volume descriptions”
Please confirm and/or share if there is solution to result this issue.
Thanks and Regards
In my case I have a 1.5 TB HDD with the “Dirty bit set”.
This is a SATA disc connected directly to a SATA port in the PC’s mobo.
This disk is for data only (non bootable).
Using DMDE 2.10.2 Free Edition and following your instructions the string containing the hex values “03 01 01..” can be found.
After editing the third hex digit to “00” and trying to wright the value to disc the application shows the following alert:
“Could not lock unmarked volumes.ATTENTION! Ignoring may cause file system damage or write access may be denied. Force dismounting will cause the loss of all volume descriptions”
I tried a 2nd time and the situation repeats.
Request:
Would it be possible that you hint me as to what to do to commit the edited hex digit translation and reset the “Dirty bit”?
Thank you.
This is extremely great information, however, once I ran it on C drive using Hiren’s Boot CD, I found and changed the 01 to 00 using HxD. Then I boot back into C and it came up with the disk check and I still could not defrag. Checked via DMDE and it showed it had *not* changed the bit to 00 – it was still at 01. Went back to the boot CD and it was still changed to 00 according to HxD. Went back 2nd time into Windows 7, and it was still showing it was not changed. Trying to figure why the discrepancy. I double-checked to make sure I had selected the correct volume and that my string was typed correctly. :`(
Not sure what is left that I can do except reimage the computer.
What about exFat volumes? Can they be manually reset to clear dirty bits? I see the other volumes listed but I don’t see anything regarding exFat. It says that the type of file system I have is exFat; the one that is dirty. Just inquiring. Can I use any of the above to manually reset or will I have to do the move everything off of the SD card, format, then put back on the SD Card? Thanks for all your help.
YOu lost me at :3 On the Partitions screen click the volume on the logical drive, then Open Volume. Click Open on the next window…………….
I have no such option (to open in the next window)… nor do i know what “the” window you keep referring to.
I’m sorry, but DMDE has been updated since this article was written and now you don’t need to “Click Open on the next window”. Once you click Open Volume, you can continue and expand the MFT view at the bottom right.
You can still download the version of DMDE we used (2.4) to see the extra window that needs the Open button clicked. ;)
Awesome :) keep up the good work
Brilliant! It cured the cause of the problem on my WinXP instead of just suppressing the symptoms.
I had never heard of “dirty” drives – well done on an excellent article.
Hey thanks,
I ran the chkntfs command in cmd to check all my hard disk drives and two of them proclaimed to be dirty which I believe is not true as I have ran the manufacturers diagnostic tools on them very recently.. anyway I followed the tutorial which works but I noticed I had to do it twice on each drive for it to actually change =S
Manufacturer diagnostic tools don’t really check the filesystem dirty bit, they check the SMART attributes and run a few other tests to check the integrity of the disk surface etc. The dirty bit is set and checked by Windows.
I had a couple of drives with the dirty bit set by Win 8.1, verified by fsutil, but DMDE could not find the string anywhere close to the beginning of the MFT. I tried both the Win7 and Win8 strings you gave, and I even searched just for “03 01”, but I couldn’t find the string before I aborted the search after five minutes and 50 million sectors. Is it possible that Win 8.1 has a completely different kind of string to look for?
Even if I have to fix the dirty bit the hard way, thanks for the article, and the great tip on DMDE, which is a great piece of freeware.
This is the only solution that seemed to work for me. Thank you so much for the help!
Hello,
I have find the sring with dirty bit in windows 7 in C: drive where OS is installed , but I am not able to save the changed string. Error of loss of data.
thnking you.
You can’t save changes to the C drive if that’s what you are booting from. Have you read the section “Changing the Dirty Bit on Locked/System volumes” on page 2?
Hello.
I have a machine with Windows XP Professional SP3 on a 250GB-SATA drive (NTFS). Two weeks ago, the machine had a read-error from the SATA drive (C:) while booting (hard reset was neccessary). Autochk.exe now loads CHKDSK at every windows boot. I tried hard to fix the problem, but no way… ‘chkntfs c:’ via CMD told me again and again that C: isn’t fine and every time before Windows starts it starts CHKDSK. I have taken a brandnew SATA drive and cloned the old drive (via Acronis) – result: same procedure as every day :((
Finally I found this excellent article here, but I can’t solve the problem. What I have done: I took a Hiren’s 13.1 and launched MiniXp. Then I launched HxD and opened C: without write protection and started a search for ‘ 03 01 01 00 00 00 00 00 80 00 00 00 18′. No results.
The next step was to start a search for ’03 01 00 00 00 00 00 00 80 00 00 00 18′. No results.
Finally I started to search for the pattern ’00 00 00 00 80 00 00 00 18’. Stepwise with F3 I had success on the beginning of the drive (Unfortunately I don’t remember the offset): ’03 01 01 40 00 00 00 00 80 00 00 00 18′ . I searched until offset 02 80 5A 9E A4 but had no further related search result.
How to go on now? Do I have to overwrite the ’03 01 01 40′ with ’03 01 00 00′ and see what happens? But why is the fourth bit 0x40 instead of 0x00?
Please give me advice or hints!
Best regards
Robert
exFAT has the dirty bit in the VBR (1st Sector), offset 106 (0x6a). Since there are 4 flags in this single byte: оffset 0 is Active FAT and indicates which FAT is active;
оffset 1 is Dirty Volume, 0=clean, 1=dirty;
оffset 2 is Media Failure, this indicates if there are ANY bad clusters on the volume;
оffset 3 is Clear to Zero (the spec does not indicate what this means)
It is truley a dirty bit, not a dirty byte.
Im trying to do the exFAT format but I am failing to follow the steps. Im lost
Normally this byte contains 00
Assume that it contains 06
— in binary it will be 0110 (offsets 1 and 2 has flags, i. e. 2³×0+2²×1+2¹×1+2º×0=16º×6)*.
We have dirty volume and media failure flags.
*small digits means offsets
Thank You so much, I confirm, bit 1 (“second” bit) on offset 0x6a is the dirty bit for exFAT.
Manually clearing it with DMDE ended several hours of struggle using many free and commercial utilities with frustrating results (external USB volume was “dirty” AND readonly after power outage, apparently no chance of “normal” correction)
Hello Everyone,
Just a note to say thanks for the info. I had wondered why I could no longer leave a flash-drive in while booting the computer. All was good until one day I happened to notice a chkdsk of my flash-drive was happening, and after that some of its data became “lost”. I had a backup for it but, sometimes even that is a pain to have to deal with.
I checked all my flash-drives with the method outlined and found two “dirty” little drives.
Fixed ’em both with the Hex Editor as per the instructions.
WooHoo!! All is good.
I do want to share one thing.
One of my FAT 32 flash-drives showed 03 in offset 41 (5 down 2 across) instead of 01 (as is mentioned in the instructions).
I was confused at first and then I figured that XP may have written to it three times (due to my stupidity, I’m sure) and that would account for the change from 01 to 03.
So, I changed the 03 to 00 and gave it a go.
Worked like a charm.
Below is what the drive looked like before (w/ the 6 or 7 or 8 zeros omitted from the beginning of each line), if anyone is interested.
00: EB 58 90 4D-53 44 4F 53-35 2E 30 00-02 20 00 04
10: 02 00 00 00-00 F8 00 00-3F 00 80 00-80 1F 00 00
20: 80 AA E6 00-70 0E 00 00-00 00 00 00-02 00 00 00
30: 01 00 08 00-00 00 00 00-00 00 00 00-00 00 00 00
40: 00 03 29 E8-90 89 99 55-53 42 20 44-49 53 4B 20
50: 20 20 29 E8-90 89 99 55-53 42 20 44-49 53 4B 20
Thanks a bunch,
At step 4, when I pressed Alt+C, the cluster selection window came up with ‘3’ preloaded as the start cluster. When I ran a search from that location for the bit string, it came up with a result at address 31DE0. Changing the appropriate bit at that address did nothing. (At least as far as dirty status! I changed it back in case it’s used for something else…)
I then went back and manually entered 0 in the cluster selection window to start at the beginning of the disk. Then when I searched it found a result at address 3DE0, which was the correct one. Changing the appropriate bit there changed the disk status to NOT dirty. (Also, the change took effect immediately, even on Windows XP, perhaps because I had booted in safe mode and/or because it was a data disk, not the system disk.)
Thanks for this.
Huh… may someone help me? i have windows xp professional and i’ ve done all steps except the last one. The chkdsk is checking local disk “E” (tipe NTFS) and it’s rather annoying (it does this at every start-up) so i tried these instructions. At the last step when i try to write the changes it says: “Could not lock unmarked volumes.” Furthermore forcing this will cause the loss of all used volume descriptors and ignoring may cause unpredictable result or write access may be denied. Damn it!
Some tips would solve this (i hope). Thanks,
Untitled
from Moon
Are you trying to run the Hex editor from the same E drive? That will cause the error you have.
If not, are you running a dual boot system? You can’t directly edit any partitions that contain boot files which might be on E and C.
Hello.
I have a double boot Win 8 / XP. I tried the whole thing, but it still doesn’t work.
I changed the dirty bit
03 01 01 01 00 00 00 00 80 00 00 00 18
into
03 01 01 01 00 00 00 00 80 00 00 00 18
Are you sure that “03 01 01 01 00 00 00 00 80 00 00 00 18” is clean ?
Thx for the help, it is still a wonderful post.
“03 01 01 01 00 00 00 00 80 00 00 00 18″ is the dirty bit if it’s been set in windows 8, in XP it will be “03 01 01 00 00 00 00 00 80 00 00 00 18″.
To clear the dirty bit in either case, set it to:
“03 01 00 00 00 00 00 00 80 00 00 00 18″
Note there’s only one “01” in the string to indicate the dirty bit isn’t set.
Thank you, Raymond, for explaining how to clear the dirty bit on my USB flash drive. CHKDSK never finishes running on my flash drive. It goes about 70% of the way, then mysteriously exits without any error message or explanation. This left me stuck in a loop until I manually cleared the dirty bit. Is the FAT32 filesystem corrupt? Maybe, maybe not. But since my only option was to keep answering NO to the “do you want to watch CHKDSK fail again?” question every time, this is definitely an improvement.
Thank you Raymond for this wonderful post – saved my bacon when a cloned drive wouldn’t boot due to Chkdsk-induced errors
I connected my target disk using a ATAPI/USB bridge (very convenient), and used FSUTIL dirty query g: to check the before and after ‘dirty’ status. I had a bit of a heart attack when I changed the dirty bit from 01 to 00 and then used FSUTIL – it still said the volume was dirty! Then I disconnected the drive from my PC, reconnected it and checked again – now it said NOT dirty – yay!!
Put it back in my laptop, and now it boots up fine – thank you thank you!!
Frank
GOOD ONE, REALLY HELPED
Just found this thread, thanks for the useful information.
USB flash drives are usually formatted as FAT32 so it’s just a matter of clearing 0x41 – I’ve just successfully done that to my flash drive and the command “fsutil dirty query f:” now confirms that volume is NOT dirty.
Hi Raymond, many thanks for your excellent research. Now I got a bunch of older FAT16 Sticks (1GB and 2GB ones) some of which also produce that “Scan and fix” dialog on Windows 7.
So I tried to locate that “dirty bit” on FAT16, and what should I say, I actually managed to find it: It’s located at offset 37 (decimal), which is 25 hex, respectively (counting from the beginning of the FAT16 boot sector).
In the FAT specifications, this byte is considered to be “unused”.
I found that it has the following meaning regarding the “dirty bit”:
00h = Not dirty
01h = Dirty
I hope this could help some folks also having FAT16 media which shows this problem. Maybe you can add this info to your article, feel free to do so!
Best regards from Germany,
Fabian
Hey, nice info.
Thank you , … i will try that the next time.
Raymond you are the Rainman!
This is a incredible good work, TWO days for one bit :-) Thanks for sharing