How to Run Windows XP Repair Install [Step-by-Step]

One of the features Windows XP introduced is the Repair Install option which in the event of a major PC crash allows you to keep your personal data while the core Windows files are replaced hopefully allowing the PC to get back up and running. A Repair install is not the same as a re-install or a clean/fresh install, a couple of other phrases you may have heard. A re-install usually means wiping the current operating system off and putting it on again, a clean/fresh install can also mean that but is more commonly used when Windows is being installed onto a drive or partition for the first time.
The good thing about the XP Repair install feature is it won’t delete your personal files, installed programs, personal information or settings, it simply attempts to repair the operating system by replacing its own files. The repair feature is very useful when the operating system files have become too corrupted to fix but is something to be used only as a last resort. If this fails, your next step would probably be a format and complete re-installation of Windows XP.
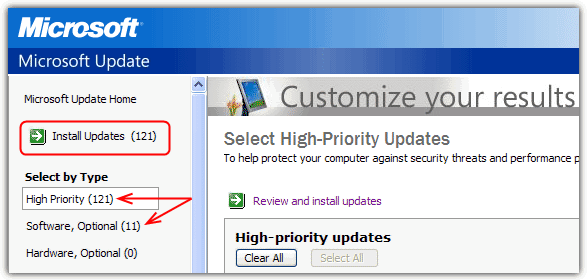
Repairing your Windows XP will remove any Windows updates you have previously installed and also the system drivers will be reverted back to the original XP versions. Some Windows XP settings might be also be reset to their defaults. It’s a good idea to try and make sure you have any needed drivers to hand and also run Windows Update once it has completed repairing. Programs such as AutoPatcher or Windows Offline Update would be very helpful in getting all the updates back on as quickly as possible because these days there will be a lot of them (100+) when using Microsoft Update.
Obviously backing up any important data you have would also be beneficial just in case, you never know. Unfortunately you will need the correct Windows XP CD for a repair and if you don’t have one the only solutions are borrowing one from a friend/relative or searching for a torrent etc. There seems to be no fully legitimate way to download and burn a Windows XP ISO these days.
1. The first step is to boot up the computer with the Windows XP CD. If your system isn’t configured to do that there may be a boot selection window available where you can press a key such as F11 or F12 etc and boot from another device, or you can configure the boot order in the BIOS.
2. A message “Press any key to boot from CD or DVD” will popup on the top left corner of your screen. Simply hit any key on your keyboard to boot from the Windows XP CD before the message disappears.

3. A blue screen will appear and begin loading Windows XP Setup from the CD, this could take a minute or more depending on the speed of your system. If you receive an error about not being able to find your hard drive, you may need to set the drive to IDE mode in the BIOS, have a look at the article about this error if you’re not sure what to do.
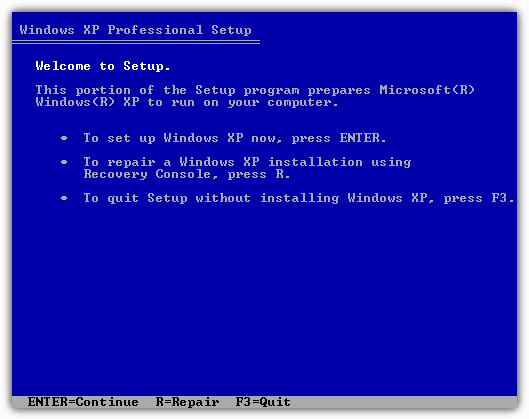
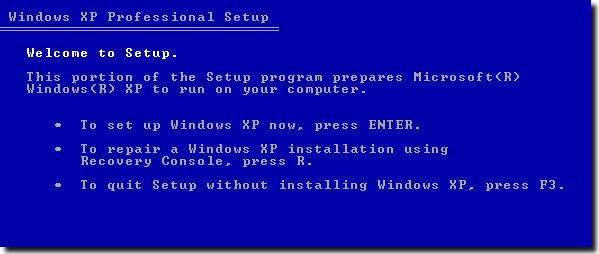
4. When it’s completed loading the required files you will be presented with the following “Welcome to Setup” screen. Select the “To set up Windows XP now, press Enter.” option by simply pressing the ENTER key to continue. DO NOT press the “R” key on this screen because it will take you to the DOS based recovery console which will ask for an installation selection and an administrator password.
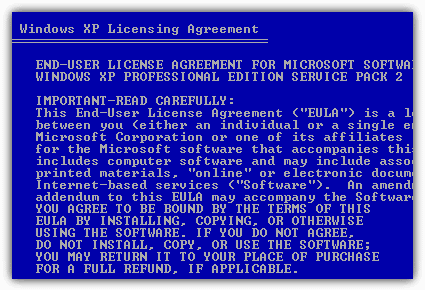
5. The next screen is nothing but the Windows XP licensing agreement. Press the F8 key to agree and continue.
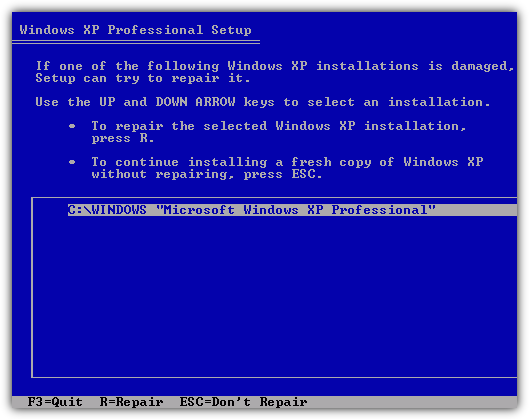
6. Windows setup will now look for an existing Windows XP installation and if it finds one, you will be given the chance to repair it, or install a fresh copy of Windows XP. This is the screen you need to press the “R” key to start repairing Windows XP.
NOTE: Make sure you’re using the correct XP disk for your repair or the installation won’t show up on this screen. For example, you cannot use a Windows XP Professional CD to repair Windows XP home and vice versa. Also make sure you have the correct Service Pack on the CD, if the system to repair is XP Home SP3, the repair CD must be XP Home SP3.
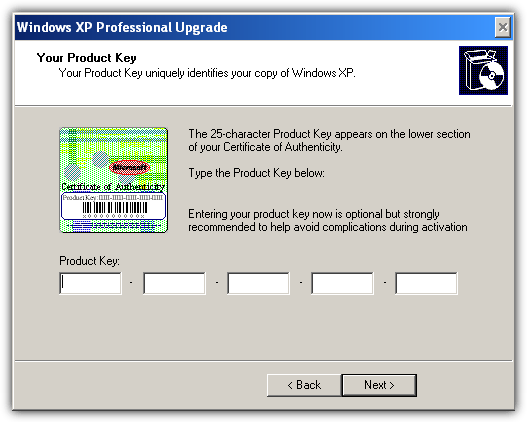
7. Now you just have to wait for it to repair the Windows XP core files by overwriting the existing ones in your current Windows XP. Get your Windows XP product key ready off the sticker because you will need to enter it during the process.
For some branded computers such as HP, there are usually 2 CDs. One is the Recovery CD and the other is the Operating System CD. To repair Windows, you need to boot up the Operating System CD first, then it will ask you to put in the Recovery CD for verification. Once you’ve loaded the Recovery CD and verified, you will need to put back the Operating System CD. Now it will start the Windows XP repair process…
There are people that encountered problems in using Automatic Updates after repairing Windows. To solve this problem, you need to manually visit the Windows Update or Microsoft Update site, download and install at least one security update or Service Pack, and it will solve the problem.
A Note About Internet Explorer 7 and 8
One of the biggest causes of a Windows XP repair install failing to work properly is to do with which version of Internet Explorer you have installed. As all official XP CD’s have Internet Explorer 6 integrated by default, that’s what is re-installed when a repair is performed, or at least some of it does. If you have IE 7 or 8 still installed during a repair, the files will get overwritten in \Windows\System32 back to the older version 6, but they DON’T get overwritten in the Program files\Internet Explorer folder. Mixed files can lead to a number of problems especially with black screens during the repair, Windows update failures or problems activating Windows when you have completed the repair.
Microsoft recommends any version of IE above 6 should be uninstalled prior to performing a Repair Install, and if you can’t uninstall Internet Explorer from Add / Remove in Windows because your system is too corrupted, there is a way to do it via the Recovery Console on the Windows CD.
1. Follow steps 1 to 3 from the Repair Install instructions above.
2. On the “Welcome to Setup” screen select the repair using the recovery console option by pressing the “R” key.
3. After selecting your installation which is usually “1” and a password if you have one, type the below command depending on your installed version of Internet Explorer.
If you have Internet Explorer 8:
CD ie8\spuninst and press Enter.
If you have Internet Explorer 7:
CD ie7\spuninst and press Enter.
Type:
batch Spuninst.txt and press Enter.
4. When the copy operation has finished, type Exit. Boot the XP CD again and now perform your Repair Install.
Make sure to install your chosen version of Internet Explorer again afterwards, you can download the Installer for IE 8 direct from Microsoft. This will also work if you have done the repair install before removing Internet Explorer and now experience any activation problems mentioned or other problems related to Internet Explorer. Any further trouble can be resolved with a Microsoft Fixit to repair Internet Explorer.


User forum
13 messages