6 Ways to Hide User Account from Windows 10 Login Screen

As we all know, Windows allows you to create more than one account so different users on the computer can have a different account assigned to them. Trusted or power user can have administrator accounts while children or less experienced users might be given more restricted standard user accounts. When you reach the Windows logon screen and there is more than one account available, each user’s profile will be selectable to log in with.
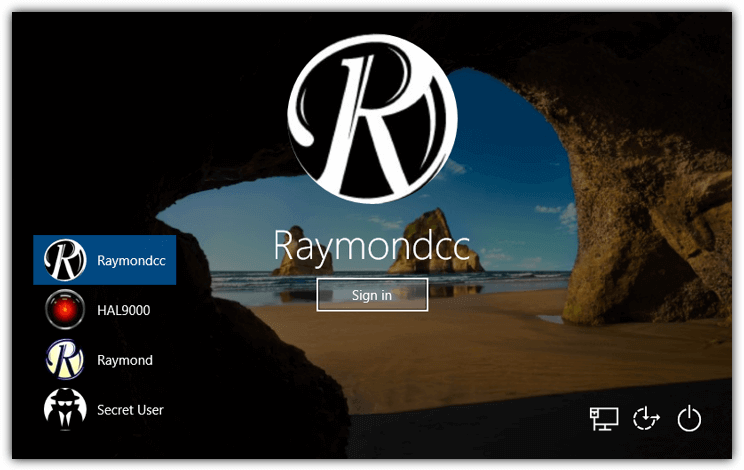
All you have to do is click on the user you want to log in as and enter the password for the account if there is one. However, there may be times when you don’t want all users to show on the logon screen and wish to hide specific accounts from other users. There are, in fact, two distinct ways to hide users from the logon screen, either hide individual users or hide all accounts and force the name of the user to be typed manually.
Here we show you multiple ways to perform both methods on your computer. These methods work on Windows Vista, 7, 8.x and 10.
Hide Specific User Accounts From The Logon Screen
If you are looking for a way to hide one or more user accounts from the logon screen but would like to leave others visible, then this is the solution that will work.
Note: It is important to note that once the account is hidden from the logon screen there is no other way to access it. The old method of pressing Ctrl+Alt+Del twice to logon as a different user doesn’t work on newer operating systems. If you need to retain access to the account but still hide it from the logon screen, use the alternative method to hide all accounts and force manual logon.
Hide Specific User Accounts Via The Registry
While this option is not that difficult, it does require a bit of knowledge of how to edit the registry. If you are uneasy doing this, use the other options such as a third party tool.
1. Click Start and type Regedit to open the Registry Editor, administrator privileges are required.
2. Navigate to the following registry key:
HKEY_LOCAL_MACHINE\SOFTWARE\Microsoft\Windows NT\CurrentVersion\Winlogon
3. Right click on Winlogon and select New > Key. Name it SpecialAccounts. Right click on the newly created SpecialAccounts key and go to New > Key and name it UserList.
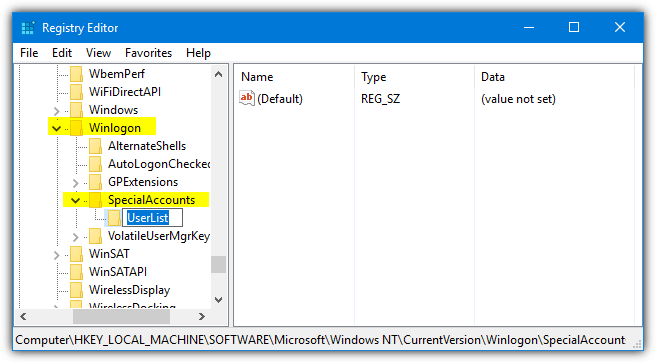
4. Right click on UserList and select New > DWORD (32-bit) Value. In the Name box type the name for the user you wish to hide from the logon screen and press Enter. Close Regedit.
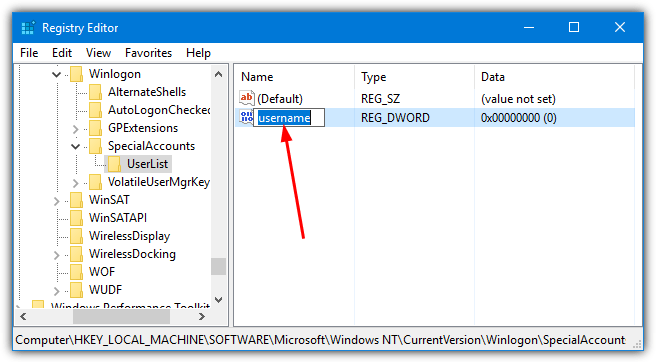
This change usually takes effect immediately, logout or restart to confirm the user is hidden from the logon screen. To restore the user go back into Regedit to the same location. Either right click on the user name and press Delete or double click it and enter 1 into the box and press Enter/OK.
To try and make things a little easier we’ve created a few ready made .REG files that you can simply double click to import the data automatically into the registry. Before doing that you just need to open the required file up in Notepad and edit the “Changeme” text to the specified user name. Then save the file.
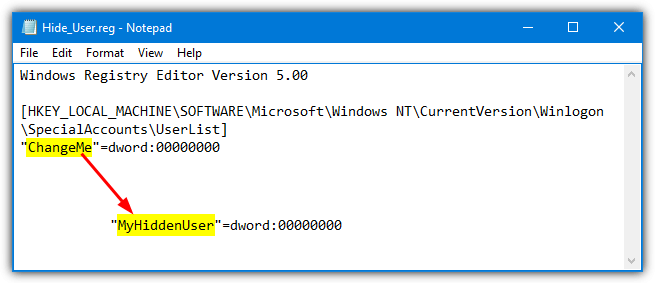
There are 3 .REG files in the archive, one to hide a user from the logon screen, one to make the user visible again, and the third will make all currently hidden users visible.
Download Hide User Registry Files
Third Party Tools To Hide User Accounts From The Logon Screen
Hide Users
This little tool is only 63KB in size and we found it on an old blog called Scenario-Solution. Hide Users appears to have been created in-house.
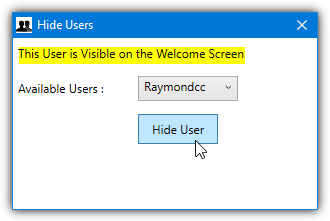
Run the Hide Users program as administrator, select an available user from the drop down menu and it will tell you if the user is currently hidden or visible. Click the Hide User button to hide a currently visible user or Show User to do the reverse. It doesn’t tell you if the user you are trying to hide is an administrator, so make sure you know in advance and leave 1 administrator visible.
XP User Hide
IntelliAdmin’s XP User Hide is another tool that was created to add and remove user name entries from the UserAssist registry key. As the name implies, this was created several years ago during the XP era and although it does also work on Windows Vista, 7, 8 and 10, there is a major limitation.
On 64-bit systems it edits the registry values in “HKLM\SOFTWARE\WOW6432Node\Microsoft\” but Windows uses the “HKLM\SOFTWARE\Microsoft\” path. As a result the values are added in the wrong place and not processed so this tool is ineffective on 64-bit systems. On 32-bit systems it runs fine.
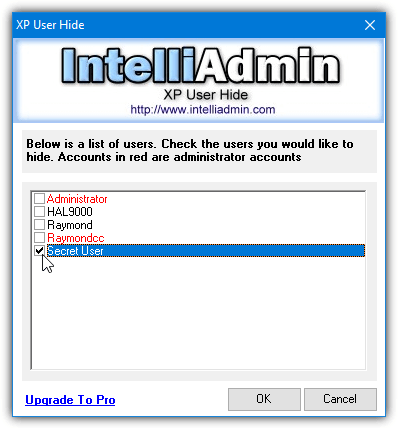
Using the program is easy, right click and run it as administrator. It will then display a list of user accounts in the window and you simply check the boxes of any accounts you wish to hide, then press OK. Those entries listed in red are administrators and those in black are standard users. Make sure to leave at least 1 red administrator account (besides the default Administrator) visible and unchecked.
Note: It is important that you do not hide all administrator accounts. Doing so will leave you with no way to change the settings back as there will be no administrator access available to do it. In that event you would need to delete/reset the registry entries using an offline registry editor.
Hide All User Accounts From The Logon Screen
This method is different from above because it shows no users on the logon screen at all. Instead you have to manually type the username you want to log in with and any password. This is similar to the old XP method of pressing Ctrl+Alt+Del twice at the logon screen. However, in modern versions of Windows that option doesn’t work anymore and interactive logon has to be set manually.
Enable Interactive Logon Via Security Settings
It’s really quite easy to visibly remove the list of users during logon and replace it with an interactive logon. The issue is the standard way of doing this through security settings is not available in Home editions of Windows. For those operating systems you will have to use the registry or third party tool options below. Interactive logon works on Windows Vista and above.
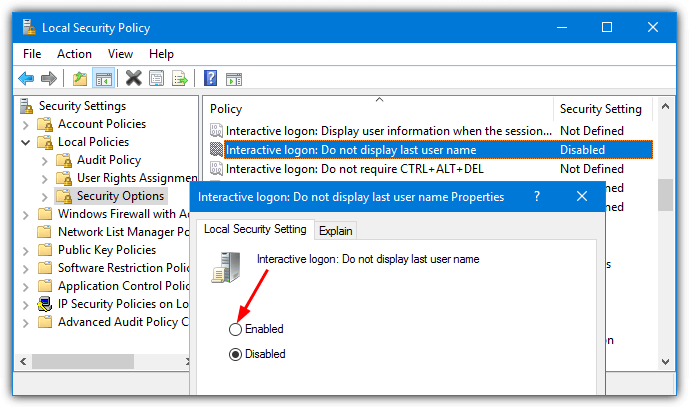
1. Open Start and type Secpol.msc or go to Control Panel > Administrative Tools > Local Security Policy. Click on Local Policies > Security Options.
2. Double click on “Interactive logon: Do not display last user name” in the right hand pane. Select Enabled and press OK.
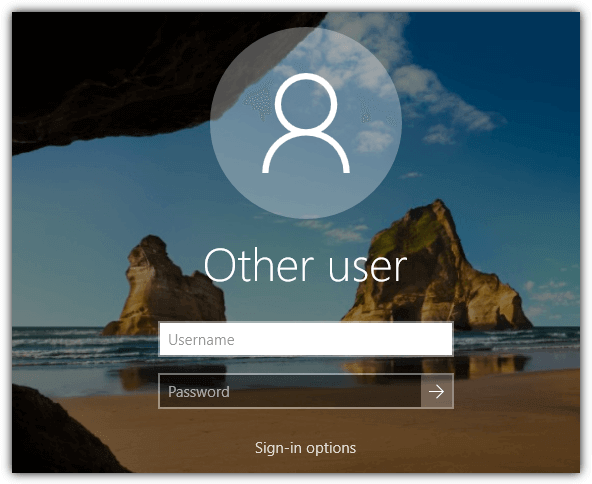
The next time you reach the logon screen you’ll be presented with a blank user or other user. Simply type the name of the required user and password into the boxes to logon as that user. No user names are listed anywhere.
Enable Interactive Logon Via The Registry
If you would like to edit the interactive logon setting manually, from a script file of if you have a Home or Home Premium version of Windows, this method can be used.
1. Open the Start menu and type regedit. Navigate to the following registry path:
HKEY_LOCAL_MACHINE/SOFTWARE/Microsoft/Windows/CurrentVersion/Policies/System
2. In the right hand pane look for the value Name dontdisplaylastusername and double click on it. Change the value Data from 0 to 1.
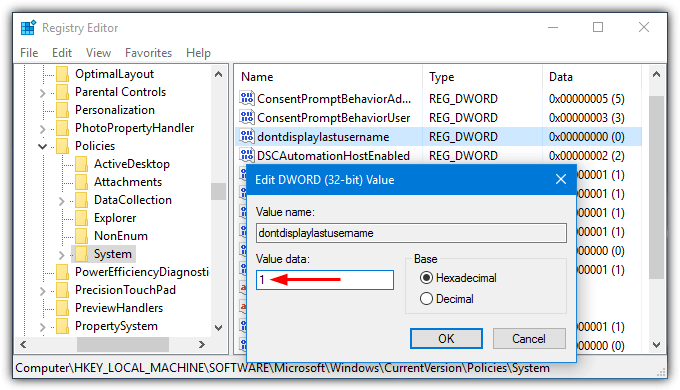
3. Click OK and close Regedit, the next time you reach the logon screen the interactive logon will appear.
To avoid going into the registry yourself, download these registry files. Unzip the archive and there are two .REG files. One will enable interactive logon, the other will go back to the standard logon. Double click the one you want and import the data into your registry. The change is effective at next logon.
Use A Third Party Tool To Enable Interactive Logon
While it’s easy enough to enable the interactive logon screen using manual methods, it’s also possible from within a third party utility. Currently one of the most useful tools of its type, Winaero Tweaker, has this ability built in.
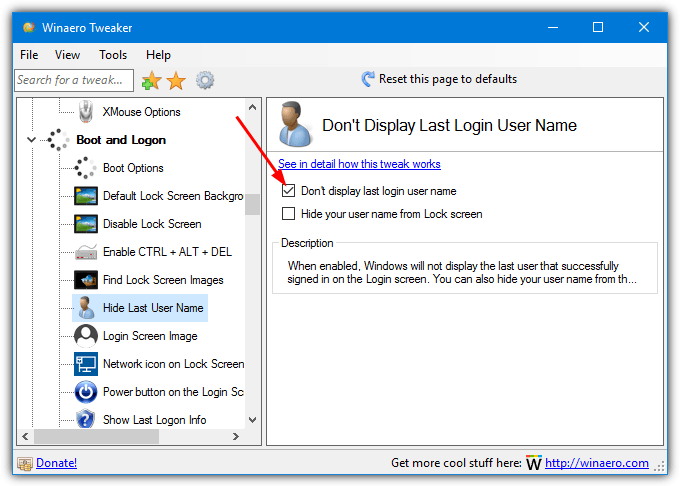
Simply install or create the portable version of Winaero Tweaker from the setup file, run it and scroll down to the Boot and Logon > Hide Last User Name option. Check the “Don’t display last logon user name” box in the right pane and close the program. Interactive logon will be enabled on the next user logon.



User forum
8 messages