No Auto Play Dialog Box Pop Up: How to Fix it
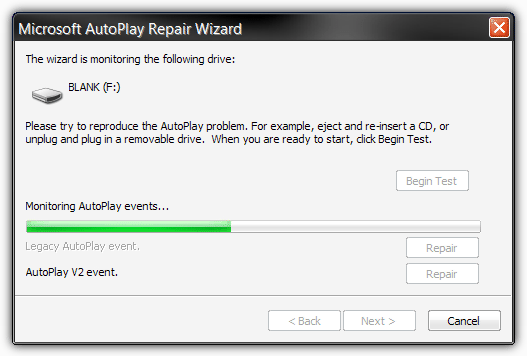
Microsoft AutoPlay Repair Wizard
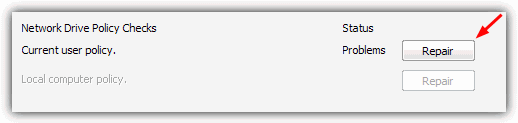
Microsoft created a program called the AutoPlay Repair Wizard way back in 2003 to try and help fix this problem, and as you might expect from a tool that old, is for Windows XP 32-bit only. The AutoPlay Repair Wizard scans your computer to find defective AutoPlay settings and attempts to fix those it finds. The areas it looks at are problems with the Shell Hardware Detection Service, the registry and any issues with the current user, local computer or driver level policies.
As the instructions how to use the Microsoft AutoPlay Repair Wizard are a bit thin on the ground and many people aren’t exactly sure how to use it, here’s how:
1. Plug in your external USB hard drive, USB flash drive or device that isn’t producing an Autoplay dialog.
2. Download and run the Microsoft AutoPlay Repair Wizard, click Next.
3. The Global Checks make sure the Shell Hardware Detection Service is running and auto starting. If there are problems with either option, click the Repair button and then Next. If you fix a problem here, you will be prompted to log off to finish. Do so and then run the tool again continuing to step 4.
4. Click on a drive from the list where AutoPlay is not working correctly and click Next.
6. Make sure that all policies are OK and if any show a problem, click Repair. You will be prompted to finish and log off again if any items need a repair. If you still have problems, run the tool through to this point again.
7. Click Next and this screen will monitor your device for a certain length of time to try and catch any issues. Click Begin Test, unplug and reinsert the drive, then wait for the monitor to finish. Hopefully there will be an event in need of repair that will fix the problem.
If the AutoPlay dialog box still doesn’t appear after this, then recheck the Autoplay setting for the device. Right click on the drive from step 4 in My Computer -> Properties -> AutoPlay tab and select “Prompt me each time to choose an action”, then click OK.
Checking the Shell Hardware Detection Service
A not likely but possible cause for Autoplay not working at all is a problem with Shell Hardware Detection Service. As it provides the Autoplay notifications, the service needs to be running and if the startup type has been changed from Automatic, it might not be started and therefore you won’t get any Autoplay. To check the Shell Hardware Detection Service is running do the following, the procedure is the same for Windows XP, Vista and 7:
1. Press Win key+R, type services.msc and hit Enter.
2. In the list of services find Shell Hardware Detection and see if its Status is Started and Startup Type is Automatic.
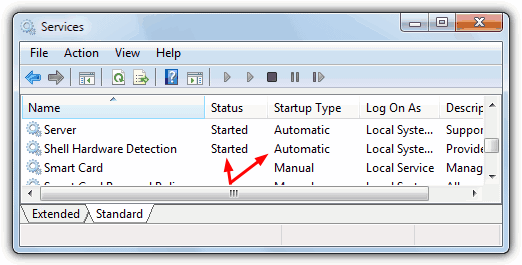
3. If the Startup Type isn’t set to Automatic, double click on the entry and in the Startup type: drop down select Automatic. Click OK and click Start the Service if it isn’t running.
Then try (re)plugging in your device to see if it gets recognized by Autoplay.
Autoplay Repair
This last tool doesn’t really fix the AutoPlay dialog problem, but it can help you repair your AutoPlay handlers and disable / enable individual drive letters from Autoplay.
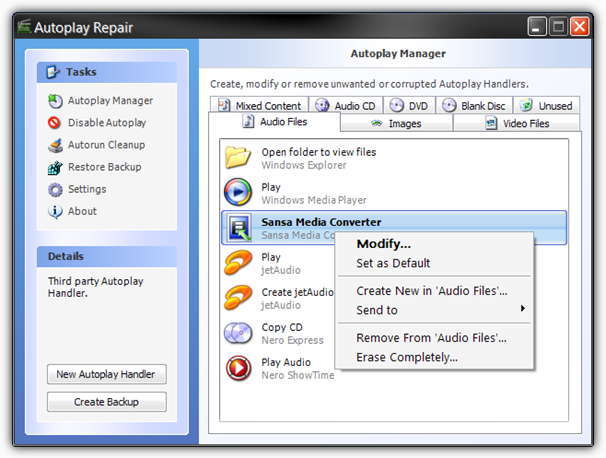
As an example, if you plug in your USB flash drive and the AutoPlay dialog box appears but is cluttered up with old entries from uninstalled software or ones which just don’t work, the Autoplay Repair tool can help. You can easily delete those invalid entries, modify them or even create new ones. There’s also an option to delete Autoplay on selected drives which is similar to the NoDriveAutorun registry option above, and also a basic startup manager.
The program requires .NET v2, is designed for Windows XP only and doesn’t show all the Autoplay entries in Vista or 7 correctly if you try to use it on those operating systems.

Improve this guide

User forum
46 messages