5 Ways to Allow Install of Unsigned Drivers in Windows 7
Option 3
However, if you don’t like the idea of your boot loader being modified, then you could use Driver Signature Enforcement Overrider. This is how you can use DSEO to sign and load the unverified drivers. Run DSEO, click Next, click Yes, select “Enable Test Mode” and click Next.
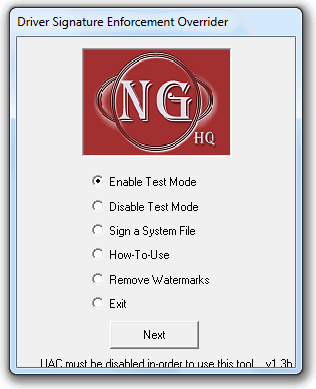
You should get a confirmation window telling you that Test Mode has been enabled. Click the OK button to go back to the DSEO window. Now select “Sign a System File” and click Next. You will now have to type in the specific file name including full path and click OK. For PeerGuardian, it is “C:\Program Files\PeerGuardian2\pgfilter.sys”. Restart your computer and the driver is now loaded and the program should work.
Option 4
This method is a another command that uses the BCDEdit utility similar to the now redundant DDISABLE_INTEGRITY_CHECKS, but this is known to be more reliable. Open a Command Prompt in Administrator mode and then type in the following command.
bcdedit /set TESTSIGNING ON
Then restart the system. Upon reboot you will notice that the Test Mode watermark is present so follow the instructions below to remove it. This command does a very similar job to the Driver Signature Enforcement Overrider program above by enabling the Windows driver Test Mode.
Option 5
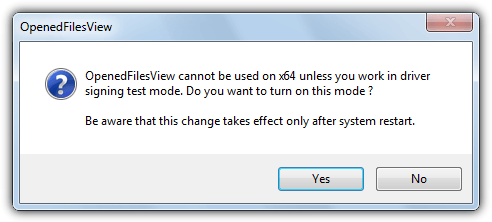
The Nirsoft utility OpenedFilesView isn’t actually designed to enable the Windows driver Test Mode and is used to view all open files running on the system, but the 64-bit version of the tool requires Test Mode to be switched on so it can run with an unsigned driver. The program will ask if you want to enable Test Mode when you run it, so simply download OpenedFilesView 64-bit and run the portable executable, then press Yes when you see the dialog box below. Reboot the computer.
OpenedFilesView can also be used turn Test Mode off again because you shouldn’t leave the computer in Test Mode permanently if you can avoid it. Open the program and go to the Help menu and click on Turn Off Test Mode, then restart.
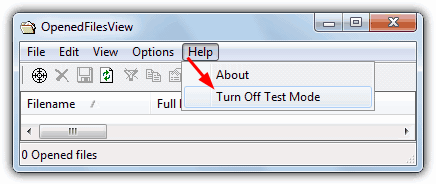
As you will get the watermark on the desktop, use the tool below to remove it.
Removing the Test Mode Watermark
After enabling Test Mode using one of the above options, you will notice that there is a watermark above the clock at the bottom right of the screen saying “Test Mode, Windows **, Build ****”.
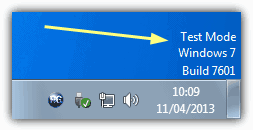
That is normal after you’ve used Driver Signature Enforcement Overrider, BCDEdit or OpenFilesView64 to enable the Test Mode. If you disable Test Mode again, you won’t be able to load the unsigned drivers. In short, you will need to be in Test Mode in order to load the unsigned drivers.
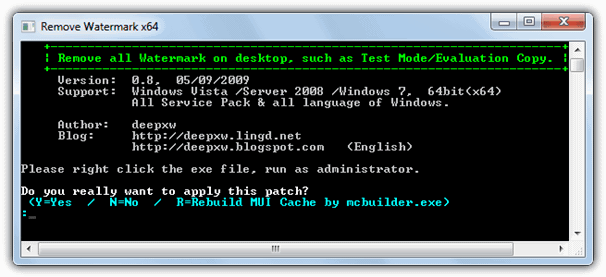
If you can’t stand seeing the Test Mode watermark, you can use a little tool called Remove Watermark to get rid of it. Just download it, extract the zip file and run RemoveWatermarkX64.exe, then type the letter Y. Restart your computer for the patch to take effect. If the watermark is still there after patching, run the tool again and this time hit the R key to rebuild MUI cache. Restart and the watermark should be gone now.
Now I am having the video driver issue?
A while ago I installed readydriverplus on my Windows 10 laptop.
I accepted the default setup. Now it always goes to Ready Driver OS, unless I sit and wait for boot screen and then select Windows OS.
I want to delete and completely remove Readydriverplus, but there is no uninstall. Revo uninstaller doesn’t show it and the link to the Readydriverplus website no longer works, so I can’t download the installer and try to find a solution that way.
I just want to uninstall it.
Please offer suggestions, guys.
This is very frustrating, I don’t want to reinstall Windows, too many apps on my system. Who writes a program that can’t be uninstalled??? It’s madness.
Thanks
Paul
Just Go to C:\BOOT and run uninstall ejecutable there
Very good article. Thanks for sharing it.
Regarding Option 3, how can I identify the driver file? I’m trying to sign an Intel video driver and when I open up the driver details in Device Manager, there are a bunch of different files, but there’s one C:\Windows\System32\DRIVERS\igdkmd64.sys. Is that the file? (System is Windows 7 Professional x64)
Tested and worked on…
Operating System: Windows 7 Ultimate 64-bit SP1
CPU: Intel Core i5 9500, Coffee Lake 14nm Technology
Motherboard: ASUSTeK COMPUTER INC. TUF B365-PLUS GAMING
– – – –
Here’s what I did:
1. Install Winaero Tweaker and open it
2. Scroll down LH navigation pane to ‘Behavior’ category
3. 2nd from last on the list select ‘Windows Installer in Safe Mode’
4. In RH pane, “check” the box ‘Enable Windows Install in Safe Mode”
5. Close out Winaero Tweaker
6. Open ‘System Configuration’ and boot into Safe Mode with Internet
Once in, install the drivers!
– – – –
Once in Safe Mode with Internet and Windows installer enabled, I used IoBit Driver Booster Pro and it downloaded and installed drivers that I could not install in Normal Mode using the same procedure, and got the unsigned drivers dialog prompt!
Note: The boot into the Safe Mode might take 5 minutes or so, because perhaps the installer is being activated, but be patient and let the PC boot up!
Also, rebooting into normal mode might take a bit as well (5 minutes or so) so that the unsigned drivers can complete.
This is simply what worked for me!
Thanks Raymond, Method 1 worked and has ended hours of pain. Thank God for you and the many helpful people out there on the internet.
This is one thing I hate about Windows. They force you to reboot the computer for something as trivial as this. Now I have to wait 20 mins for my PC to boot. :/
wow, thats insane time!
Im 100% sure that you can optimize this load time.
my windows 7 boots in 8-9 seconds from the end of POST to seeing desktop
Thank you so much. I spent hours searching for Coby Netbook drivers from 2010. Coby has no official website and the Network drivers available are only from third party websites. After Disabling Driver Enforcement I was finally capable of installing the network driver. All seems to be running fine. :)
DSEO worked fine for me today on 64-bit Windows 7 getting drivers for my old pentium 4 system. I still got warnings but not the refusal or failure to display the drivers. Thanks! It was the first time I have tried 64-bit and the signature enforcement thing came as a bit of a shock!
(As did the 400 updates my old win 7 DVD install required!)
Check if you have BitLocker enabled by your IT group. If so, the bcdedit will lock you out of your machine until you type in the Windows BitLocker Drive Encryption Recovery Key.
I’m currently in that situation. Just trying to load a driver for a board I designed several years ago, they upgrade our machines and now I can’t do my job. Shoulda kept my XP machine. :)
Hello, this would had been a solution to install unsigned audio and Ethernet drivers on a laptop (dell latitude d600) if my system weren’t a windows 7 ultimate 32bit. Please tell me if this solution can be apply in this case. Thank you in advance for any advice you can give.
Filbieri
First of all thanks raymond for showing me a bunch of methods i was unaware of.
For those who will need to do this on a regular basis or are simply too lazy :D ive just made 6th option: a simple batch file which will “automate” the process somewhat.
* make a new text document by clicking your desktop > New > Text Document
* Press enter twice
* Now that the document is opened in notepad copy paste the text at the bottom of this post in it (you could remove the line called “pause” if you dont want a confirmation, then the program will do what you’ve asked and automatically close itself.
* Save your document and call it anything you like.
* Change the file extension from .txt to .bat (note: if you cant change or see the file extension this means that “Hide extension for known file types” is checked under Folder Options).
* Its ready to use! (Run with Admin privilege, not sure whetever it is necessary to turn UAC (User Account Control) off first. Correct me if im wrong here!
!!Note!!
Dont forget changes are active after rebooting windows and more importantly!!! Like JSSmith said when you are done doing whatever it is you need change the setting back to default because theres a good reason for windows not allowing unsigned drivers!!! Better be safe then sorry right :)
@echo off
echo 1=Allow the installation of unsigned drivers
echo 2=Block the installation of unsigned drivers (windows 7 Default)
echo X=Exit
choice /C:12X
if errorlevel 3 goto End
if errorlevel 2 goto Block
if errorlevel 1 goto Allow
:Allow
bcdedit /set nointegritychecks OFF
Echo Installation of unsigned drivers is now ALLOWED!
goto end
:Block
bcdedit /set nointegritychecks ON
Echo Installation of unsigned drivers is now BLOCKED!
:end
pause
cls
Forgot to mention that this works on Windows 7 x64.
To run this procedure I must disable “secure boot” in the UEFI at start up of the PC desktop in Windows8. Can this be done without any harm??
Thanks?
Chris
I’m sorry but I have to insert in the text file from:
——
@echo off
echo 1=Allow….
to
…pause
cls
——
and I did not understand the difference between keeping or delete the line called “pause”:
the program runs as ReadyDriver Plus during boot?
I would like to try your solution but I do not understand what are the differences with ReadyDriver Plus, I’m sorry.
thanks a lot
Observation – Please… so Microsoft’s Intentions – to protect us from countless risks, locks us down so tightly, that for those of us with needs for (1) or at most a few “unsigned drivers”, forces us to unprotect our whole system (100%) 24/7, in order to maintain certain functionality… KaVoom’s KVM utility requires “Enforcement” turned OFF at every bootup cycle.
Thanks Microsoft (Idiots)… rather than providing for a case-by-case exception (providing 99+% Protection), they push us into an “all or nothing” solution. My first 20 years in technology I loved and believed in Microsoft – My last 10 years, I have grown to despise them and dozens of their product and business decisions… May their market share go to hell.
Is there no solution that handles “unsigned drivers” on a case-by-case basis ???
Actually the first option where you enter “bcdedit /set loadoptions DDISABLE_INTEGRITY_CHECKS” into the command prompt works on windows 8. Worked for me anyway. Just make sure your running it as administrator
F8 trick worked! Thanks buddy
The number of times this blog’s solved something for me…
I’ve had to get a Netcomm AM5066 (Rave III) USB dialup modem working on a customer’s laptop running Windows 7 64bit. Netcomm have 64bit drivers for XP, 32bit for Vista and list nothing at all for W7. I’ve managed to get the XP64 drivers working in W7 by disabling driver signing.
I tried the NGOHQ program first, and that seemed to work okay. 2 weeks later my customer brought it back, and it’d stopped working; I couldn’t get it to accept the drivers again. Not sure what happened.
Then luckily found this post. I strongly recommend ReadyDriver Plus over DSEO; it’s a far simpler solution and a lot easier to set up and leave. It pretends to be a human pressing the buttons to get to the F8 boot menu and then pick the “disable driver signing” option.
Works for me!
I use ReadyDriver Plus and it works fine for me! Thanks
Great find Raymond..As a person who deals with all flavors of OS in the market, I know what a pain it is to get drivers installed in 64 bit versions. Hats off to you..
Very nice tutorial, this is why I love your blog.
I’ve been using DSEO without many problems.
Thanks for the tutorial.