5 Tools to Make FreeDOS or MS-DOS Bootable USB
TL;DR:
- Flashing your motherboard’s BIOS used to require a floppy disk and DOS.
- Today, you can update BIOS easily using Windows or a USB flash drive.
- If Windows-based software is broken, you can still flash BIOS from DOS using a USB drive.
Flashing your motherboard’s BIOS has evolved. Back in the day, this process involved booting into DOS from a floppy disk. However, today, it’s much easier: you can update BIOS directly from Windows or use a USB flash drive.
But what if your BIOS doesn’t support flashing from a USB or if Windows-based tools are broken? Don’t worry—you can still update your BIOS through DOS, just like the old days, but using a USB drive instead of a floppy. This guide shows you how to do this using FreeDOS or MS-DOS and five handy tools.
How to Flash BIOS from DOS Using a USB Drive
The Traditional Way: DOS and Floppy Disks
In the past, flashing BIOS involved booting your computer into DOS, inserting a floppy disk, and running a BIOS update. This process was cumbersome and required physical disks.
Modern BIOS Updates: Easier with USB or Windows
Today, BIOS updates are a lot simpler. You can use software provided by the motherboard manufacturer to update BIOS directly from Windows, or you can use a USB flash drive with a built-in flashing tool inside the BIOS.
What to Do If Software Fails: Flashing BIOS from DOS via USB
In some cases, you may face issues with Windows-based tools, or your BIOS might not support USB flashing. Here’s where DOS comes in handy. Instead of using a floppy disk, you can use FreeDOS or MS-DOS installed on a USB drive. This method is quick and straightforward with the right tools.
Top 5 Tools for Flashing BIOS from DOS Using a USB Drive
Below are five of the best tools to help you install FreeDOS or MS-DOS on a bootable USB drive for BIOS flashing.
1. Rufus: A Simple, Powerful Tool for BIOS Flashing
What is Rufus?
Rufus is a popular utility for formatting and creating bootable USB drives. It’s widely used for tasks like installing Windows and, of course, flashing BIOS from DOS using a USB drive.
How to Use Rufus for BIOS Flashing
To create a bootable USB with FreeDOS or MS-DOS:
- Plug in your USB flash drive.
- Run Rufus and select your device.
- Set the file system to FAT32.
- Check “Create a bootable disk using,” and select FreeDOS or MS-DOS from the dropdown menu.
- Click Start to begin the installation.

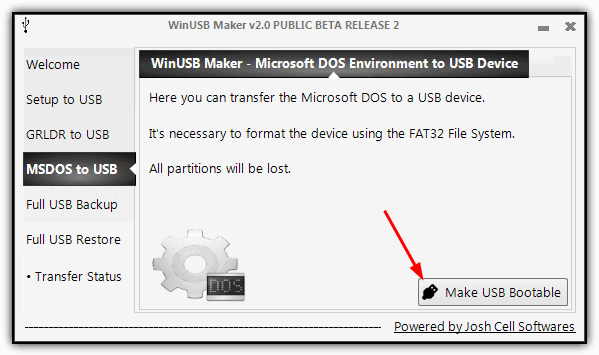
2. WinUSB Maker: Install MS-DOS with Ease
What is WinUSB Maker?
WinUSB Maker is a tool that allows you to create bootable USB drives. It’s especially helpful for installing MS-DOS onto a USB stick for BIOS flashing.
Steps to Use WinUSB Maker
- Insert your USB drive and launch the tool.
- Select your USB device.
- Click “MSDOS to USB” and then “Make USB Bootable.”
- Accept the warning, and the tool will prepare your USB drive.
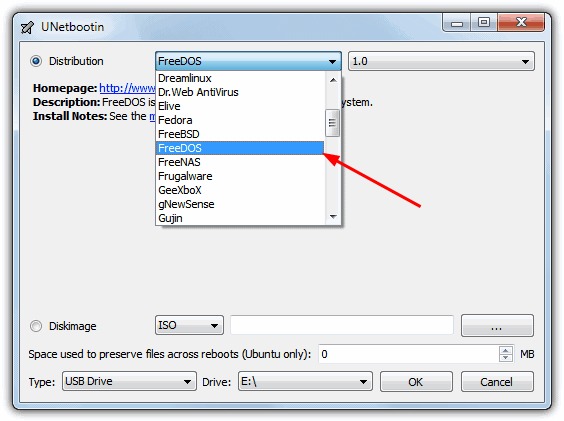
3. UNetbootin: For Easy FreeDOS Installation
What is UNetbootin?
UNetbootin is primarily used to create bootable Live USB drives for Linux distributions. It also allows you to easily install FreeDOS onto your USB drive for BIOS flashing.
Steps to Install FreeDOS Using UNetbootin
- Run UNetbootin and select FreeDOS from the distribution list.
- Choose your USB drive from the dropdown menu.
- Click OK to download and install FreeDOS onto the USB.
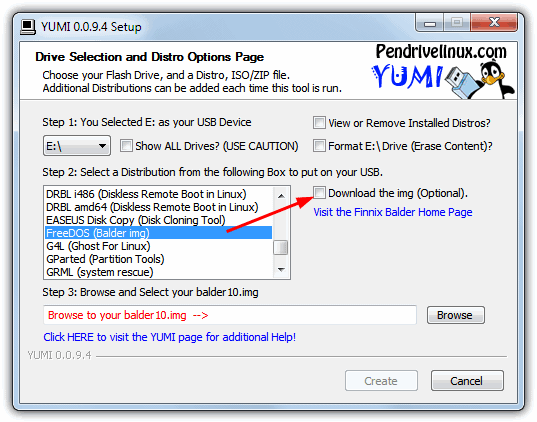
4. YUMI: Create Multiboot USB Drives with FreeDOS
What is YUMI?
YUMI is mainly used to create multiboot USB drives, but it also supports installing FreeDOS for BIOS updates.
Steps to Use YUMI
- Select your USB drive.
- Find “FreeDOS (Balder img)” in the list.
- Click Download the img and browse for the downloaded file.
- Click Create to install FreeDOS onto your USB.
5. HP Disk Storage Format Tool: A Manual but Reliable Method
What is the HP Disk Storage Format Tool?
The HP Disk Storage Format Tool is a classic utility for formatting USB drives. While it requires a bit more manual work, it can be used to install MS-DOS or FreeDOS and create a bootable USB for BIOS flashing.
Steps to Use the HP Tool
- Insert your USB drive and run HPUSBDisk.exe.
- Check “Create a DOS startup disk” and browse for the MS-DOS/FreeDOS folder.
- Click Start to begin the installation.

Conclusion: Flash Your BIOS with Ease Using These Tools
Once you’ve installed FreeDOS or MS-DOS on your USB drive, simply copy the BIOS firmware file and flashing tools from the manufacturer’s website. Boot from the USB and run the batch file to update your BIOS without the need for a floppy disk.
With these tools, flashing your BIOS from DOS has never been easier. Choose the one that best suits your needs and get your BIOS updated quickly.

Improve this guide

User forum
3 messages