Using Webcam or Video Capture Source Simultaneously on Several Application
You’ve just bought your new Logitech webcam and very anxiously wanting to have a video conference with your family which is staying a few hundred miles away from you. It’s so much cheaper to use the internet to talk via microphone, hearing via speakers and watching via webcam. You’ve connected your webcam, installed the drivers and everything seems to be working out perfectly.
You’ve logged in to your Windows Live Messenger and started a video call with your family without problems. You then start up your Logitech QuickCapture program to take a few pretty snapshots of yourself. Weirdly, you get an error message saying :
Camera is in use by another application. Stop the application that is using the camera and then press the Reconnect button
or
Webcam in use. To use your webcam with Logitech Webcam Software, end video streaming in Skype, then return here and press the Reconnect button
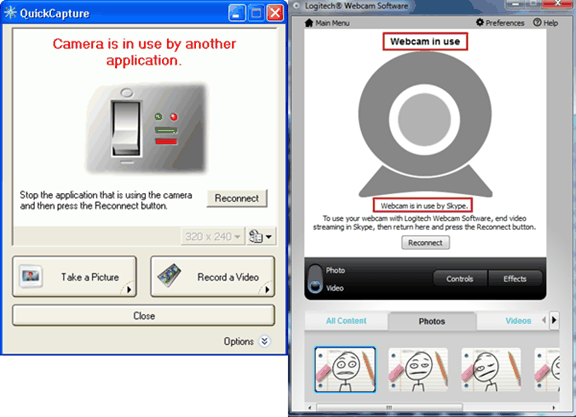
After stopping your video call from Windows Live Messenger and you click on the Reconnect button, you are now able to take snapshots from your webcam using Logitech Webcam Software. Trying to the other way around will also experience the same problem. This annoying problem is caused by the video capture driver itself and the manufacturer that develops the driver never made it to support multiple streams at the same time. Thankfully there is SplitCam, a third party software and driver that enables you to share your webcam or any video capturing hardware with multiple applications.
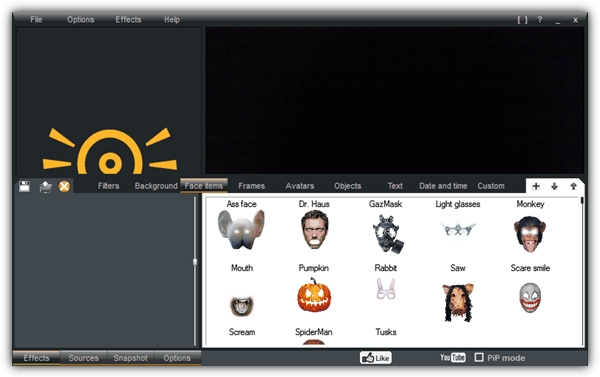
SplitCam is a free software that is capable of splitting and distributing the signal from your webcam so that it can be simultaneously used on multiple applications. Other than that, SplitCam also comes with some goodies to make the webcam streaming more interesting by allowing you to add special and funny effects. You can use filters, change the background, add face items, frames, objects or text and even create avatars to use on internet forums.
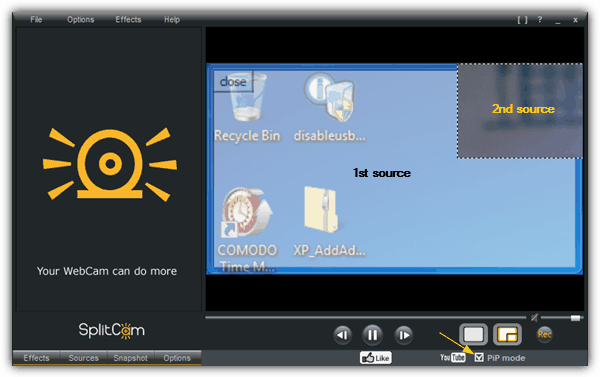
Where I find SplitCam to be really interesting is the ability to specify the source to stream in applications.
For example, instead of streaming my webcam to one of my friends in Windows Live Messenger, I can instead stream image slideshows, video playback, and even my own desktop. For advanced users, you can enable the PiP mode where you can stream TWO sources at the same time.
Read more:
The PiP feature is really useful if I want to demonstrate something on my desktop while still allowing the viewer to see me through my webcam.
Some of the included small features are the ability to zoom by using the scroll on the mouse, recording a video to an AVI file, taking continuous or interval-based snapshots and auto uploading to YouTube.
Although SplitCam is free and very useful, below are some important points that you should take note of. An alternative to SplitCam that we can recommend is CyberLink YouCam 3.5.
1. I would advise to only run SplitCam when needed because your webcam will be automatically turned on when SplitCam is running. If you’re using SplitCam on your laptop, turning on the webcam all the time will obviously drain the battery faster.
2. Pay extra attention during the installation because SplitCam setup downloads third party adware and will be installed to your computer if you blindly click on the Agree button.
3. The left pane of SplitCam may be displaying inappropriate advertisement. During our test, it was displaying links to an adult webcam site. Fortunately this can be easily blocked by redirecting the adult site to localhost using the Windows HOSTS file.
3.1. Click the Start button, and type the following line in the Search programs and files bar.
notepad %windir%\system32\drivers\etc\hosts
3.2. Press Ctrl+Shift+ENTER and click Yes.
3.3. Copy the line below, paste it at the end of the text file and save the changes.
127.0.0.1 www.myfreecams.com
In order for the changes to take effect immediately, you may need to flush the DNS by typing the following command in command prompt.
3.4. Click the Start button, type cmd in the Search programs and files bar and press ENTER.
ipconfig /flushdns
This is a working example while writing this article and the link that is blocked can change in future. If it changes, simply right click on an empty area at the left pane of SplitCam program, select Properties and add the “Address (URL)” to the HOSTS file.

Improve this guide

User forum
1 messages