System Stability Test: 11 Best Software to Use in 2025
If you are performing resource intensive tasks and the system becomes unstable, crashes, or even shuts down while being put under stress, it will be a great cause for concern. This could be a problem such as the CPU or GPU overheating, or an overclock that doesn’t work properly. Maybe the power supply simply cannot cope anymore with all hardware components running at full intensity.
Whether you’re someone who wants to test their PC components because of a possible hardware fault or have a new PC and want to make sure it runs stably at maximum load, you need a program to be able to put the system under a sustained load for periods of time to monitor the situation. Here are 10 tools to do just that and put your system under huge amounts of stress to check for faults or problems.
Read More:
- Best Online VRAM Test Software
- Best RAM Stress Test Online
- 7 Best CPU Comparison Websites to Inspect Benchmark Results
- Can I Delete MSP Files? Yes! Here Are 5 Tested Ways
- Best Wondershare LiveBoot Alternatives
Note: As you might expect, there is some crossover between software that aims to benchmark your PC and software that stress tests PC components. They both want to push the hardware to its limits but for different reasons. As stability testing requires more time to stress the hardware fully, we are not including software that will only run for a short period of time.
1. AIDA64
AIDA64 is a popular Windows utility tool designed to help users test the true limit of their Windows device. The software subjects the system to a period of induced stress and maximum usage to determine the device’s health. Furthermore, users can use AIDA64 to determine how stable the memory overlock is or as a supplement with overloads. The tool offers a free trial, making it easily accessible to users who need to do a quick performance test on their devices.

First, download and install the aida64.exe zip file on the device you wish to test. Next, click on the Tools option> select “System Stability Test” from the menu box > click on Start to run the operation. Furthermore, with the AIDA64 stability tool, you can customize your experience by using the “Preference” filter. For example, you can easily switch from the result’s screen to the individual component page to visualize how the system reacts under stress.
The AIDA64 stability tool is a great option for conducting a light and in-depth evaluation of your device’s stability. In addition, the application allows the user to check how stable the system’s CPU, Cache, memory, and FPU are. The software can log different sensors as the application monitors them simultaneously. Furthermore, users can decide to channel sensor data into a curve, create a status section on the taskbar, or share the information with other third-party applications.
2. HeavyLoad
HeavyLoad is a utility that aims to stress the main component areas of a PC. They are processor, memory, hard drive, and graphics. It can run these tests individually, selectively, or all together. Obviously, the maximum stress placed on the system hardware and the power supply will be when all tests are run simultaneously.
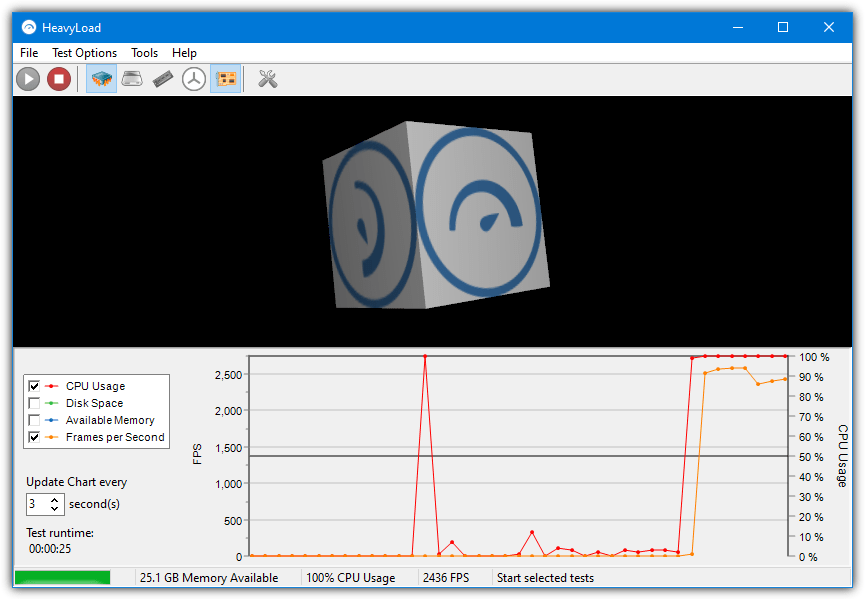
The Disk space and Available memory tests are not really there to put undue stress on those components, but rather continually write a large file to the drive and allocate/deallocate memory to the system simulating heavy load when all major components are utilized. There is an option to add more stress to the hard drive by using Jam software’s other popular included tool Treesize Free to simulate more heavy disc access.
The default is for HeavyLoad to run its tests continuously. You can change this by going to Options > Misc and enabling the “End test after” option. The default setting for that is 60 minutes. HeavyLoad comes as a setup installer or a portable Zip archive.
3. FurMark
FurMark is a benchmark and stress testing tool designed especially for graphics cards (now also CPUs). It runs a very intensive “Fur” rendering algorithm that is well known for pushing the GPU to its absolute limits. There are a few settings that can be changed such as resolution, full screen mode, and anti aliasing. A few benchmark presets are available for 720/1080/1440/2160 or there’s a single button for running a stress test.
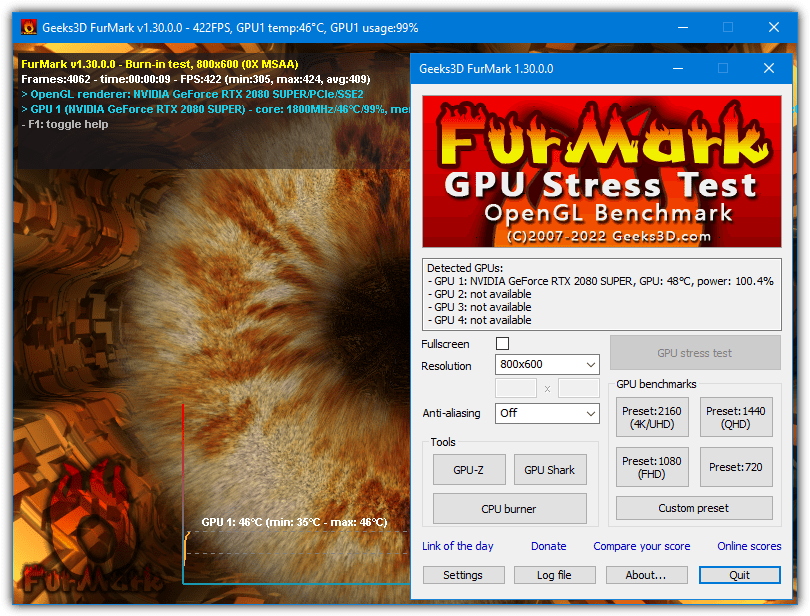
The benchmark’s default run time and an alarm for the maximum allowable temperature for the graphics card are found via the Settings window. Benchmark scores can be compared or viewed online.
Some extra third party tools are available from within the man window. GPU-Z is the very well known graphics card information tool from TechPowerUp while GPU Shark is a GPU monitoring tool from the same developer as FurMark. CPU Burner does what the name suggests and is a small utility to stress the CPU instead of the graphics card.
There have been reports over the years of FurMark killing graphics cards. This appears to be because it stresses the GPU far more than any normal game or application would. As a result, use FurMark with care as it could find a weakness in your graphics card that wouldn’t be an issue under normal everyday conditions.
There are also a couple of custom versions of FurMark that are branded for hardware manufacturers MSI and Asus. In addition to an OEM themed skin, there are some extra testing options that more advanced users might find useful. MSI Kombustor and FurMark Asus ROG Edition are free from the FurMark website. An EVGA version is available but several years out of date.
4. Cinebench
Cinebench is one of the most popular CPU benchmarking tools around and it’s nearly always found in written and video CPU reviews. Cinebench is based on the Maxon Cinema 4D rendering software, and like most 3D rendering applications (such as Blender), it pushes the CPU to its limits. The render test is split into tiled blocks with each being rendered by a CPU thread.
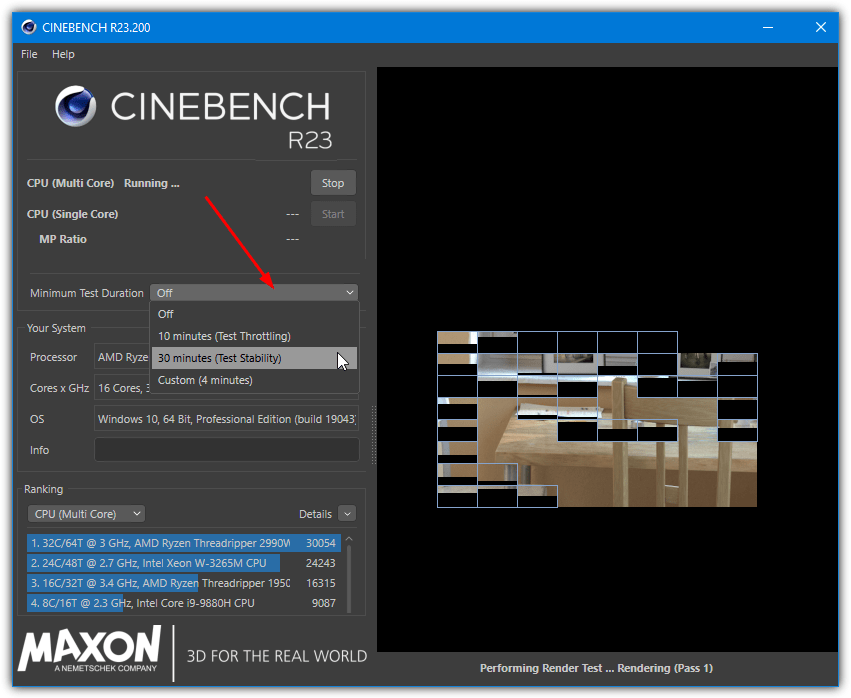
Although Cinebench runs a single benchmark by default, you can tell it to loop for a period of time, which is required for stability testing. Firstly, you can click the File menu and select “Advanced Benchmarks”. This adds a “Minimum Test Duration” dropdown menu to the main window. From there, you can choose a 10 minute throttling test or a 30 minute stability test.
The alternative loop option is to go to File and select Preferences. The prefs window has a “Custom Minimum Test Duration” where you can set the minimum number of minutes the test will run. The current benchmark run will finish once the time limit is reached. Cinebench is portable but extracts from the Zip archive to over 600MB.
5. OCCT
OCCT is a tool that is known to put serious amounts of stress on your system components and is especially good at severely stressing your power supply. There are rumors it can even kill poor quality or cheap PSUs so is obviously a utility to be used with care. CPU stress tests include an OCCT test and a Linpack test, a standard 3D GPU test, and the mentioned power supply test.
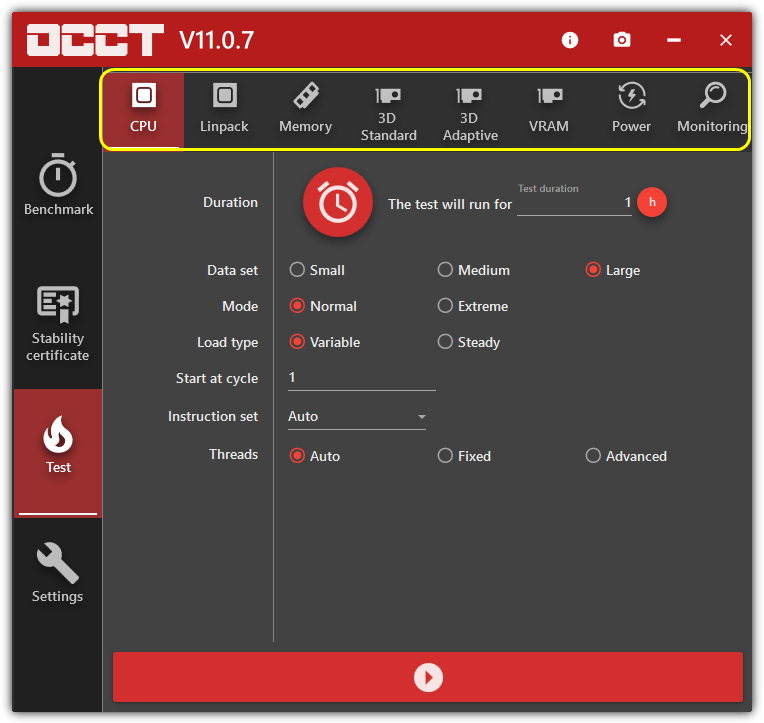
There is also a useful temperature and voltage monitoring window where you can keep an eye on the values during any of the tests. Most stress test settings will be fine if left at the defaults and you only really need to change the timer to test for more than an hour. Click the clock timer icon to run tests until they are manually canceled. OCCT is a portable executable.
The unfortunate thing about OCCT these days is it pops up a 10 second donation nag window before you run any test. This becomes a bit tiresome if you want to run multiple tests or multiple runs of a test.
6. SiSoft Sandra Lite
Sandra is a well known hardware information and benchmarking application, the Lite version is completely free to use. There is an option to run a burn in test available from the Tools menu or window tab. This is achieved by simply running a number of the individual benchmark tests continuously placing good amounts of stress on the system. Setting up a burn in test is done with the help of a multi step wizard.

Several tests are available for specific hardware components, including processor, graphics card, video memory, system memory, physical disks, optical drives, and network (including WiFi). These tests can then be executed continuously, for a set time period, or for a specified number of loops. Steps four through ten of the wizard can probably be left at the defaults for most users.
As most tests are enabled by default that cover various system hardware components, it’s recommended to disable what you don’t need. It makes little sense to leave tests for hard drives or network running if you only want to test memory or the CPU.
7. Unigine Heaven and Valley
These two graphics card benchmarks are essentially the same software underneath. The only major difference is the scenery on display while each is running. Valley is more of a virtual flight over mountains and through the trees while Heaven is a virtual tour through a steampunk village in the clouds. The settings window that shows on launch is where you set up the benchmark for your system.

Although there are a number of settings you can change, for the most part, choosing the built in Extreme preset and hitting the Run button will be enough to push most GPUs to the limit. The good thing about Heaven and Valley is the benchmark will simply loop until you manually stop it. Although not every visual scene will stress the GPU to the maximum, most will cause very high utilization.
Download UniGine Heaven | Unigine Valley (both are available for Windows, Mac OS, and Linux)
There are some other Unigine benchmarks available. SuperPosition hasn’t been included as it only runs a single benchmark pass. The looping stress test option is only for paid versions. Unigine Tropics and Unigine Sanctuary are older benchmarks that were superseded by Heaven and Valley. They still work if you fancy a different visual tour during the stress testing.
8. IntelBurnTest
Despite the name, IntelBurnTest actually works fine for testing on AMD processors as well. The Intel part of the name comes from the Intel Linpack tool that Intel themselves use to stress test CPUs. IntelBurnTest is portable but the .NET Framework 2/3.5 is required for Windows 10 and 11 users.
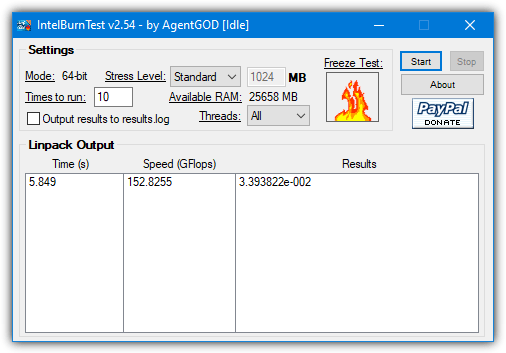
Usage is easy and all you have to do is set the number of times to run the test (default is 10), the number of threads to use (default is All) and the test stress level (default is Standard). The level can be Standard, High, Very High, or Maximum and each will use increasing amounts of system memory. The Standard option will probably be perfectly fine in most cases.
9. StressMyPC
This is a simple, tiny, and portable utility of around 150KB that can run a stability test on your PC’s processor. In addition, it can also perform a couple of other tests such as a simple GPU graphics test and also a test for the hard drive.
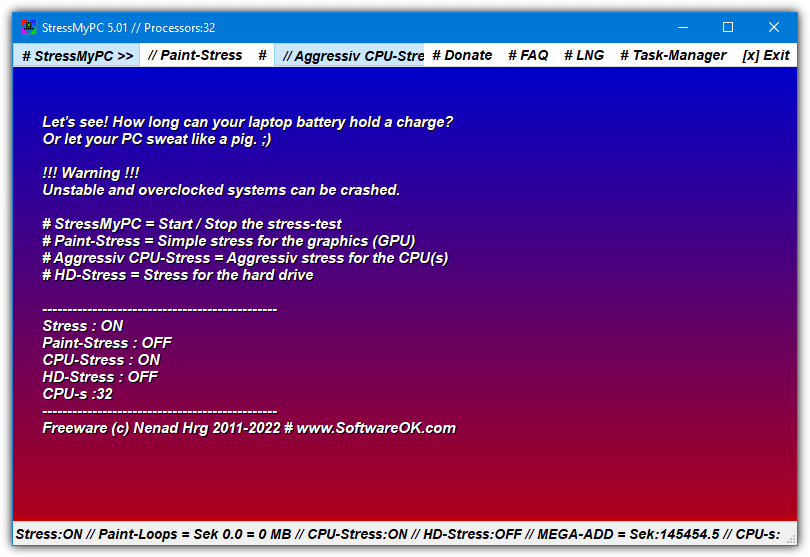
The “Aggressive CPU Stress” test is enabled by default if you press StressMyPC to start. Do note that your CPU might not reach 100% utilization for up to a minute or so once the test is started. The “HD Stress” and “Paint Stress” tests can be run individually or all three tests can be run at once to put your system under more stress. The Paint test is not exhaustive though and our graphics card usage barely exceeded 40%.
10. Prime95
Prime95 is a tool used extensively by those who overclock their systems and is often run for several hours pushing the CPU to its limits during that time. This is due to Prime95’s high reliance on the CPU’s Floating Point Unit for much of its running which keeps the stress levels and temperatures very high during use.
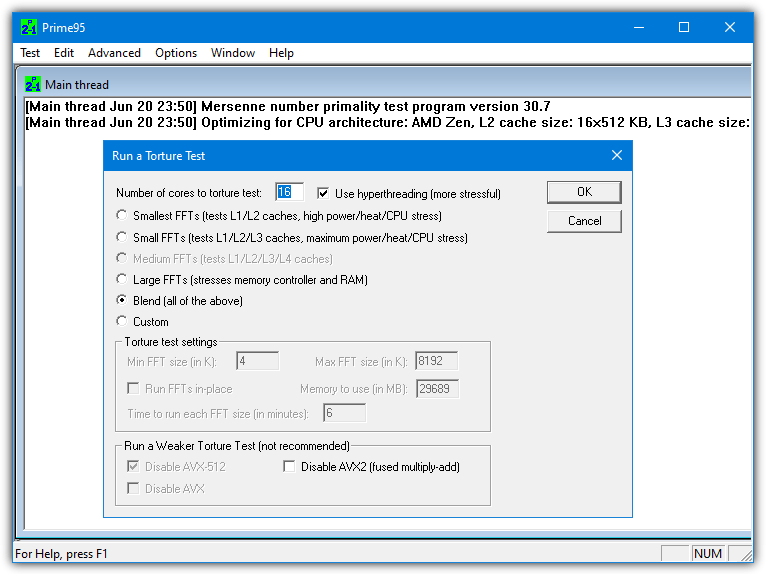
On starting (after pressing “Just stress test”), the tool will pop up a settings window to configure the running of the test. This ranges from Small FFT which stresses mainly the CPU, to the Blend test which also puts stress on memory and the memory controller. The default settings should suffice for most users. Prime95 is portable and works on pretty much everything from Windows 95 and up.
11. CPU-Z
For detailed information about your CPU, motherboard, and RAM, there aren’t many tools that do a better job than CPU-Z. It’s a hugely popular program from the same developer as HWMonitor and is often among the first to support new CPU information. Over the years, CPU-Z has added a few extra features, one of those is a processor benchmark and stress tester.

Head over to the Bench tab from within CPU-Z and you have two options. There’s a benchmark test that will simply run for a matter of seconds to get a single core and multi core score that can be compared to other results. The second option is the “Stress CPU” button that simply runs the multi core benchmark test continuously. Simple and quite stressful for your CPU.
CPU-Z is portable and has optional OEM branded versions for vendors like Asus, Gigabyte, MSI, and ASRock. However, those versions lack the extra features found in the original version. The stress tester is still included though.
Important Note
Stress testing your computer components is not something that should be performed often. It is only really meant to help identify hardware faults by placing excessive stress on components. Or it is used to fully stress a new system to ensure all components are working reliably. This does mean a computer is more likely to encounter shutdowns, reboots, or crashes during a stress test as any faults are uncovered.
It’s also NOT a good idea to test a hard drive if you suspect it has any kind of problem because a stress test will increase the speed at which the drive might fail. Backing up is therefore highly recommended before running tests on any drives that hold important data.
A hardware monitoring utility is important to use as well so you can monitor system temperatures, fan speeds, and voltages while the stability tests are being performed. You can stop the test more quickly if you identify an overheating component or a fan problem etc. Some listed tools already have monitoring built in so you won’t need to use an external program as well.
It’s only a small thing, but do make sure you know where the STOP button is on any of the listed stress testing tools before you start!
For further details and stress-testing software options, you can explore AMD Radeon RamDisk.

A nice collection of stress tests, but I am currently searching for DOS-based software. Will keep looking, but perhaps you could add something in this vein the next time you update the article?
BurninTest software is good for testing, but unfortunately it’s not free
any commandline tools, i need them in my automation
3d mark is good for higher end graphics cards
Aida64 is also good program. It is almost head-to-head with BurnIn Test made by PassMark
I generally run Orthos and MemTest. For the hard disk, when I get a new one, I copy tons of files big and small to it and then try using these files. Last drive showed problems immediately after this.
I also always do a Nero Recode and x264 encodes since these are heavy CPU programs.
Useful tool and have noted contributors very helpful warnings.
Looks like a decent benchmarking software. Thanks Ray!
My suggestion regarding this type of program:
Run it well BEFORE your warranty expires. Make sure you didn’t get a system with faulty components. Don’t experiment on an older system (with gigs of files & programs at risk). If something is “marginal”, these programs WILL find them – often destructively!
Second this – it is actually possible for stress testing software to fry your PC. E.g. normal use of a video card will not come close to the temperature and power consumption of running a 100% stress test like FurMark, and this could cause an otherwise working component to fail. It does mean the component is running out of spec, so it could even be recommended to run this just before your warranty expires, but not after.
An example of how testing software can be destructive if it does not change or write anything new or over existing files, code or registry? If a tool writes its own fix without showing you changes before they happen then don’t use it.
Thanks again for a useful tool Raymond
Thank you Raymond.
Nice tool.
A very good and large hardware store here uses Everest for stability testing
Thanks for the info Raymond!