5 Ways to Automatically Upload Files to FTP Server
Although cloud services have pretty much taken over online file storage space, there are still times when other options are needed. For instance, if you run or are involved in a website or have some of your own server space, file transfers will be commonplace. One of the things you might need to use quite often is the File Transfer Protocol (FTP) to upload files to the server.
Uploading can be done pretty easily and there are some well established FTP tools around like the open source FileZilla. If you just want to quickly upload a file or image it can be a bit of a pain going through FTP software to do it. A simple solution is to use the context menu in Windows to do the work for you. Just right click on a file and click the send option in the menu. Here’s a selection of ways you can achieve it.
1. WinSCP
WinSCP is a powerful and popular file transfer client and it can handle other protocols like SFTP, SCP, and WebDAV as well as standard FTP. Another thing that makes WinSCP useful is it’s one of the only dedicated FTP clients with the ability to place a shortcut into the Send to context menu.
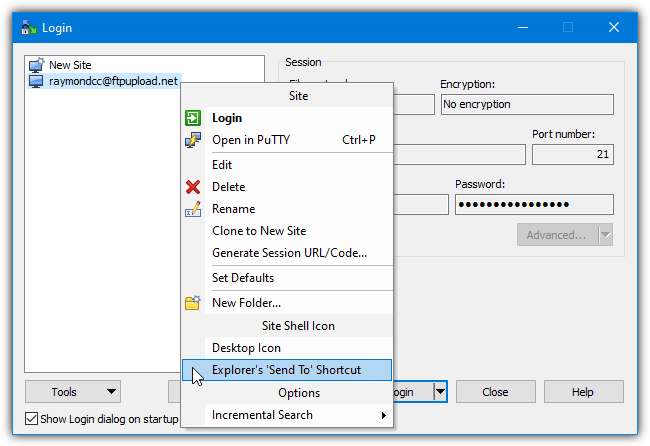
Setting up a shortcut is pretty easy and shouldn’t prove too difficult for even intermediate users. Launch WinSCP and it will pop up a connection dialog. Fill in the data for hostname, username, password, etc. Click Save and the profile will be added to the list on the left. Right click on the new profile (or press Manage) and click on “Explorer’s Send to shortcut”.
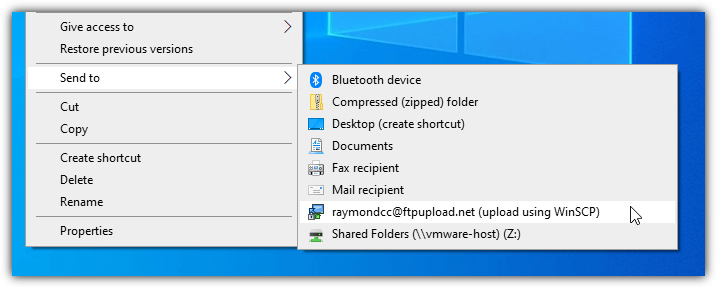
A new Send to shortcut will be created with the name “[user name]@[host name] (upload using WinSCP)”. Before the transfer, a setting window will show that asks for the remote folder and a transfer type such as text or binary. Click OK to begin the transfer. WinSCP also has a portable version available but don’t move the portable folder after setting up the shortcuts.
2. RightLoad
Sadly, age has caught up with RightLoad and some of the features no longer work. This includes the Facebook, Flickr, Imageshack, Imgur, and VirusTotal plugins and the imported servers list. Luckily, the plugins can be excluded during installation but make sure to not exclude “Context menu entry” and “Sent To icons”. The available portable version doesn’t include the right click menu options so the setup installer is required.
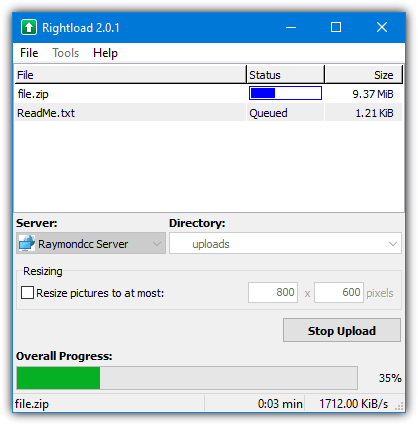
Open the program and go to Tools > Options > Servers tab > New Server. Enter the FTP details and optionally change the default server name by right clicking on it. More servers can be added if required as well as a named Send to shortcut. RightLoad creates two sets of context menu entries, one in its own “Upload with RightLoad” menu and another in the Send to sub-menu. When you right click on a file it can be queued or sent immediately.

Drag and drop onto the main window is supported and files added to the queue can be started off by clicking the Start Upload button. For a bit of added security to protect your logins, Rightload can be set up with a master password that will be required every time you use the program. An image resizer and thumbnailer is included to help optimize images before upload.
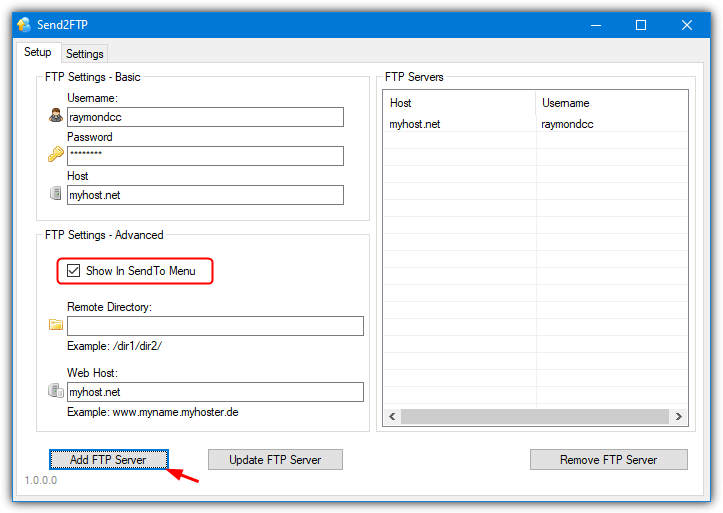
3. Send2FTP
This is quite an easy to use tool and it’s also portable. Make sure to place it in a permanent location before configuration or the Send to menu entry won’t work. A function some users might find useful is the ability to compress the file before uploading. Send2FTP can upload a single file or the contents of a single directory. Windows 10 and 11 users will need .NET Framework 2/3.5 installed to run Send2FTP.
Launch the executable and enter your FTP information, then click the “Add FTP Server” button to add it to the list. Multiple FTP servers can be configured and added to the list. When you right click on a file the option will be available as a shortcut from the Send to menu in the form of “Send to [host name] as [user name]”. If you see no Send to option, make sure the “Show in Send To menu” box is checked in Advanced settings.
Note that compression is disabled by default, enable it from Settings where you can set it to ask or always use Zip compression. Send2FTP never got past the beta stage and it’s from 2011 so there will be no more bug fixes or updates. It worked fine during testing but may have bugs or other issues we didn’t encounter.
4. SendTo FTP
SendTo FTP is almost as old as Windows XP and dates back to 2003. It still actually works but you need to run the installer in compatibility mode when running from Windows Vista or above. To do that, right click the setup.exe > Properties > Compatibility, check the “Run this program in compatibility…” box, and click OK (Windows XP should be preselected). To access the program settings, right click on a file > Send to > “SendTo FTP”.
In the window, supply a profile name and add your FTP details. If you need to change Passive mode or firewall ports, click the Options button. SendTo FTP can remember your user name, password, and sub-directory for each profile. Clicking OK will then upload your files. Multiple files can be selected but not folders.

Enabling both the “Start sending files without OK” and “Exit when file transfer is complete” settings in Options will make the process automatic but will effectively lock you out of the user interface to make changes. To re-enable access, download this Registry file and import it into the system registry. This resets both options so you can get back into the user interface.
5. Create a Right Click FTP Entry Using Windows
You can easily configure Windows to set up your FTP as a network location and then upload files to it via the File Explorer “Send to” context menu. The advantage of this method is it requires no additional software at all although configuration options are limited. Despite the number of steps required, it is a quick method and only takes a minute or two to set up. Here’s how:
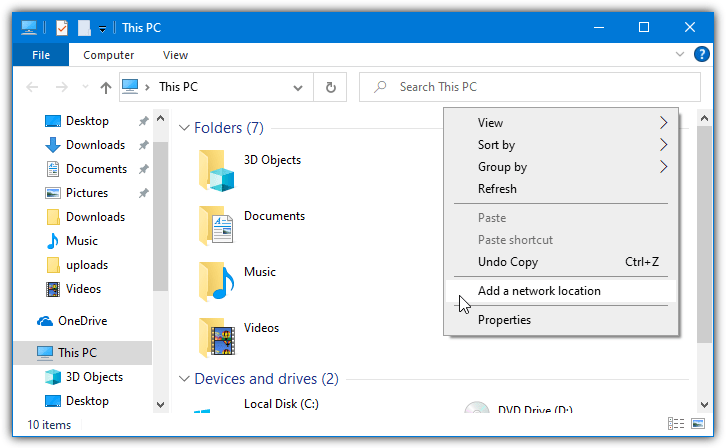
1. Open This PC from the desktop or click on the File Explorer icon on the Taskbar. Right click on an empty area in the Computer window and select “Add a network location” from the context menu. Click Next.
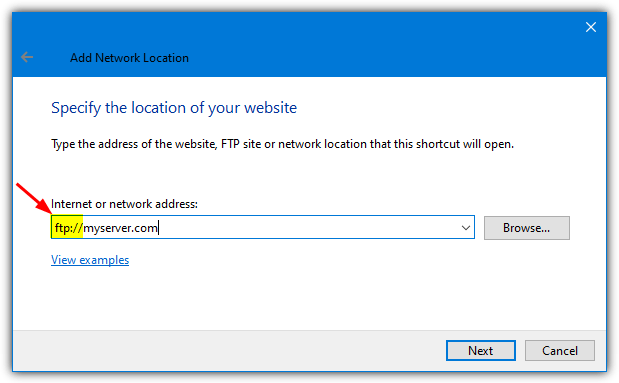
2. Make sure “Choose a custom network location” is highlighted and click Next. Enter the address of your FTP server making sure to include the “ftp://” at the beginning (eg; ftp://myserver.com). Failure to do that will produce an error.
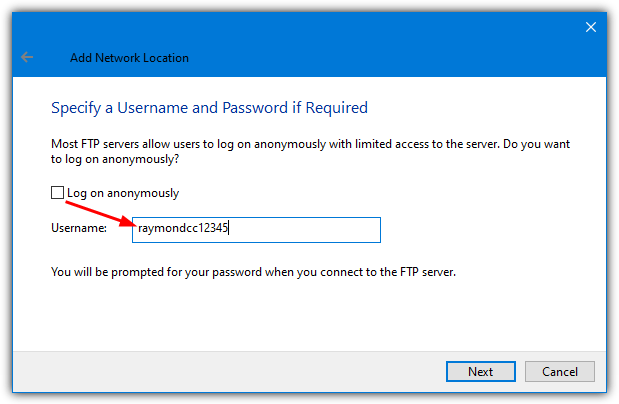
3. If you log on to your FTP server anonymously, just click Next. Otherwise, uncheck the “Log on anonymously” box and enter the username below, then click Next.
4. Give the network location a name of your choosing and click Next. Click Finish leaving the “Open this network location when I click Finish” check in the box.
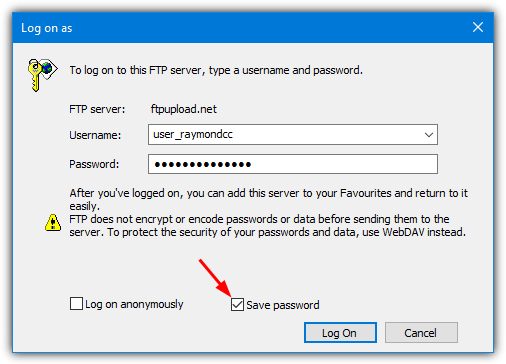
5. Windows should now connect to your FTP and will ask for the password if one is required. Simply type it in and make sure to check the Save password box before clicking Log on. Navigate using Explorer so you can see the folder where you want to send the files but don’t go into the folder. Leave this Explorer window open.
6. Open the Send To folder by pressing Start (or Win key+R to open the Run dialog) and type or paste the following:
%appdata%\Microsoft\Windows\SendTo
7. Place the FTP folder location window and the Send To window side by side. Right click on the FTP folder you want to send the files to and drag it to the Send To window, then let go. A menu will pop up where you can select “Create Shortcuts here”. Rename the shortcut to your liking (eg; “FTP to Uploads Folder”).
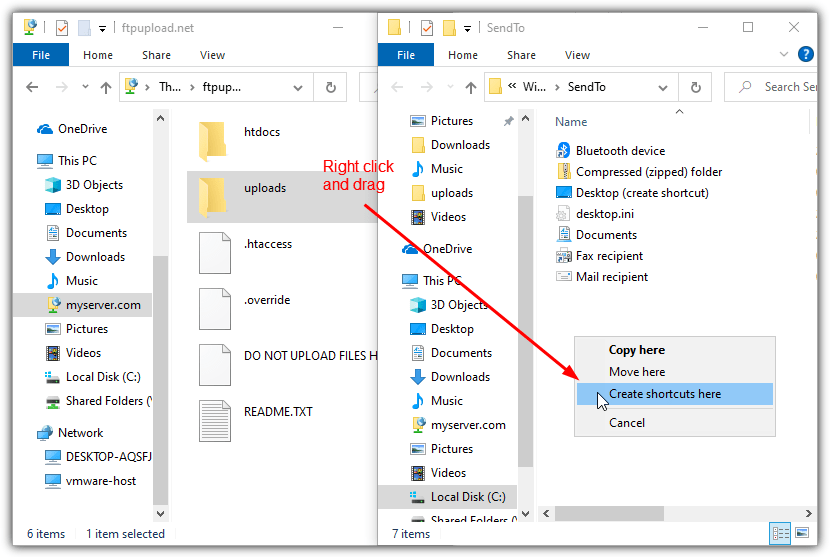
Now when you right click on files or folders > Send To, the FTP shortcut will be there. When you click on it, the data will automatically upload to the FTP folder. The good thing is you can add several Send to shortcuts for different FTP folders or servers by simply repeating the steps above.
Simply delete the shortcut in the Send to folder to remove it. The FTP connection itself can be removed from the Network locations section in Explorer.

Improve this guide

User forum
0 messages