How to Slipstream Windows XP to Create a Bootable CD
Windows XP has now had 3 major update packages called Service Packs in the time since its release. The Packs contain most of the released hotfixes up to that point and also a few new features and enhancements. The most notable being Wifi support introduced to XP in Service Pack 2. The problem is, if you don’t have the latest version of Windows XP on your install CD, there will be literally hundreds of patches from Microsoft Update including the latest Service Pack which you have to install first and is over 300MB.
If your Windows CD doesn’t include the latest Service Pack, there is a process to be able to seamlessly integrate it onto your CD (or USB stick) and with every new installation of the Operating System from then on, the latest Service Pack is installed at the same time. This method is called “Slipstreaming” and while it creates an updated install from you CD, it also produces a much quicker and cleaner Windows installation.
Slipstreaming the latest Service Pack can actually save between 1 and 2 hours on a slow machine if you have to install it after your operating system has been installed. This makes it worthwhile for everybody with an older CD to do and is quite easy only taking a few minutes. All you need is a blank CD and the latest Service Pack 3 from Microsoft.
Here’s how to do it:
Slipstream Windows XP Service Pack 3
It’s pretty safe to say that Windows XP will never receive another Service Pack and version 3 will be the last. You need a standard Retail or OEM Windows XP CD with either Service Pack 1 or 2, or no Service Pack at all to integrate SP3.
Here are 2 ways to integrate the Service pack, the first using the Command Prompt, and the second through the excellent slipstreaming tool nLite. If you are not a fan of using the Command Prompt or like an easy life, try the nLite method below.
1. Download the full “Network Installation Package for IT Professionals and Developers” Service Pack 3 English version [316 MB], and save it to a folder on your hard drive, in my case D:\XP-SP3. Please do NOT use spaces in the folder names!
2. Next, copy your Windows XP CD to your hard drive. Just create a folder (I used D:\XP-CD), and copy all the contents of your Windows XP CD into that folder.
Method #1 via Command Prompt
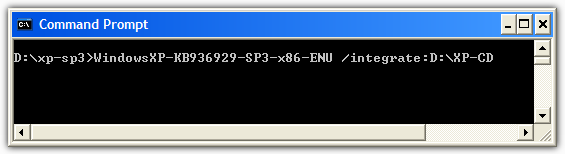
1. Open a Command Prompt (Windows key+R > type cmd and press Enter), and go to the folder where you downloaded SP3 by typing:
cd yourfoldername (eg. cd D:\XP-SP3)
2. Then type the command:
WindowsXP-KB936929-SP3-x86-ENU /integrate:drive\path
In my example the command is:
WindowsXP-KB936929-SP3-x86-ENU /integrate:D:\XP-CD
Method #2 using nLite
1. Download nLite and install then run it. Alternatively you can download and run the portable version.
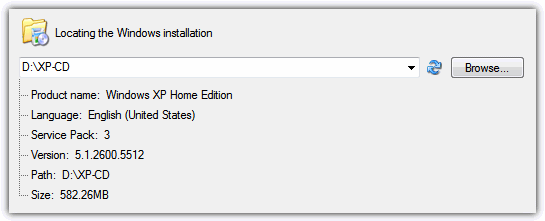
2. At the screen to locate the Windows installation, Click Browse and point to the folder containing the files copied off the CD (eg. D:\XP-CD). Click Next -> Next.
3. On the main screen, click the top option “Service Pack” so it turns green, then click Next.
4. All you need to do here is press the Select button and point to the Service Pack executable. In my case it was D:\XP-SP3\WindowsXP-KB936929-SP3-x86-ENU.exe. The slipstream will then proceed.
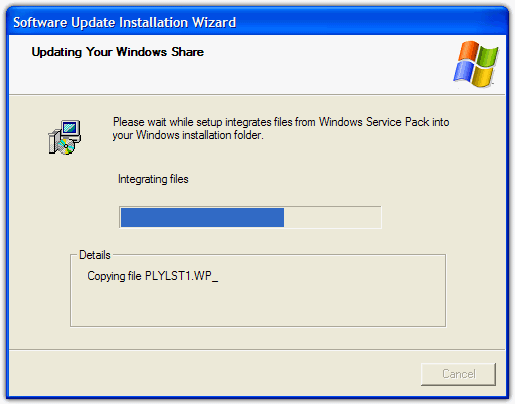
First, the files will be extracted, and next they will be integrated into your Windows XP files.
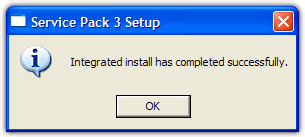
When the process completes, you should get a confirmation. Windows XP Service Pack 3 has now been Slipstreamed into your original Windows XP files.
If you get this error:
This Service Pack cannot be integrated into a destination that also has integrated Software Updates.
Consult the Service Pack documentation for more details about supported integration scenarios
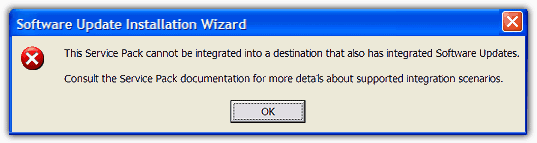
This is caused by the fact that your Windows XP CD contains updates that will be automatically installed when you run setup. This type of CD will usually be from larger OEM suppliers (like Dell, HP, Acer or others).
You cannot use this type of CD to create a slipstreamed SP3 install, only the standard untouched discs as they came from Microsoft are fully compatible.
Creating a Bootable CD
Burning the files back to a bootable CD is incredibly easy thanks again to nLite. All you have to do is click a few buttons!
1. If you never used method #2 from above, then download nLite and install then run it, or download and run the portable version.
2. At the screen to locate the Windows installation, click Browse and point to the folder containing the newly slipstreamed SP3 files. Click Next -> Next.
3. On the main screen, click the bottom option “Bootable ISO” so it turns green, then click Next.
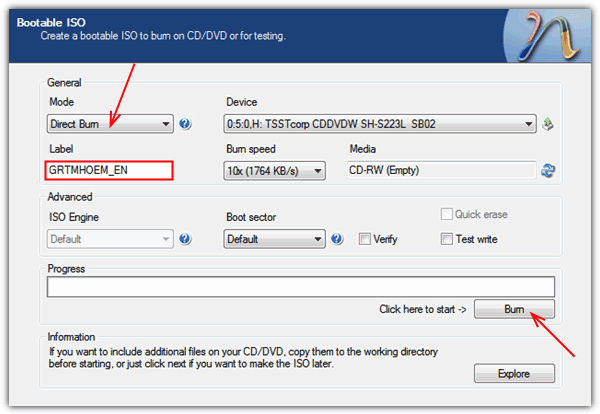
4. On this screen you can create an ISO or burn an already created ISO if you wish. The option we are going to choose here from the Mode drop down is “Direct Burn” which will burn the files straight to CD. Simply choose your CD writer if it’s not the correct writer, the burn speed (for Windows CD’s it’s recommended to burn at 8x or below to avoid XP install errors), and give it a label. Finally click the Burn button and wait for your files to be written to disc.
You now have a new bootable Windows XP CD with Service Pack 3 slipstreamed. Simply boot from it normally to install or repair XP.

Improve this guide

User forum
10 messages