LastPass YubiKey Setup: Step-by-Step 2023 Guide
Protecting your main email account is very important. Some of the effective methods to protect your email password is by using keystroke encryption software, a virtual keyboard, autofill browser extensions etc, but we still have to be prepared for the worst which is what if a hacker manage to get hold of your password? The answer is to use a two-factor authentication, also known as 2-step verification.
Recently you’ll find a lot of popular major online services such as Google, Facebook, Dropbox, LastPass, and Microsoft that allow you to set up two-step verification for your account. You can either setup your phone to receive SMS or voice call or install an authenticator app on your smartphone that generates a security code. On the surface, the above method seems safe but is actually ineffective against modern threats such as phishing and mobile malware that can intercept SMS messages.
A device that is safer to be used as a 2nd factor authentication would be YubiKey. Basically YubiKey is a small yet water and crush-resistant device that doesn’t require drivers or batteries to work. All you need to do is insert the YubiKey into a USB port and touching the sensor will automatically perform the 2nd step authentication.
If you’ve purchased a YubiKey, here we show you how to configure your YubiKey with Google, LastPass and KeePass.
Configure YubiKey with Google
Your Google account could be the most important online account if you’ve signed up to other services with your Gmail. Before you start configuring your YubiKey with a Google account, ensure that you’re performing the steps below using the Google Chrome browser because other browsers like Firefox currently don’t support the U2F protocol.
1. Visit https://accounts.google.com/SmsAuthConfig and click the “Start setup” button.
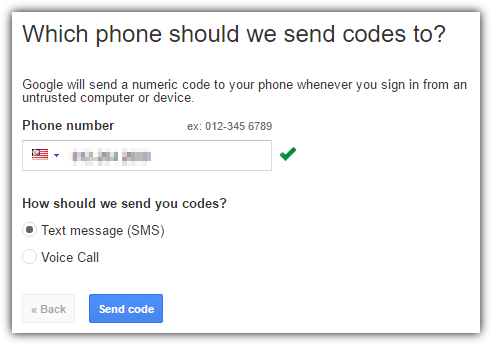
2. Enter your phone number and choose either to receive the code via text message or voice call, then click “Send code“.
3. You’ll receive a 6 digit verification code on your phone which is to be entered into the next step followed by clicking the Verify button.
4. Click Next to trust the current computer followed by Confirm to turn on 2-step verification.
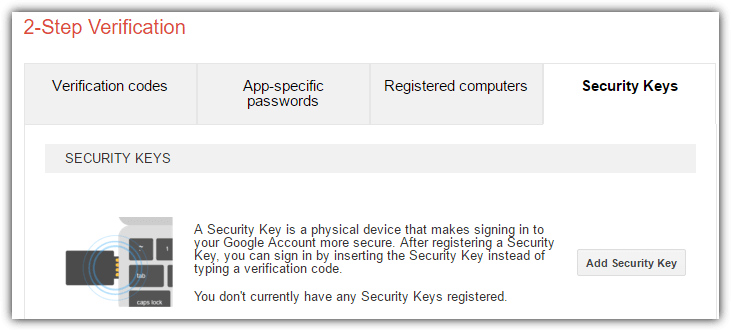
5. At the 2-Step Verification page, click on the “Security Keys” tab and click the “Add Security Key” button.
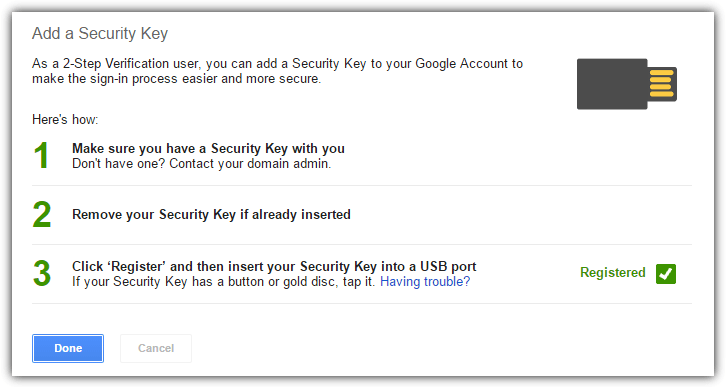
6. Insert your YubiKey into the USB port and click the Register button.
7. Touch the sensor of YubiKey when asked to. The Done button will be enabled for you to click after it’s finished registering your YubiKey with your Google account.
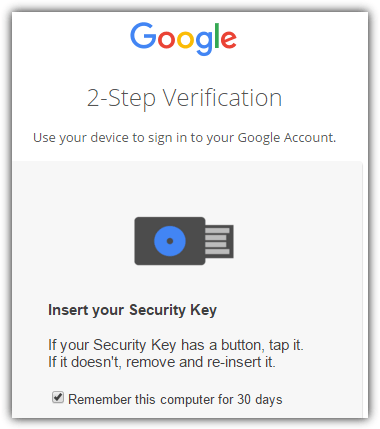
Google remembers the currently signed in computer through browser cookies for 30 days without asking you to go through the 2-step verification. After 30 days or if the cookies are cleared, logging in to your Google account will ask you to to use your YubiKey device to sign in.
Configure YubiKey with LastPass
LastPass is the most popular online cloud based password manager that can help you use different and complex passwords for each account. Protecting your master password is of utmost importance because if someone manages to steal your master password, they will have access to all your accounts that are stored in your password manager. YubiKey can provide an additional strong layer of protection on top of your master password.
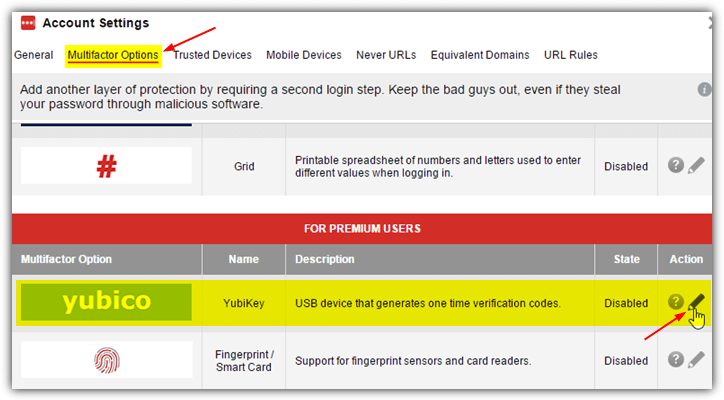
1. Visit LastPass Account Settings.
2. Click on Multifactor Options
3. Scroll down to YubiKey and click the Edit icon.
4. Select the Yes option for Enabled, optionally allow or disallow for offline and mobile device access. Click at the YubiKey #1 and touch the YubiKey’s sensor which will automatically fill up the first slot with masked characters to association your YubiKey with your LastPass account.
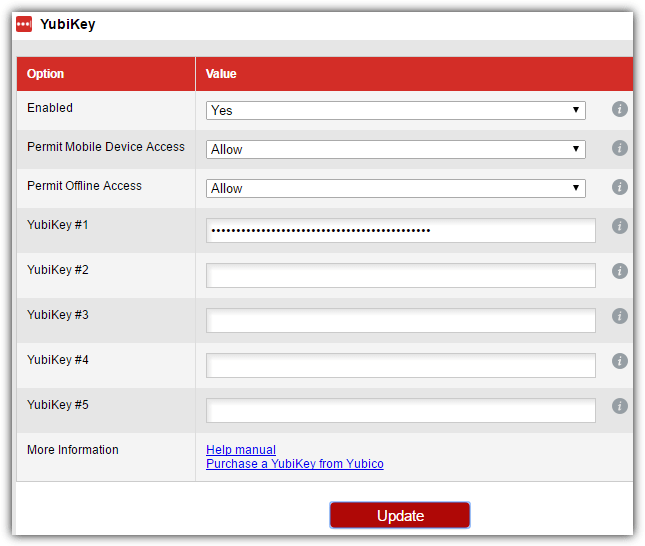
5. Click the Update button.
Additional Notes: Using YubiKey with LastPass will require a LastPass Premium subscription at $1 per month or $12 per year, which is much cheaper if compared to Dashlane Premium.
Configure YubiKey with KeePass
KeePass is regarded as one of the best if not the best local password management software mainly because it is open source, flexible and very extensible using plugins. While KeePass has its own unique technology known as Secure Desktop that effectively protects your master password against keyloggers, it is still good to further strengthen your encrypted KeePass vault with a physical second factor YubiKey.
If you’ve been using KeePass, you should have known that it is less user friendly and requires manual configuration on most settings. Unfortunately YubiKey does not work out of the box even after installing the plugin. Here are the steps to setup your YubiKey with KeePass.
1. Download the YubiKey Personalization Manager and install.
2. Insert your YubiKey to a USB port and run YubiKey Personalization Tool.
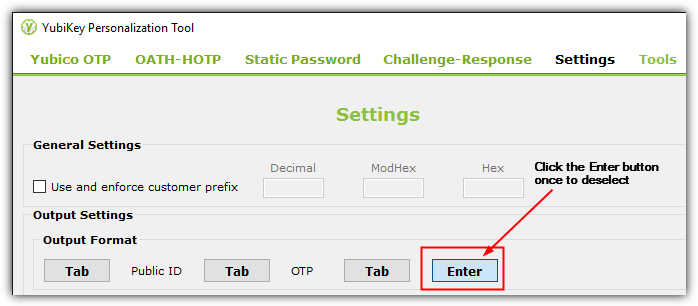
3. Go to Settings and click on the Enter button once using your mouse cursor to deselect the option. The change is automatically saved after deselecting the Enter button.
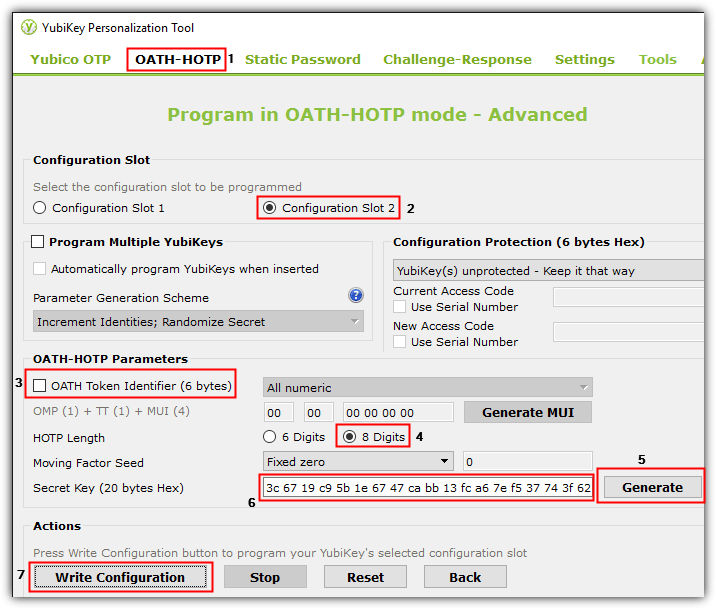
4. Go to OATH-HOTP, select Configuration Slot 2 (by default slot 2 is unused), untick the “OATH Token Identifier (6 bytes)” checkbox, select “8 Digits” for HOTP Length, click the Generate button to generate a random secret key, make a copy of the secret key, and click Write Configuration button.
5. Download the Professional version of KeePass (v2.x)
6. Install or extract KeePass if you’ve downloaded the portable version to a new directory.
7. Download OtpKeyProv plugin, extract the OtpKeyProv.plgx file to KeePass’ directory.
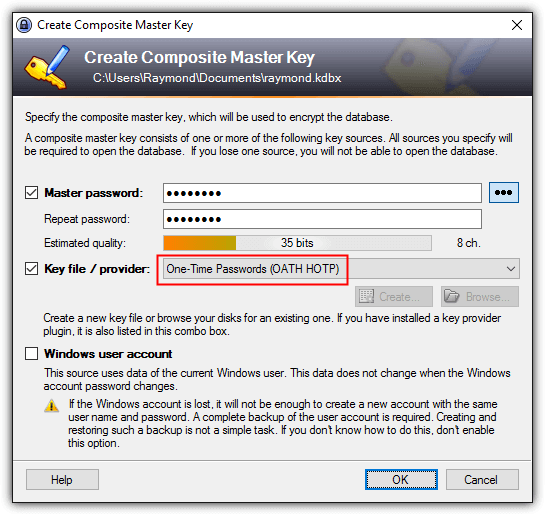
8. Run KeePass and you should be prompted to create a composite master key if it’s the first time you’re running KeePass. Specify the master key, tick the “Key file / provider” checkbox and select “One-Time Passwords (OATH HOTP)” and click OK. If you already have a KeePass database, login, go to File and select Change Master Key.
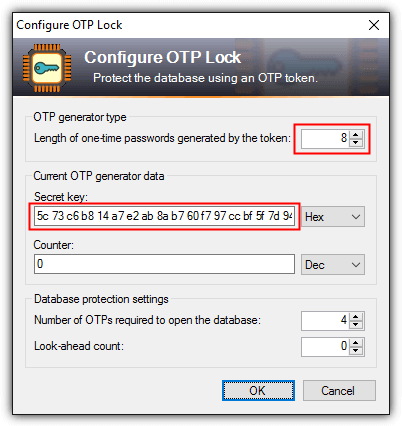
9. KeePass will now ask to configure your OTP lock by specifying the secret key which you’ve copied down earlier in step 4. Paste the secret key to the box and click OK. Save the database for the changes to take effect.
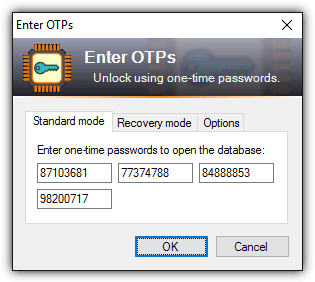
10. When you attempt to open KeePass with the database that is protected with YubiKey, you’ll be prompted to enter the one time password. All boxes will need to be filled with the one time password by pressing and holding on to the YubiKey sensor for 3 seconds until the one time password is generated.
If you want to login to your KeePass database but do not have your YubiKey with you, it is still possible to login by using the recovery mode. Go to Recovery Mode tab and enter the secret key which was randomly generated by the YubiKey Personalization Tool in step 4.
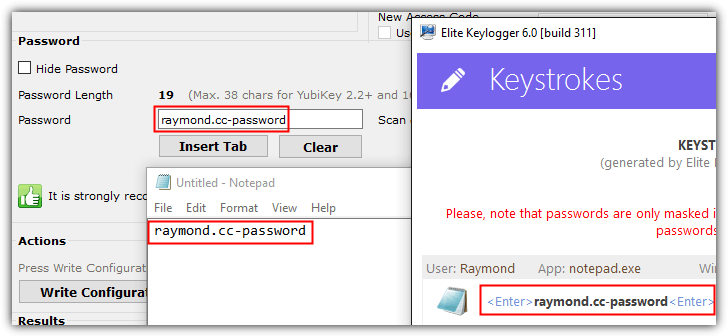
The newer YubiKey supports static password mode which allows you to conveniently insert a single same password by touching the sensor. This static password mode will work on most applications but it is actually very unsafe as the static password can be captured by a keylogger. As you can see from the screenshot below, the top left red box is the static password configured for a YubiKey using the personalization tool. The bottom left red box is the static password inserted by YubiKey after touching the sensor. Finally, the third box on the right shows a keylogger captured the static password that was entered into a Notepad.
While it is definitely safe to use YubiKey’s one time password mode, try to avoid using the static password mode as it only provides convenience but sacrificing security.

Improve this guide

User forum
9 messages