7 Portable Tools to Make a Full Image Backup of USB Drives
Creating a full Windows backup by using the built it Windows Imaging Tool, Acronis TrueImage, EaseUs Todo Backup, or Macrium Reflect is pretty common for experienced computer users. However, it’s recommended for all users to keep backups in case of crashes or hardware failures. If your system is unable to boot, start up the computer with the imaging software’s rescue media and it can restore your system back to the time when you created the image.
Imaging is different from just backing up your files or selected folders because a complete copy is created for the whole hard drive or partition and its structure. The problem with some imaging software is it doesn’t allow creating backup images for external devices such as a USB flash drive, digital camera, or MP3 player. Or perhaps you prefer not to install a complete software package just to back up a small flash drive.
For someone with one or two flash drives, it’s useful to have full backup copies so you can swap between them when required. Here are 7 free and portable tools that you can use to create backup images of USB memory sticks, hard drives, memory cards, and MP3 players, then restore them when you need to.
1. PassMark ImageUSB
ImageUSB is by PassMark software that make tools like Performance Test, BurnInTest, and OSFMount. This little tool is free and portable with a few very handy features such as being able to read and create images from more than one USB flash drive at once and also write a single image back onto more than one flash drive at the same time.
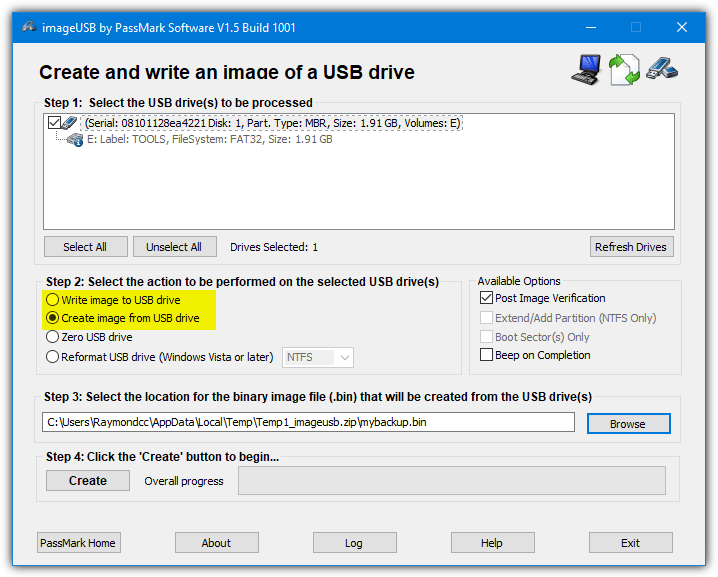
Everything is laid out into numbered steps. Select the USB drive(s) to work on and choose whether to write to the selected drive or create an image from it. Then browse for the backed up file or enter a new name and press the button in step 4 to start the process. You can verify a newly created image or the contents of a written USB drive, uncheck the “Post Image Verification” box if you don’t want to verify.
Backup images are created as uncompressed BIN files. ImageUSB can write those BIN files or ISO image files onto USB. However, writing an ISO file can be troublesome and you might not be able to read the drive contents properly due to the file systems used by ISO images. A log file is created in the same folder for each BIN image which includes MD5/SHA1 checksums for the file and any verification results.
2. Rufus
Rufus is a USB tool we’ve mentioned before that can perform a number of different functions such as creating bootable USB media. A lesser known feature added in 2018 is the ability to save the contents of the selected USB drive as a disk image. In this case, the image is saved in the popular Virtual Hard Disk format (VHD). Rufus has an installer version but most users probably just use the portable executable.
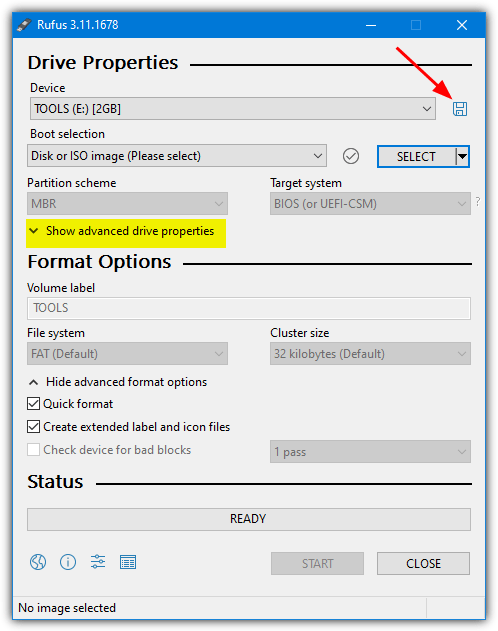
Saving the USB device as a VHD file in Rufus is very easy. All you have to do is make sure the USB media to copy is selected in the Device drop down at the top, click “Show advanced drive properties” and an icon of a floppy disk will appear at the top right. Cick on the icon, give the output file a name, and press Save. The whole of the device will be saved to an uncompressed VHD image.
Writing the VHD file back to USB is just a case of making sure “Disk or ISO image” is the Boot selection type and pressing the SELECT button to browse for the previously saved VHD file. The useful thing about using the VHD format is the files can be mounted natively in Windows as virtual drives. You can easily view and even edit the contents of the backup image before writing it back to USB later on.
3. USB Image Tool
USB Image Tool is a portable program that can create full images of USB memory sticks, MP3 players, and any other storage devices that are mounted as USB drives. The program has a drop down option to let you select between taking an image of the whole USB drive or just the first volume on the device. That’s useful if your device has more than one partition although the boot sector will not get saved in Volume mode.
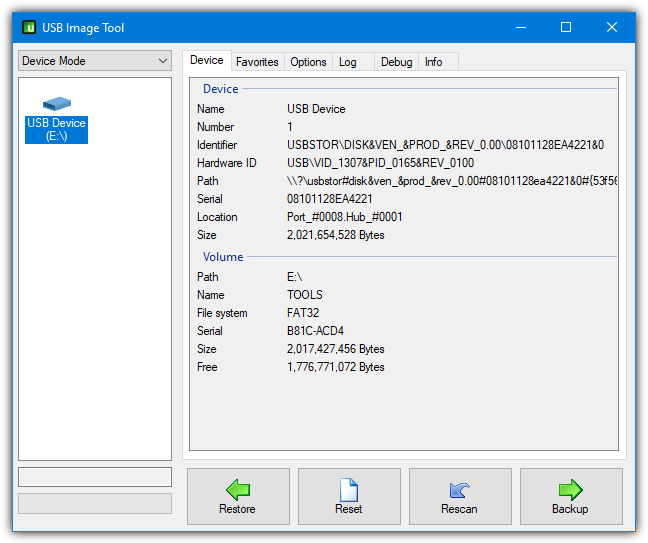
Select the USB drive, click Backup, and choose the file name and save folder. USB Image Tool backs up drives to an uncompressed IMG file by default. To compress an image file, click the “Save as type” dropdown when asked where to save the file. There are options of saving as Zip compressed IMZ or GZip compressed IMG.GZ files. Compression might take a bit longer but could reduce the size of a large image file.
There’s also a Favorites tab where you can keep backup locations stored for quick access. Some options are available such as creating an MD5 checksum with the backup file, showing non-removable devices, verifying the backup, and defining a naming structure for the backup files. The .NET Framework 4.7 is required for non Windows 10 users. A command line usbitcmd.exe is included for advanced usage, such as in scripts.
4. HDD Raw Copy Tool
Although the name might suggest this program is only meant to copy hard drives, it is also specifically designed to handle all types of media devices. USB flash drives, hard drives, and all types of flash based media and cards are supported. HDD Raw Copy Tool makes a complete sector by sector duplicate of the device irrespective of what partitions or operating systems are present.
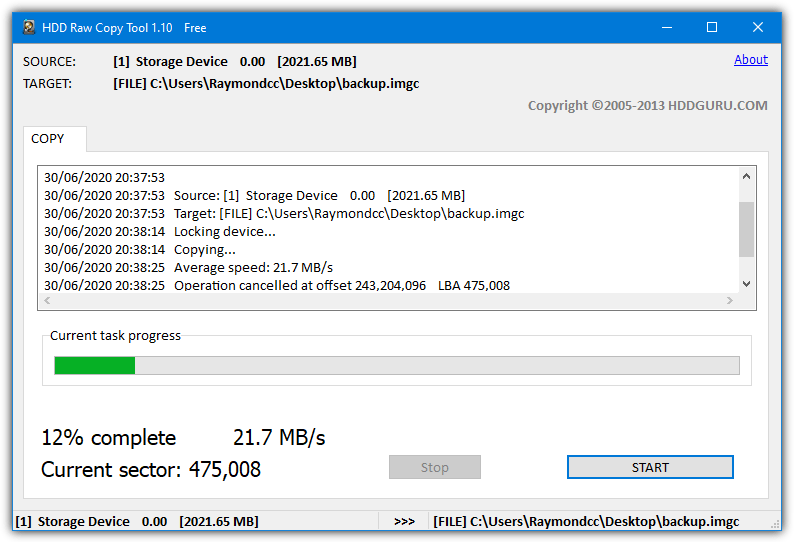
On start, you are shown the Source window where you select the USB drive to copy. The next window is the Target window where you have to double click on the File option in the devices list and choose a save name and location. The default save option is a compressed IMGC file although you can select an uncompressed IMG format from the “Save as type” drop down.
Click Continue and then Start to begin the backup. As the backup file will be compressed, it could be much smaller than uncompressed backup files that will be the size of the whole drive. Restoring a backup is a case of swapping things around and selecting the backup file in the Source window and the USB drive in the target window. An installer version is available but the portable version does the job perfectly fine.
On page two we show you more portable image backup tools and also show how to compress backup files more efficiently.
5. USB Flash Tools
Although USB Flash Tools is from 2009 and its website is long gone, this is a handy little program to have around. Besides being able to back up a USB drive to an image file and restore it, USB Flash Tools can also secure erase the whole drive or free space, and verify a USB drive or memory card to check for a fake capacity.
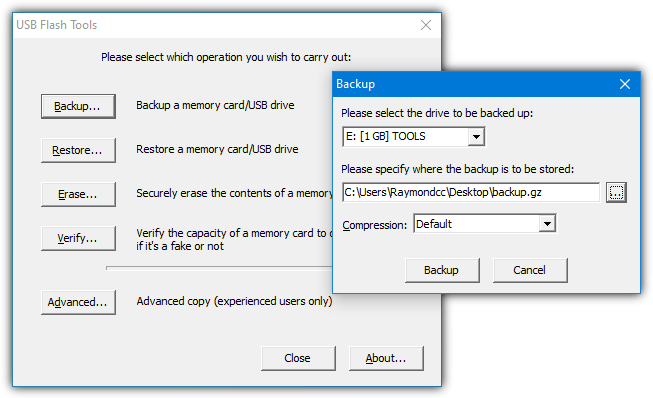
Click the Backup button, choose the device from the drop down, and specify a name for the backup file. You can save as an uncompressed (IMG) or a compressed (GZ) file. A drop down option offers different levels of compression from fastest to max and the compression ratio and time taken will vary. There is also an Advanced copy window with extra functions for start offset, copy length, and buffer size.
Sometimes we encountered a “Can’t open source” error when clicking the Backup button with compression enabled. A solution to this problem is trying to make sure other programs that have access to the drive are closed. Simply closing any open Explorer windows fixed the error for us.
6. RMPrepUSB
If you want a more advanced tool with several other functions besides being able to backup your USB device, then RMPrepUSB could be a useful tool. In addition to creating a full image backup of a drive, it can also install bootloaders and various operating systems onto USB, test a device’s write speeds, wipe a drive and run checks to see if a USB flash drive is the correct capacity and not fake.
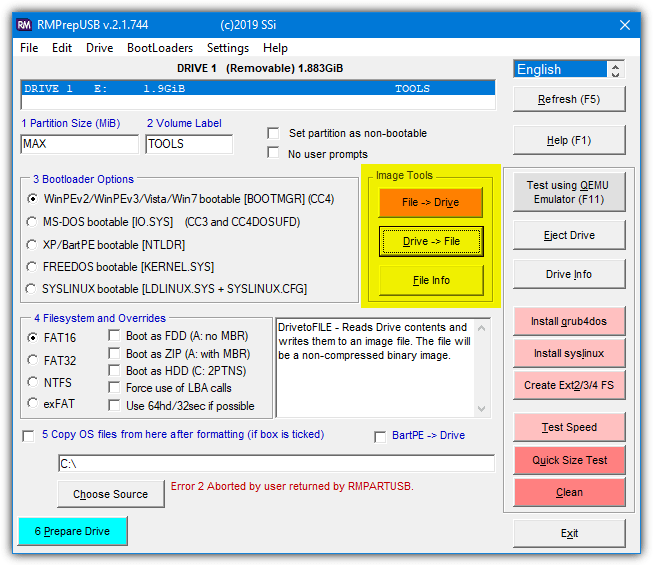
The only options you need are the Image Tools in the middle of the window to create and restore USB image files. “Drive -> File” will make the backup file and there are some advanced options available after selecting the new file’s name. These are choosing the start sector, partition or size amount to skip, and the amount of data, partition or MBR to copy. Press enter each time to accept the defaults of everything being copied.
Writing an image file back to a drive accepts a number of file formats although not all of them will be compatible with writing to USB flash drive or memory card etc. They include standard BIN, IMG and IMZ files, and also Zip and 7-Zip archives. Interestingly, it also supports virtual hard disk files such as VDI and VHD although success writing them to USB will be limited (Rufus VHD images should work though).
7. Roadkil’s DiskImage
DiskImage is a tiny portable executable of around 70KB (a setup installer is available) and it works on anything from Windows 98 to Windows 10. This is a very simple and easy to use tool but be aware that it lists all physical drives and volumes, not just the USB storage devices. DiskImage also starts on the Write Image tab so to read a USB device you need to click on the Store Image tab.
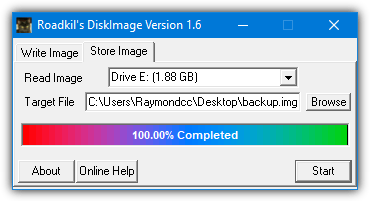
Usage is easy and you simply choose the drive, browse where to put the new file, give it a name, then click Start. The whole device will be backed up uncompressed to the IMG file format and the file can then be viewed or files extracted by tools such as 7-Zip or UltraISO etc. Writing the image file back out is simply a case of selecting the drive to write to and locating the IMG file from the Write Image tab.
8. Win32 Disk Imager
Win32 Disk Imager is a simple, free tool designed to create and restore disk images for USB drives and SD cards. It’s portable, so you don’t need to install it, and it’s a great choice for creating backups or making a bootable USB drive.
The process is straightforward: select the drive, pick the file for the image, and press the “Read” button to create an image or “Write” to restore it. The tool supports IMG files, which are the most common disk image format. This makes it easy to create a backup or restore a device with just a few clicks.
One key limitation is that the program only supports IMG files, so if you need to work with other image formats, you’ll need a different tool. Overall, Win32 Disk Imager is an excellent, no-frills option for creating disk backups of your USB devices.
Reducing the Size of Compressed Backups
When you take a full image backup, it will also copy previously deleted data on the drive. You might only use 20% of a 16GB drive but the drive has previously been 90% full. When that happens, there is 90% of data to compress and not just 20%. This is a reason why a compressed backup might be close in size to an uncompressed backup (it also depends on how compressible the data is).
A way to potentially compress the backup a lot more is to wipe the free space on the drive so only the data currently in use will need to be compressed. A program called SDelete can do that with the help of our own small frontend tool. SDelete is a command line only tool so the frontend makes it easier to use.
1. Download SDelete from Sysinternals and extract the Zip file. Also download our Raymonodcc Free Space Wiper Frontend and place both in the same folder.
2. Launch the frontend tool, choose the USB device from the drop down list, select the “Zero free space” option, then press the run button.
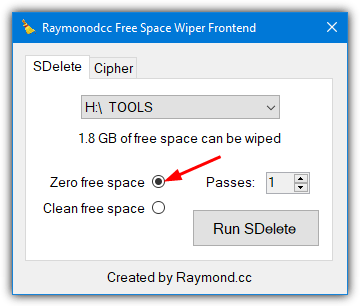
SDelete will zero the free space on the drive while leaving current data intact. As zeros compress to virtually nothing, you can back up with compression or without compression and use an archiver later on. The end product should be a smaller and better compressed file. Wiping free space with random data won’t help compress the image so you must use zeros or another consistent character such as ones.
You can also use USB Flash Tools above (program #5) for this with its Erase > “Overwrite free space” option. Make sure to use zeros or ones as the overwrite method.
Note: Although doing this every now and then isn’t a problem, constantly zeroing the device’s free space could help decrease its lifespan and is not recommended. It’s not a problem for mechanical USB hard drives but applies to flash memory based devices like USB sticks, SD cards, externals SSDs, MP3 players, mobile phones, and etc.
use ImageUSB by passmark to backup my ipod classic, is there anything similar that would do incremental backups thanks
My issue with all/most of these tools is that you have to have the same size or larger flash drive when you recreate the drive.
I’m going to look into the Easeus ToDo again.
Yes, their main purpose is to backup and restore onto the same drive, not different drives.
Hiya all just FYI – found a way using UltraISO to create a backup image of a USB, extract only the boot sector data, then you just need the file system contents + boot sector data to re-create to other USB. The boot sector data is much smaller than the backup image itself, but I found the image creation was required before I could target then extract the boot sector data, as I couldn’t grab it from live USB. Hope this helps, I thought for sure I’d see UltraISO on this list when I saw the title, been using that for a while!
You can actually extract the boot sector data from live USB:
1. You may need to run the program as Administrator
2. Choose Bootable> Extract boot sector from Floppy/HDD drive… (yes, it doesn’t mention USB but you can still choose it)
3. UltraISO will then extract and save the data in a strange extension .bsf file, but it’s actually a .bin file, just rename the file extension and you can use it normally.
try image Usb by passmark
Minitool Partition Wizard Free can resize the partition to fit the USB drive. I used it yesterday with good result.
I also tried Rufus, and I didn’t get an error right away, but when the smaller drive was full, I got a misleading message about it being in use.
Hi, Thanks for this wonderful article. Rufus does it very well for me.
@Maxime: are you using backup or clone? Because clone asks for a drive as target (which I am not interested to), not creating an image, so I guess backup. As backup I see Disk or Partition backup seem to answer the question, but both ask to buy a license. AOMEI Backupper Standard, labelled as Free, but is it really free?
I’ve just installed AOMEI Backupper Standard and it doesn’t ask to buy a license for a disk or partition backup. It’s possible you may be trying to use a Pro feature somewhere while using the backup option. Not 100% sure of that, just a guess.
PassMark ImageUSB make ISO , why do you say it can be done it has only save as .bin NOT iso
Read the article again, it says you can create a bin file from usb or write a bin/iso onto USB. Where does it say you can create iso files?
You can delete .bin and write .iso manually. It will work.
I can delete any file extension and write in another file extension. Does that change the actual file?
Nope.
because it saves and restores a BIN file
These tools are indeed very interesting. My specific need is to copy the folders and files on a USB flash memory stick, where one folder is specifically for “shortcuts”, i.e. hyperlinks to various folders, which works as a kind of table of contents. Everything else that I need to back up works using copy and paste, but not the hyperlinks, which link to the old drive and not the new drive. Is there a solution to this, other than imaging? I mean is there a solution that does not tie up so much empty disk space? If not, then I will work with the limitations of imaging.
I did not like any of these flash drive imaging utilities as they only save the complete flash drive image which I do not like as they all create a very large full drive image regardless how small data you have on your flash drive.
Let me explain, if I have a large 256 GB flash drive and I only have a 10 GB data on this drive, all of the above mentioned programs will save the full and complete 256 GB image instead of just the 10 GB data, a complete waste of unnecessary space as they create a very large backup image file.
Unfortunately the popular Macrium Reflect imaging program does not recognize flash drives so this program will not work.
Luckily, the latest Acronis True Image 2018 build 12510 will successfully backup only the 10 GB data image and this backup image file will be much smaller than taking the full (unnecessary) 256 GB flash drive like all the above listed programs do.
Acronis TI is not free but it is the only one I found to do exactly what I want and need.
If you do know of another program that will do exactly what Acronis TI can do and is FREE then please share it here with us all.
Thank you
Easeus ToDo Backup Free is free and can do the same: an image of the only data-filled part of the drive
Failed to backup linux SD card, not even when doing sector by secotr copy, still fails ( all other programs handle that). Lots of popups asking to buy all the time… feel like scam program.
Stay away I say.
Experienced users will also achieve a MUCH smaller image by first deleting large or excess files: (ALL of these will be regenerated upon next BOOT)
Pagefile.sys
c:\windows\prefetch
c:\windows\temp
Other TEMP folders
Other TEMPORARY folders
Useless .BAK; .TMP; .OLD files
OFFLINE WEB PAGES
SOFTWAREDISTRIBUTION
INSTALLER
OFFLINE WEB PAGES
SOFTWAREDISTRIBUTION
I know your comment is now 2 years old, but I hope my suggestion will be helpful to those finding this article –
Today (June 2020), AOMEI Backupper just does that on Windows, for free.
I succeeded in backuping a 32 GB flash disk into a 586 MB image, and another 32 GB flash disk to a 6.55 GB image.
The first flash disk was a Dell Restore & Recovery USB media, made with Dell Direct Key Creator (used to restore Dell machines to their factory state).
The second one was a standard Windows 10 Installation disk, made with Windows 10 Media Creation Tool.
Each time, I made the backup image, formatted the drive, and restored the image back to the same drive. Everything was OK, and all restored disks were both bootable and working.
I did not test any other schemas, such as restoring on a smaller or different drive.
The free (Standard) version of AOMEI Backupper is said to be slower than the paid version, but my 32 GB stick (USB 2.0) was backuped quite quickly, as well as my USB 3.0 32 GB stick (Patriot Memory Supersonic). The Patriot (containing the Windows 10 image) was backuped in 1 minute, and restored in two minutes.
On Linux, you could use the classic dd command with the conv=sparse option.
Flash drives have gotten so large and cheap that it is common to have a little 500 MB bootable image on a 32 GB flash drive. Since these tools make uncompressed image files, imaging such a flash drive can waste a LOT of space. So the obvious solution is to compress the image files.
What tool(s) would you recommend for that? Which tools happily work with such enormous files, and which are fast enough to not be overly painful to use?
One other thought: to make an image file which is maximally compressible, you should first zero-out the free-space on your flash drive, before making the image file. The easiest way to do that is with Mark Russinovich’s SDelete tool.
For example, if your flash drive is F: then do this from an administrator-level command prompt:
sdelete64 -z f:
You can download SDelete (which includes both 32-bit and 64-bit versions) here:
docs.microsoft.com/en-us/sysinternals/downloads/sdelete
Great tip, thanks!
I’ve been looking for a way to make smaller images. I also suspect that the longer way(without the zeroing part) causes much more wear and tear on the flash drive’s memory.
Dave,
Thanks for the info.
I know this is old but hopefully you are still tracking it. It is not working for me. I am probably missing something. I ran sdelete prior to PassMark ImageUSB as indicated, but still got an image file as big as the flash drive total size. This is the process I am using. Could you please help?
1- run sdelete on the flash drive
2- create image with PassMark ImageUSB
thanks,
sdelete is to make the compressed file smaller, you have to compress the image file with for example 7zip or WinRAR, the resulting file will be smaller than the file without running sdelete first because those clusters might be different from zero ( when you delete data you only delete the MBR entry but the data still remains so it’s possible to recover as long as you don’t add more data that can overwite it ).
Hi All, Thanks RAY for another wonderful article, System Image of USB drives was beyond my thinking ! I tried the robust option : USB Image Tool ( RMPrepUSB for future ) but it takes considerable time to image even a 8gb pendrive on a quite speedy system ! I would like to ask what will be the Best + Fast + Versatile way to image a single vs multiple partitioned USB drive ? In the meantime i would like to explore the installed Macrium Reflect Free for the purpose ! Thanks & Regards.
As always, we are accustomed to your good articles. Thank you.
Thank u very much. But as u said the image files are as big as the flash drives no matter how much data they contain. Is there any app that will create image files sizing according to the size of the contents in the flash drive?
Which one (if any) can copy a GPT partitionned USB key ?
I failed with ImageUSB.
I would think options 3 or 4 can do that as they copy the whole drive starting from sector 0.
Really useful as usual,
many thanks
marvelous ray!
Another great tool. Thanks!
Thanks Raymond.