How To Install Visual Basic 6 (VB6) in Windows 10
Visual Basic 6 (VB6), released in 1998, still stands tall as popular tool for legacy applications despite its age.
In this guide, we explain how to install vb6 on Windows 10 (64-bit) by bypassing outdated Java requirements and resolving common installation issues.
When installing VB6 on modern 64-bit systems, you may face errors that prevent the setup from continuing. The following steps provide explicit, actionable instructions to help you overcome these hurdles and complete the installation successfully.
Bypass Update Microsoft Virtual Machine for Java Requirement
The VB6 setup insists on installing the outdated Microsoft Virtual Machine for Java. To continue, you must bypass this check.
Below are two methods that trick the installer into either “seeing” Java already installed or skipping the Java installation entirely.
Trick VB6 Setup into Thinking Microsoft Virtual Machine for Java Is Installed
The installer checks for the existence of msjava.dll in C:\Windows\SysWOW64 (64-bit) or C:\Windows\System32 (32-bit). Placing this file in the proper folder will allow the setup to continue without prompting for Java.
a) For the quickest solution, download MSJava.dll and copy it to the correct folder. For 64-bit systems, use C:\Windows\SysWOW64; if that folder isn’t available, use C:\Windows\System32.
b) Alternatively, if you have the installation disc, extract msjava.dll using an archiver such as 7-Zip. Open the archive in the IE4 folder by right-clicking MSJAVX86.exe and selecting “Open archive,” then extract the DLL (copying it first to the Desktop helps avoid access errors) before placing it in the correct system folder.
After copying msjava.dll, launch setup.exe to bypass the Java update prompt and continue installing VB6.
Tell VB6 Setup Not to Install Microsoft Virtual Machine for Java
If the VB6 setup files are stored on your hard drive, you can modify the configuration to skip the Java installation requirement. This method lets you bypass the check altogether.
a) Download the appropriate SETUPWIZ.INI file:
Place the file in the main installation folder to overwrite the existing one and prevent the Java prompt.
b) To edit manually, open SETUPWIZ.INI in Notepad, find the line VmPath=ie4\msjavx86.exe, and delete it (or remove everything after the “=”).
Save the file and restart the installation process.
Change VB6 Setup Options to Prevent Hanging or Failing
Even after bypassing the Java requirement, the installation may still hang or display error messages. Issues such as the “Setup is updating your system” stall, DCOM user account errors, and javasign.dll registration failures are common. The following methods disable problematic components to ensure a smooth setup.
Disable the Setup Components Automatically
This is the simplest method. A modified STF file in the Setup folder already has the problematic components disabled by default.
1. Download the correct file for your version. Right-click the grey Download button and choose “Save link as”:
VS98ENT.STF (Enterprise)
VS98PRO.STF (Professional)
2. Copy all VB6 installation files from the CD to a folder on your hard drive—this is necessary to replace files on disk.
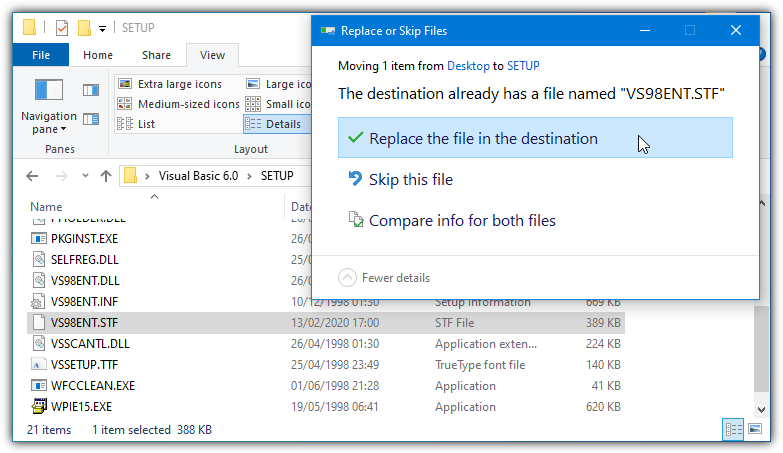
3. In the SETUP folder, replace the original STF file with the downloaded file.
4. Run the installer. The modified STF file pre-selects options to disable components like Microsoft Visual InterDev 6.0, ADO and RDS, and Visual Studio Analyzer, preventing setup errors.
Disable the VB6 Setup Components Manually
If installing from CD or if the automatic method isn’t viable, use the Custom install option to disable problematic components manually.
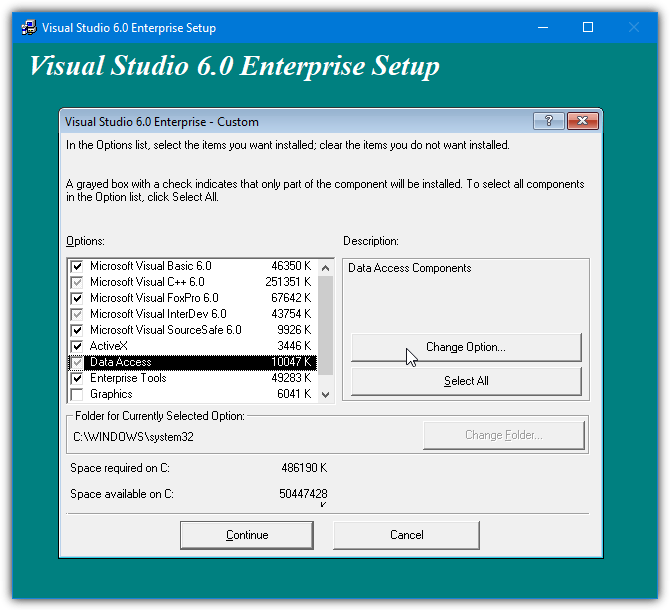
1. Select the Custom install option during setup.
2. When prompted for component selection, highlight Data Access and click “Change Option…” twice to open the subcomponent list.
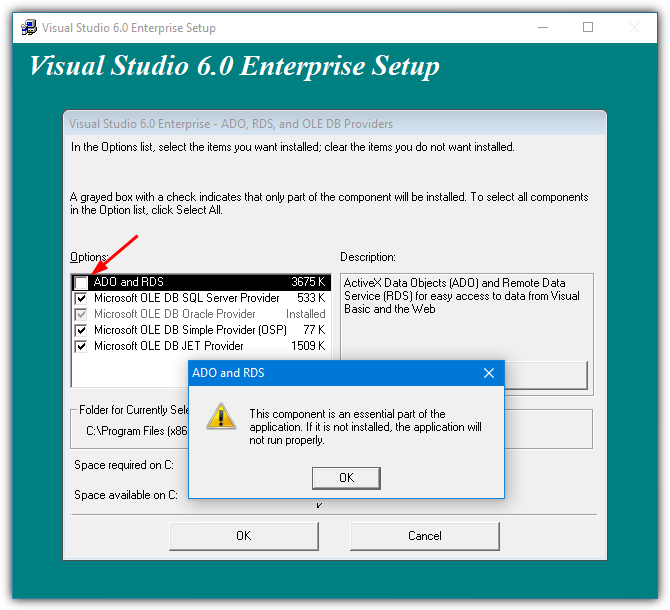
3. Uncheck the first ADO and RDS option. If a warning appears about essential components, click OK to proceed.
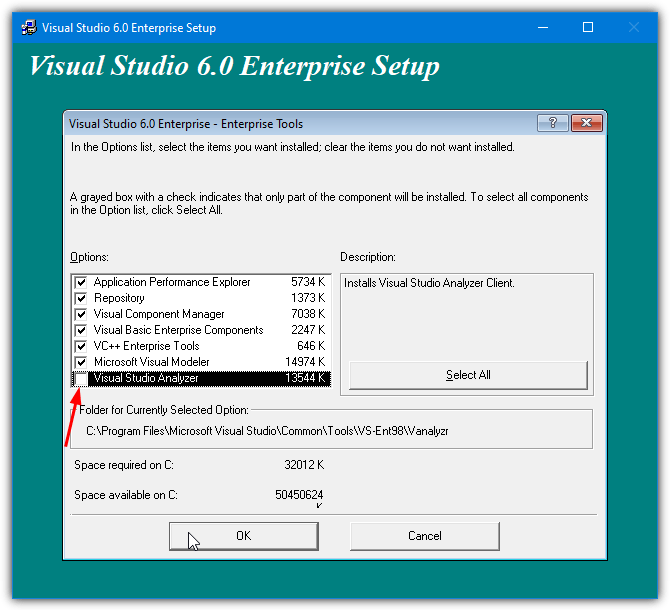
4. Highlight Enterprise Tools, click “Change Option…”, and uncheck Visual Studio Analyzer (skip if you’re using the Professional version).
5. Finally, uncheck the Microsoft Visual InterDev 6.0 option in the main install window to avoid the javasign.dll error. Continue the installation; after a reboot, VB6 should be ready to use.
Run Visual Basic in Compatibility Mode
If VB6 displays errors on the New Project screen after installation, run it in compatibility mode. Navigate to C:\Program Files (x86)\Microsoft Visual Studio\VB98, right-click VB6.exe, and select Properties. In the Compatibility tab, enable compatibility mode (the default Windows XP SP2 setting is recommended, though you may try others).
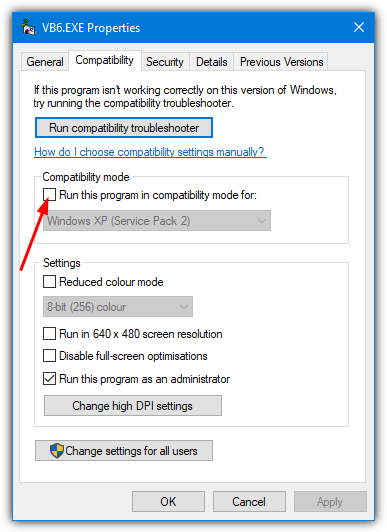
Adjust the settings as needed and click OK. This step can resolve issues related to legacy software compatibility on modern Windows systems.
Following these detailed steps, you now know how to install vb6 on Windows 10 with ease.
By bypassing outdated Java requirements and disabling problematic components, you can ensure a smooth, error-free installation. If issues persist, refer back to this guide for additional troubleshooting tips.

Improve this guide

User forum
182 messages