7 Ways to Unassociate a File Type: Quick Guide

5. Remove a File Extension Association From Command Prompt
If you don’t want to use a third party tool, another solution is to remove the file association using Windows Command Prompt. Windows 7, 8, and 10 have a built-in command line utility called Assoc which can change file associations from scripts and other programs. Here’s how to delete a file type association.
a) Run an administrator Command Prompt by typing cmd into Start and pressing Ctrl+Shift+Enter.
b) Firstly, check the file extension’s current association by adding the extension to the command. Running Assoc without any arguments will show the current associations for all extensions.
Assoc .extension
c) When you’re sure you have the right extension, type the following to remove the file association:
assoc .extension=
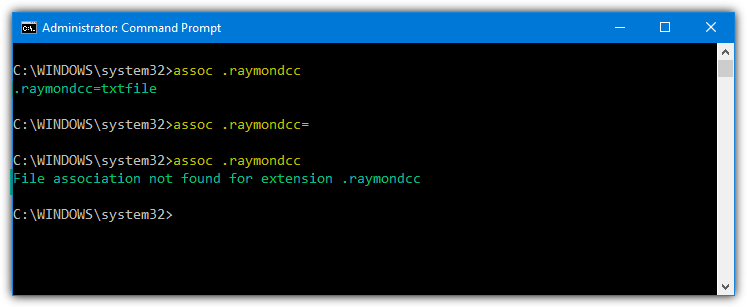
The command effectively sets the association to nothing which deletes it. There is no success message so type the first Assoc command again. It should say file association not found instead of what was displayed before.
Note that if the file extension association has been placed in the current user profile as well as the system file types profile, the file can still get opened on double click. In that case, another method needs to be used. The same is also true if the file extension has additionally been placed in the Explorer FileExts list.
6. Using a Fake File Type Association
This solution might sound a little odd but it does actually work. What you do is associate the file extension with a program that is subsequently removed from the system. The result is the file extension has no valid association because the program that is supposed to open it is no longer available.
a) Find any executable file on your system and make a copy of it. Optionally rename the file to something unique but do not change its extension from .exe. The file can be any executable such as a program installer, portable utility, or a copied system file like Regedit.exe.
b) Right click on a file with the extension you want to unassociate and click Open with > Choose another app. Click More apps, make sure “Always use this app to open xxx files” is checked, scroll to the bottom of the list, and select Look for another app on this PC. From there, browse for the executable.
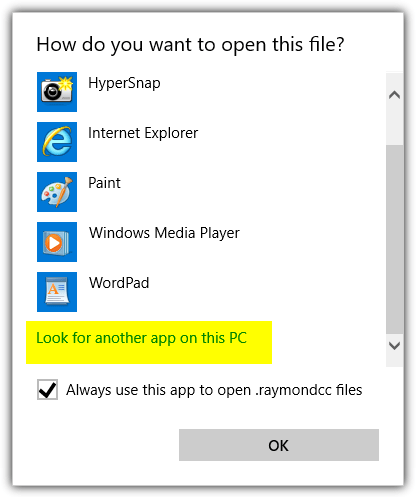
Windows 7 users: Click Open with or if there is a sub menu, click on Choose default program. Press the Browse button and locate the file created in the previous step. The program will appear in the Open with window. Make sure always use the selected program is checked and Click OK to close the window.
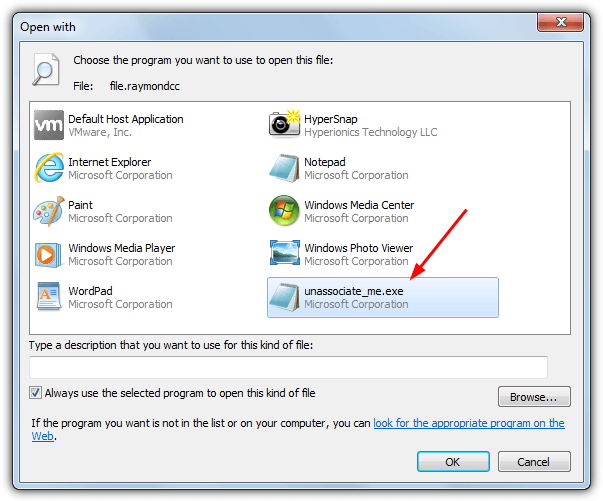
c) Now delete or rename the temporary executable file and it will break the file association. Double clicking on a file with the extension will pop up the Open with window instead of an associated program.
7. Unassociate A File Type From The Registry
What the options above have in common is they all unassociate the file type from the extension using a similar method, which is through the Windows registry. Adding, removing, or changing what happens when a file with a specific extension is double clicked is handled from the registry. If for some reason the above solutions don’t work then going to the source of the problem might be your last resort.
a) Open the Registry Editor by typing Regedit into the Run dialog (Win+R) or Start menu search. Navigate to the following registry key.
HKEY_CLASSES_ROOT\.extension
Substitute .extension for the file extension name you wish to remove, such as .useless or .file etc.
b) Click on the extension key and double-click the (Default) value name in the right pane. Delete the contents of Value data and press OK. This essentially does the same thing as the Assoc command and doesn’t remove the extension but tells Windows not to associate it with anything.
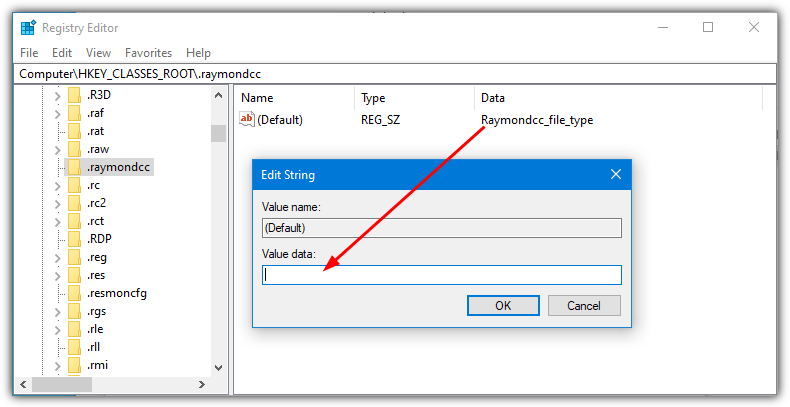
If you want to delete the extension instead, highlight it in the tree and press Del. An important step is pressing F5 to reload the list and check if the extension has come back. If it has, press Del again. This happens because file extension data can load from two different registry locations, so when one is deleted the other will appear if it’s in use.
See if the association has been removed by double-clicking on a file with the extension. If the file is still being opened it may also be in the current user profile.
c) In Regedit browse to:
HKEY_CURRENT_USER\Software\Microsoft\Windows\CurrentVersion\Explorer\FileExts\.extension
d) Right click on the extension and delete it, then close the Registry Editor.
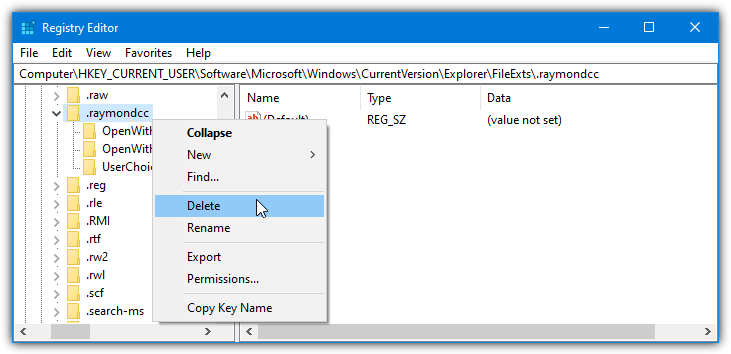
The association should now be completely removed from the system. If it’s not present already, this entry is created when you manually select a way to open the file extension, such as on double click or the Open with context menu.


User forum
9 messages