How to Uninstall & Reinstall DirectX on Windows: Quick Guide

XINSTALL BY CLICKING THE DOWNLOAD FILE
To fix various PC problems, we recommend Restoro PC Repair Tool: This software will repair common computer errors, protect you from file loss, malware, hardware failure and optimize your PC for maximum performance. Fix PC issues and remove viruses now in 3 easy steps:
  1. Download Restoro PC Repair Tool that comes with Patented Technologies (patent available here).
  2. Click Start Scan to find Windows issues that could be causing PC problems.
  3. Click Repair All to fix issues affecting your computer's security and performance
  • Restoro has been downloaded by 0 readers this month.

If you asked a knowledgeable computer user how to uninstall Internet Explorer completely in Windows, they would likely advise you not to do that because IE is part of Windows and some features require the IE files be present or there would be crashes and other weird problems. The same principle applies to to DirectX. Simply put, DirectX is a Windows technology that enables higher performance in graphics and sound when you’re playing games or watching video on your PC. Even if you CAN uninstall DirectX completely, it’s almost guaranteed you that you will face problems on your computer by doing so.

For example, if you uninstalled DirectX and tried to launch Windows Live Messenger, there will be an error popup “This application has filed to start because DSOUND.dll was not found. Re-installing the application may fix this problem”. That’s because the dsound.dll is a part of DirectX which adds functionality for Direct Sound and Messenger requires it. Logging in to Outlook.com will make the screen and advertisements keep on flashing. As for computer games, anything that relies on DirectX wouldn’t run, which is most games available today.

program can't start dsound.dll is missing

So, if you have problems when trying to play a game or watch a video and know that it has something to do with DirectX, the first thing we would suggest is to download the latest version of DirectX and perform a re-installation. This will replace any missing files. However, if re-installation fails or doesn’t fix the problem, your last resort would be to uninstall DirectX and then try installing again. Here’s a few different ways on how to try and uninstall DirectX.


Note: After completely removing it from your computer, you won’t be able to re-install DirectX, so this isn’t the ideal way to go about it. If you try running the dxwebsetup.exe, you’d get the error “An internal system error occurred. Please refer to DXError.log and DirectX.log in your Windows folder to determine the problem.” Weirdly, both log files cannot be found in the Windows directory. What you need to do is to rollback to the original DirectX from the Windows setup disc first, then install and update DirectX to the latest version. There are a few tools and scripts around which are able to help you uninstall DirectX or rollback to the original DirectX from Windows installation CD.

1. Iobit Uninstaller

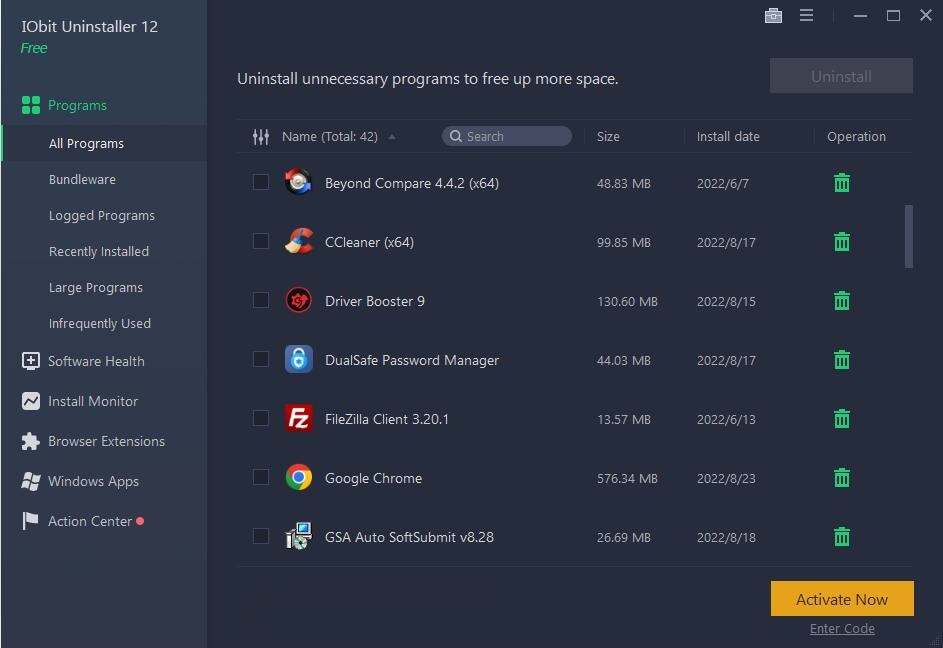
This Windows uninstall tool makes it easy for the user to eliminate a faulty DirectX on their device. This software provides additional security when removing unwanted programs, Windows applications, and malicious extensions. To get started, follow the following steps.

1. Download, install, and launch the software.

IObit Uninstaller dashboard
IObit Dashboard

2. Next, activate the Iobit Uninstaller by using a license code. Once you’ve entered the license code, click Register Now to activate it.

3. Next, visit the computer’s control panel and select Settings > Programs and Features > Powerful uninstall to launch the program.

IObit Uninstaller uninstall page
IObit Uninstaller

4. To delete the DriverX, right-click on the program and select Powerful Uninstall to begin the removal process. Drag the program over the Iobit Uninstaller and the app will automatically begin work.

Download Iobit Uninstaller


2. A Simple Registry Hack

The first trick to try and get DirectX to re-install involves a small change in the registry. This does the simple job of fooling Windows into thinking it has an older version of DirectX currently installed and therefore will allow the latest version to be installed again over the top. This is the easiest fix to try and doesn’t need the use of third party software. Follow these simple steps:

1. Run Regedit by pressing Win key+R to get the Run Box and type Regedit, then press enter.

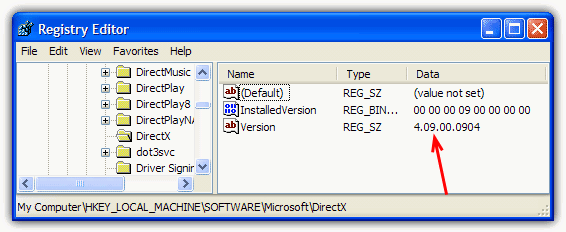
2. Locate the following registry key:

HKEY_LOCAL_MACHINE\SOFTWARE\Microsoft\DirectX

You should then see a value called “Version” with a data value of 4.09.00.0904

uninstall directx registry

3. Simply double click on Version and change the number from 4.09.00.0904 to 4.08.00.0904. Then close the registry editor.

If you’re not someone who likes to poke around in the registry, simply download one of the .reg files from below, and double click to import one of the above numbers into the registry for you.

Set Version to 4.08.00.0904Set Version back to 4.09.00.0904

Now download and run the DirectX installer, and it should re-install. This could also work in Windows Vista and 7 because the 4.09.00.0904 version number is the same. We haven’t fully tested it though on these operating systems, so do it with care and at your own risk.


3. DirectX 9 Uninstaller

DirectX 9 Uninstaller

This uninstaller uses your original XP CD and restores the original DirectX 8 files from it. DirectX 9 uninstaller extracts the DirectX 8 files from the Driver.cab in the i386 folder on the CD into a folder on your hard drive called C:\DXTEMP. Extract the DirectX 9 Uninstaller files and then execute the UnDx9.bat file. That will start the process to uninstall and replace the DirectX 9 files. The UnDx9 Uninstaller batch file MUST BE USED IN SAFE MODE because DirectX files will be locked in normal mode. The tool can only uninstall DirectX 9 from Windows XP and 2000.

Download DirectX 9 Uninstaller

We have three more methods to uninstall or rollback DirectX on page 2.

4. DirectX Eradicator

DirectX Eradicator is designed to safely remove the DirectX runtime core component from Windows. It supports the full uninstall of DirectX from version 2.0 up to to version 9.0c, complete removal of all DirectX files and folders, full registry cleanup and CD rollback option. There is no interface for this utility, just a confirmation dialog.

DirectX Eradicator

Extract the DirectX Eradicator archive, run dxerad.exe, click Yes when asked and reboot. Upon reboot, you will notice a new icon named “DirectX Rollback Wizard” on the desktop. To rollback to the original DirectX, launch the shortcut, click Yes and enter your Windows installation disc.

A couple of things worth noting; the tool disables Windows File Protection by default so don’t use the program if you’re not comfortable with it doing this. You must be logged on as an Administrator or at least a member of the Administrators group for the program to run properly, and also the service “Cryptographic Services” must be running. It’s enabled by default in Windows but is worth checking just in case.

This tool works with Windows 98/ME/2000/XP/2003. Vista and 7 are NOT supported.

Download DirectX Eradicator 2.0


5. DirectX Buster

DirectX Buster

DirectX Buster uninstalls DirectX from version 5 up to version 9.x without any problems. The author says the tool may also work on later DirectX versions such as DirectX 10 but we wouldn’t recommend trying it, just in case. It told us during install that our version of XP wasn’t compatible so it really doesn’t give Windows Vista or 7 users much of a hope! DirectX Buster is only supposed to be fully compatible with Windows 9X, ME and 2000 so its use is very limited. This tool is perhaps the last thing to try before a Windows reinstall.

Download DirectX Buster


6. DirectX Happy Uninstall

DirectX Happy Uninstall

DirectX Happy Uninstall (DHU) certainly looks to be the most powerful tool for managing DirectX. Using the program, you have the options to backup, restore, perform a rollback using a Windows disc, and a full install function. DHU definitely has most of the bases covered when it comes to DirectX management, but the major drawback is DirectX Happy Uninstall is shareware and costs $19.95. You really have to weigh up whether you think it’s worth 20 dollars for a tool you may only ever use once in your life, and it might, or might not fix the problem you’re currently having.

DirectX Happy Uninstall does have something in its favor over the other tools here in that it has full O/S support for Windows 2000/XP/2003/Vista/2008 and Windows 7 including x86 and x64 editions. All DirectX versions are supported including the latest DirectX 11.

Download DirectX Happy Uninstall

36 Comments - Write a Comment

  1. BJ 7 years ago
  2. turahn hayden 7 years ago
  3. Aditya Sainy 8 years ago
  4. fan 8 years ago
    • Otakar 8 years ago
  5. Ben 8 years ago
  6. Patton Dickinson 8 years ago
  7. Mau 9 years ago
  8. mohamed asjath 9 years ago
  9. Windows10User 9 years ago
  10. Odigwe Victor. 9 years ago
  11. gare 10 years ago
  12. Johnny 10 years ago
  13. frane 10 years ago
  14. Rangana Lakmal 10 years ago
  15. weuter 10 years ago
  16. Tawheed Wani TD 10 years ago
  17. hicham 11 years ago
  18. ahmed 11 years ago
  19. rheist 11 years ago
  20. wow 11 years ago
  21. jenmar 11 years ago
  22. Andre 11 years ago
  23. Jeffrey 12 years ago
  24. Sal Demirci 12 years ago
  25. Alex 13 years ago
  26. joel 14 years ago
  27. dernailer 14 years ago
  28. Ernie John 16 years ago
  29. turkish man 16 years ago
  30. tracyjo 16 years ago
  31. pm 16 years ago
  32. Kautsar 16 years ago
  33. sunkumar kothari 16 years ago
  34. MR. Young 16 years ago
  35. chunky 16 years ago

Leave a Reply

Your email address will not be published. Required fields are marked *

Note: Your comment is subject to approval. Read our Terms of Use. If you are seeking additional information on this article, please contact us directly.