How To Test and Boot an ISO Image Without Burning to CD or DVD
If you’re even a little tech minded, you would most probably know what an ISO image is by now. A lot of ISO images can be downloaded legally from the internet such as a Windows 7 install DVD, Live Boot CD’s and Antivirus rescue discs which all come in ISO form and you’ll usually have to burn them to CD, or use a utility to write the images to USB stick to test them out.
Sometimes I would like to test an ISO image first before burning it to a CD. Recently I’ve been trying to merge a few ISO images into one to create a multi-boot CD. With the ability to test the ISO image first, I don’t need to waste CD-Rs. Even if I can use CD-RW, it is still inconvenient because I don’t need to waste my time in burning the disc and booting up my computer with the CD-RW.
There are a few ways to actually mount an ISO in Windows to be able to read the contents of it. A portable tool which is able to mount and run the ISO virtually allowing you to test it quickly is MobaLiveCD. While MobaLiveCD is great for quickness and ease of use (because it can also be attached to your ‘Send to‘ menu), it uses Qemu as the virtual emulator and booting into larger ISO images can be incredibly slow.
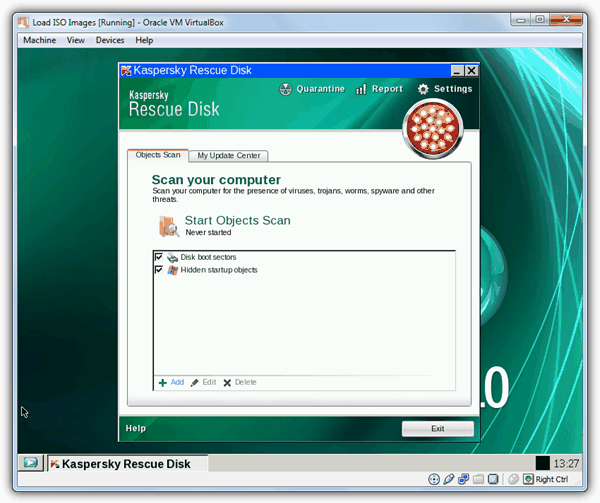
The image above shows Kaspersky Rescue CD booted up in a virtual machine without burning to CD. While something like MobaLiveCD is good at testing small images, for testing something larger, I think other virtualization software like Virtual PC, Windows 7’s XP Mode or VirtualBox are much better suited all round.
How to test ISO Image without burning to a disc
Here’s how I test an ISO image without burning to a disc using Oracle VirtualBox. Of course, you can use any of the other virtual machine software to get a similar result.
I also have Virtual PC 2007 installed, and it too does a good job of mounting ISO images for testing, but for this article VirtualBox is used because it’s freely available to run on all Windows systems.
Simply follow the steps to load an ISO image into VirtualBox:
- Download and install VirtualBox.
- Run VirtualBox from Start -> Programs -> Oracle VM VirtualBox -> VirtualBox.
- Click the New button and a new virtual machine wizard window will appear. Click Next.
- Enter any Name and select an O/S Type. It doesn’t matter what you enter in here because it’s only for your own reference. (For example, I use the name “Load ISO Images” and OS Type as Other/Unknown)
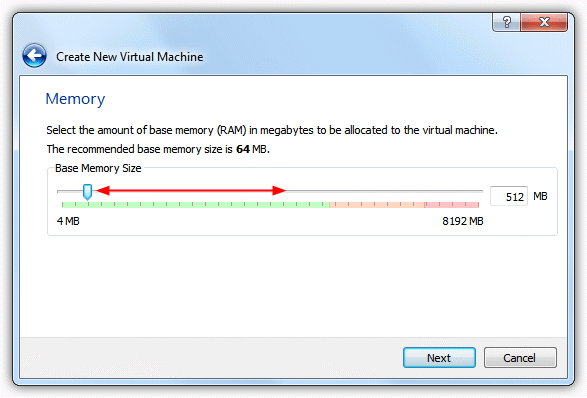
- Select the amount of base memory (RAM) to be allocated to the virtual machine. The default is 64MB but I Recommend at the very least 256MB because a lot of bootable O/S images load parts of the system into memory to speed things up when running from CD. 512MB – 1GB is enough for most boot discs.
- At the next screen, you’ll need to create a virtual hard disk. Click the New button, then click Next. It’s not actually essential to create a virtual hard disk for a bootable ISO to function, but some will complain about the lack of a partition or system drive if one isn’t present. If you want to try without a virtual hard disk, untick Startup Disk and skip to step 9.
- When asked to select a virtual disk type, any of them will do, although a Virtual Hard Disk (VHD) is readable natively in Windows 7 and also Virtual PC/XP Mode. Click Next.
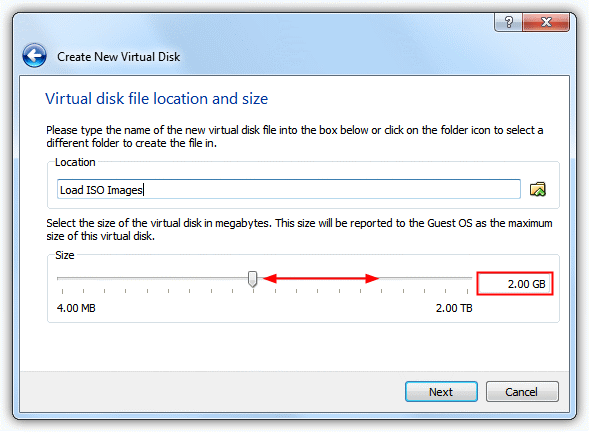
- A dynamically expanding image initially occupies a very small amount of space on your physical hard disk. It will grow dynamically as the Guest O/S claims disk space. As for fixed-size image, it is fixed to what you specify in the window and does not change. Click Next again at the next screen which asks you to set the virtual disk location and size. The default size is 2GB but can be reduced if space is a concern. Click Next.
- The last screen will give a brief summary of your settings. When ready click Create.
- Now you’ll see the new virtual machine that you’ve just created on the list. Select the virtual machine and click the Settings button.
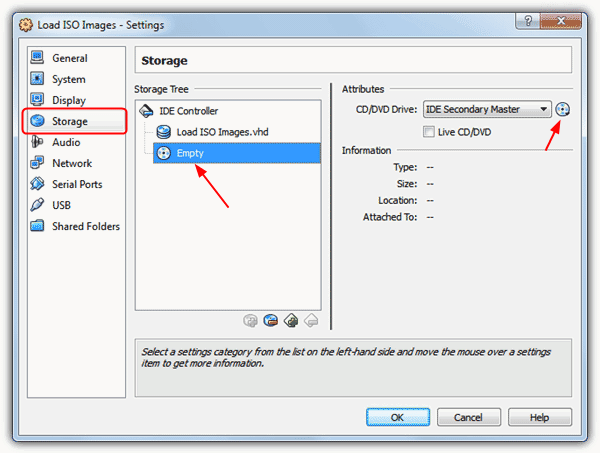
- On the left pane of the settings window, click Storage, in the storage tree click Empty which represents an empty ROM drive. Then use the button far right to browse for an ISO image or choose from the recent list. The details about the image will show in the information area. The Live CD/DVD tickbox will keep an ISO loaded even if it is ejected by the guest system. Press OK.
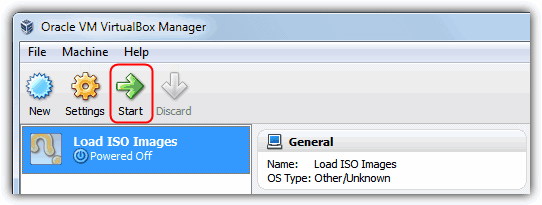
- Finally, click Start button to boot the virtual machine with the ISO image file.
Please don’t be frightened by the long 12 steps.
It is actually very simple once you’ve go through all the steps once and get to know the procedure.
The power of the virtual machine can also be increased by changing some of the settings such as the number of usable processor cores, graphics memory, enabling/disabling network or sound and hardware virtualization etc.
Troubleshooting Tips
- ISO Doesn’t Boot:
- Verify that the ISO file isn’t corrupt by testing it on another virtual machine or checking its checksum.
- Ensure the boot order in VirtualBox is set to prioritize the optical drive.
- Performance Issues:
- Increase the allocated RAM or processor cores if the ISO boots slowly.
- Enable hardware virtualization in your computer’s BIOS if available.
- Virtual Hard Disk Warnings:
- If you encounter errors regarding the lack of a system drive, try creating a minimal virtual hard disk even if you plan to boot solely from the ISO.
- General Configuration:
- If the virtual machine is unresponsive, check VirtualBox’s settings for compatibility issues with your host system, and update VirtualBox to the latest version if necessary.
Keeping Your Setup Up-to-Date
Since virtualization software is frequently updated, always ensure you’re using the latest version of VirtualBox. This not only improves performance and security but also ensures compatibility with new ISO images and operating systems.
Iv a 2nd hand dell im clueless i wanted learn so am really trying but not sure its sinking in i dont no wot windows 7 its got on iv never done this bfor i dont no if iv a key as i didt no much when got it but i cant get past the login screen i cant download anything ANY SUGGESTIONS? ? I wanted kinda reset settings & clean hard drive uninstall wots on it so can reinstall windows i can see if i my mistakes as im going (trying self -teach) How much would be a fair price pay at at repair shop Pls
Very useful article. Thanks a lot.
Thanks – I could not figure out how to boot from daemon tools before!
THANK YOU! This was such a help!! :DD
thanks!!!!
i had been looking for this piece of information.
Great work bro…thanks a lot for sharing..
Thanks a lot for this article.. Virtual Box is a nice tool
otherwise i’d have to use VMware which is quite more troublesome.. and it’s not free..
wow..great tools!
good information :)
wow
Very very Thanks Raymond.
it is great post.
Slax live CD works fine with virtualbox – i’ve used it.
All linux distros run fine on it.
Alas – my favorite Virtual Machine.
Thank You very very much Raymond for writing an article on this.
need to learn it… :)
Nice utility Raymond :D
Thanks