How to Boot from ISO File [From Hard Drive or Without USB]
Not too many years ago if you wanted to try out the latest Linux distro, test to see if a repair CD you downloaded worked or whether your custom made Windows install disc could boot, you had to burn the content to CD or DVD and then reboot your computer to try it out. This not only took vast amounts of time waiting for the disc to burn but it also meant perhaps fiddling with the boot order in the BIOS and if you didn’t have any rewritable media, every burn would cost you money.
These days disc images (ISOs) are everywhere and that allows you to do several things such as burn to CD like before, mount the ISO as a virtual drive, install the image onto USB flash drive, or even load it into virtualization software to test without leaving your desktop. The trouble is using the above methods to boot the ISO image can still take time which isn’t ideal if for example you quickly want to try a number of the latest Linux distros. Being able to boot and test an ISO image with just a couple of clicks of your mouse can be a real time saver, here we show you 3 ways to do it.
How to Boot From ISO file:
Moba Live CD
MobaLiveCD is a freeware tool that will run your Live or bootable disc images directly from within Windows with just a couple of clicks of your mouse. This is thanks to the small and open source virtual machine emulator QEMU. The program itself is portable and only 1.5MB in size which is quite impressive.
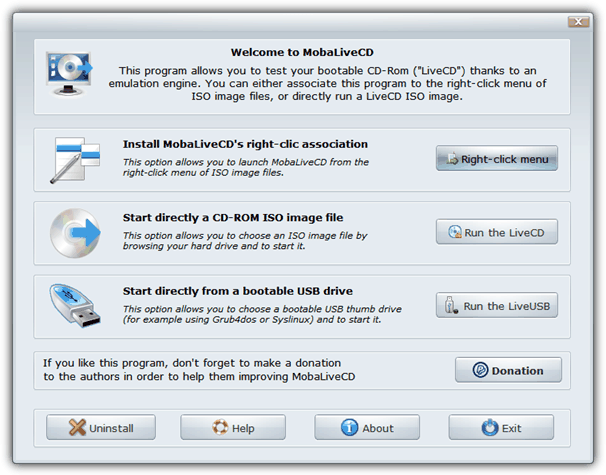
Not only will it start bootable CD ISO images but with the last update to version 2.1 you can also launch a bootable USB flash drive which is useful when you’re testing if your multi boot or installation USB works before trying it for real. MobaLiveCD is simplicity to use, all you have to do is run it (Run as administrator if you have UAC on) and either press “Run the LiveCD” and browse for the ISO image file, or click “Run the LiveUSB” and choose the letter of your flash drive.
The program will then launch QEMU with a predefined configuration and begin the boot process. To interact with the emulated operating system, click in the window, press Ctrl + Alt to get out again. The “Right-click menu” button usually doesn’t work in Windows 7 or 8 because they recognise the ISO file type by default and already have other programs associated with it, Vista and XP will work if their ISO file type hasn’t already been taken over by another program.

Although MobaLiveCD is small and easy to use it does have drawbacks. Firstly the QEMU program it relies on emulates very low end hardware. It does use up to 1GB of memory but the CPU being emulated is a Pentium II 333Mhz which makes things sluggish during boot and inside the live operating system. As a simple example we booted Mini XP from Hiren’s BootCD in MobaLiveCD and VirtualBox, MobaLiveCD took 2 minutes 10 seconds to boot to the desktop, VirtualBox took only 33 seconds.
Also, because there has been no updates since 2009 it will sometimes fail to boot an ISO image or USB flash drive correctly, likely due to a now rather outdated version of QEMU. MobaLiveCD is still compact and useful but its mileage depends entirely on whether you can get it to work, an update would definitely be welcome but sadly the project appears to have been pretty much abandoned.
2. Boot an ISO Image Directly From VirtualBox
VirtualBox is a hugely popular free software to create and run virtual operating systems and it can run a virtual CD/DVD disc inside a virtual machine (VM) by using the computer’s real optical drive or an ISO image. This is ideal for booting and testing an ISO but there are a several steps to go through each time you want to boot a different image. Here we show you how to setup a virtual machine and be able to run ISO files with a few clicks.
1. If you don’t already have it, download and install VirtualBox. Note we have tried this method with Portable VirtualBox and it doesn’t work.
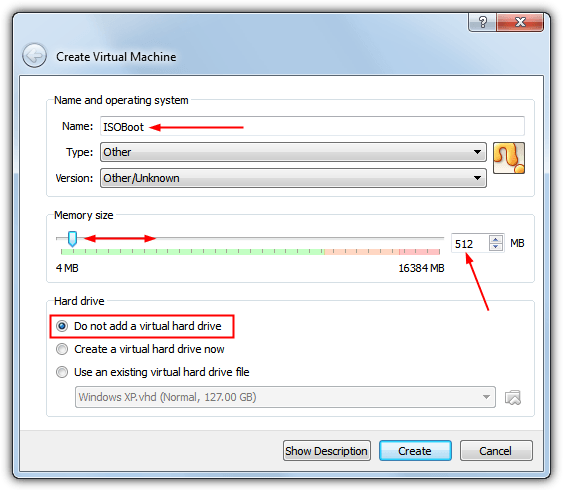
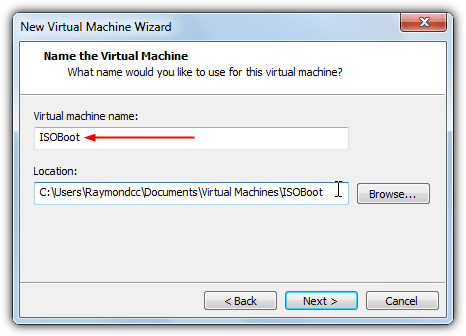
2. Run the program and click New to create a new machine, name it ISOBoot. You MUST use ISOBoot (including capitals) or you will have to manually edit things later on. For Type/Version use anything you like.
3. Allocate enough memory to allow the ISO images to boot, 512MB-1GB should be plenty. Choose “Do not add a virtual hard drive” and click Create.
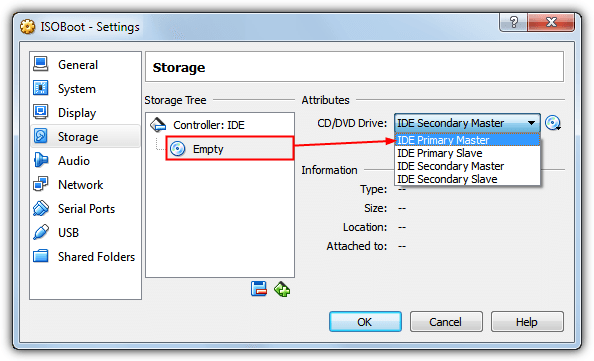
4. Now with the new VM selected click Storage on the right, click the Empty drive in the Storage Tree and change from IDE Secondary Master to IDE Primary Master in the CD/DVD Drive dropdown menu. Click OK and close VirtualBox.
5. The trick is to make VirtualBox load and boot an ISO image from the desktop without you having to launch the program first, go into Storage settings and manually browse for the file every time. Download the following file:
Download ISOBoot_VirtualBox.bat
The batch file injects the selected ISO filename into the ISOBoot virtual machine and then automatically runs it which boots to the ISO image. You can either drop an ISO file onto the BAT icon or launch it as a command. To make things easier, copy the BAT file to:
C:\Programs Files\Oracle\VirtualBox
Then download the zip file below, open it and double click the Install file to import the data into your registry:
Download ISOboot_VirtualBox_Context.zip
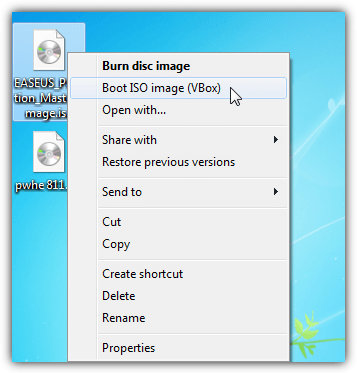
This creates a context menu entry so when you right click on an ISO file in Explorer a menu entry will allow you to click and run the ISO file inside VirtualBox automatically. Run Remove_ISOboot_VirtualBox.reg from the Zip to remove the context menu entry.
When you have finished simply power off the VM. These files rely on VirtualBox being installed to the default locations, you will need to manually edit them if this isn’t the case. If you don’t see the right click entry it could be that another program has taken over the ISO file type in which case you will need to edit the registry file yourself. Have a look at the (Default) Data value in HKEY_CLASSES_ROOT\.iso to see what has taken over from the default of “Windows.IsoFile” and adjust the registry file accordingly.
3. Boot an ISO Image Directly From VMware Player
VMware Player is also a popular free virtualization software although we prefer VirtualBox because of the valuable snapshot facility. It can also be configured to automatically boot to an ISO image in a similar way, here’s how.
1. If you haven’t already, download and install VMPlayer (near the bottom of the download page).
2. Launch VMPlayer and click “Create a New Virtual Machine”. Select “I will install the operating system later” and then Next. For the Guest operating system select Other/Other (Important!) and click Next again.
3. Name the virtual machine ISOBoot and click Next. At the Disk Capacity screen you can leave the default of 8GB, this won’t be used as you are not using the virtual hard drive. Click Next -> Finish and close VMPlayer, things like usable memory can be edited later on.
4. This method is pretty much the same as VirtualBox, download the batch file below and either drop the ISO file onto it or use it as a command with an argument of the ISO filename.
To add the context menu, copy the BAT file to:
C:\Program Files (x86)\VMware\VMware Player
or for 32-bit systems use
C:\Program Files\VMware\VMware Player
Download the Zip below, open it and run the Install registry file to import the data into your registry, use the included x86 or x64 file depending on your host system.
Download ISOboot_VMware_Context.zip
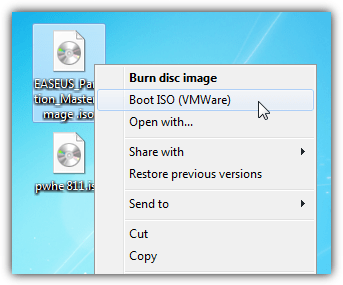
If everything works you will have a right click entry to directly launch a clicked on ISO file using VMware Player.
Like the VirtualBox setup above, the context entry won’t work if other software has previously taken over the ISO file type and you will need to check the registry to see which file type needs changing and then edit the registry file.
Final Note: Although they are much larger than MobaLiveCD and need installing, apart from the obvious of being able to run your own virtual operating systems, both VirtualBox and VMPlayer have the advantage that the virtual machine you are using for ISO booting can be configured to run at a similar speed to the host computer. You can also enable or disable options such as networking and sound, and also allocate graphics memory, system memory and the number of CPU cores etc.
MobaLiveCD on the other hand can be quite unreliable and incredibly slow to boot images because it emulates low end hardware and hasn’t been updated for years, meaning VirtualBox or VMware Player could be big time savers if you find yourself testing Linux distros or bootable ISO images often.

Improve this guide

User forum
22 messages