How To Remove Shared Documents or Public Folders from My Computer and Explorer
Everyone with a Windows computer will have opened My Computer in Windows XP or Computer in Windows Vista, 7 or 8 at least once during their lives. And some may have wondered what some extra icons are doing there. In XP when you open up My Computer you’re greeted with a folder icon called Shared Documents and a lot of people have no idea what it actually does.

In the newer operating systems of Vista and above you don’t get this because it’s got a different name and you don’t get a folder in the same window as your drives, but a similar thing still exists and is present in Windows Explorer. In Vista, 7 and 8 the function is called Public folders and is pretty much the same thing. But some users may wonder what it does and why is it there if you don’t use or need it.
Shared Documents or Public folders and all their sub folders provide a place for you to store documents, pictures, video and music that users of different accounts on your computer can access. For instance, if you have an account for each member of your family, one user cannot read the contents of another users Document folders even if you want them to access files in there. Place the files in a Public or Shared folder and they are accessible to all users. This is also the case for other computers on your local network which can also make use of these folders.
This can be a nice thing to have for multiple users but if you’re the only user on the computer, these folders serve no real purpose. They simply get in the way sometimes and are just another place you can accidentally move your files to! If you don’t want these Public or Shared folders showing in My Computer or Explorer, here’s how to remove them.
Removing Shared Documents from My Computer in Windows XP
You can’t delete the Shared Documents from My Computer. Try right clicking on the Shared Documents folder and you can’t find the delete menu. Pressing the Delete key on your keyboard will do nothing as well. Trying to delete the actual Shared Documents folder in \Documents and Settings\All Users\ will produce the error message:
Documents is a Windows system folder and is required for Windows to run properly. It cannot be moved or renamed.
There are a few ways to do this depending on which version of XP you have. The first way uses the Group Policy Editor to remove Shared Documents from My Computer which is ONLY available in Windows XP Professional and not present in XP Home:
1. Press Win key+R to open the run dialog, or go to Start and click on Run.
2. Type gpedit.msc and press Enter.
3. In the Policy Editor navigate to User Configuration -> Administrative Templates -> Windows Components and click on Windows Explorer.
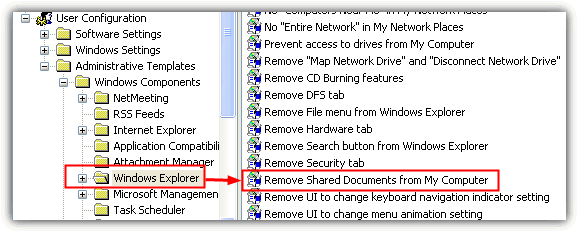
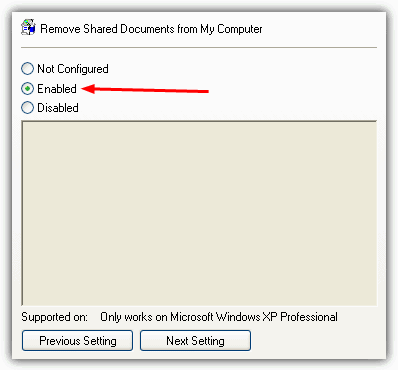
4. In the right hand window find and double click on “Remove Shared Documents from My Computer”. Unsurprisingly, you need to select the Enabled option and then click OK.
Windows XP Home users don’t have it quite so easy and you need to manually add a value to the registry. This method of course also works on Windows XP Professional:
1. Press Win key+R to open the run dialog, type regedit.
2. Navigate to:
HKEY_CURRENT_USER\Software\Microsoft\Windows\CurrentVersion
\Policies\Explorer
3. Right click on Explorer and select New -> DWORD Value. Give it a name of NoSharedDocuments.
4. Double click on this new entry and enter a value of 1. Press OK and exit regedit.
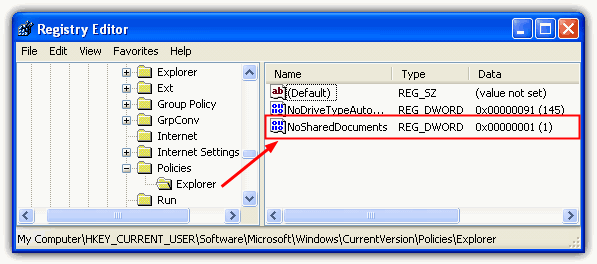
5. Reboot or log off and when you come back the Shared Documents should be gone from My Computer.
If you don’t want to go into the registry here’s the above as a .reg file to download and run.
Disable Shared Documents | Re-enable Shared Documents
The above registry key isn’t the only one that can disable the Shared Documents folders in My Computer, there is another one that you can use. Do be aware that for XP Pro users this registry setting will render the “Remove Shared Documents from My Computer” setting in the Group Policy editor useless.
1. Press Win key+R to open the run dialog, type regedit.
2. Navigate to:
HKEY_LOCAL_MACHINE\SOFTWARE\Microsoft\Windows\CurrentVersion\Explorer
\MyComputer\NameSpace\DelegateFolders
3. Right click the following key and delete it: {59031a47-3f72-44a7-89c5-5595fe6b30ee}
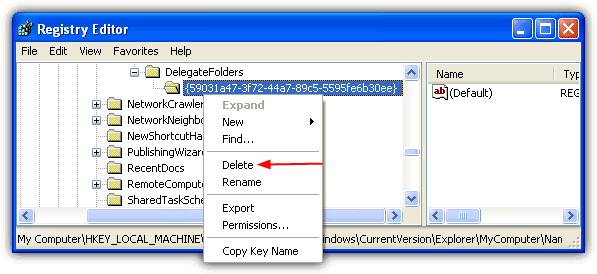
4. Reboot or log off.
If you want to re-enable the key again simply use the reg file below or manually add it back in the same location.
Disable Shared Documents | Re-enable Shared Documents
You don’t need to use both registry methods for removing the Shared Documents folders to work, only one or the other.
Removing Public Folders in Windows Vista’s Explorer
Windows Vista introduced Public folders to us and Shared documents was removed so you no longer get the folder icons with the list of drives in My Computer. It does however, leave 2 entries for the Public folders inside Explorer, one in Favorite Links and a special folder in the Folders list.
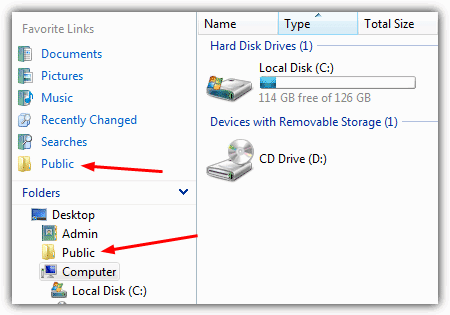
1. Removing the Favorite Links entry is easy and simply a case of right clicking on it after opening the Computer window and selecting Remove Link.
The Public icon in Folders contains the 6 public sub folders when expanded and cannot simply be deleted by right clicking or pressing the Del key. It needs to be removed by deleting a key in the registry.
1. Open the registry editor by pressing Win key+R and typing regedit into the Run dialog.
2. Navigate to the following key in the registry:
HKEY_LOCAL_MACHINE\SOFTWARE\Microsoft\Windows\CurrentVersion\explorer
\Desktop\NameSpace\{4336a54d-038b-4685-ab02-99bb52d3fb8b}
3. Right click on {4336a54d-038b-4685-ab02-99bb52d3fb8b} and delete it. This will take effect the next time you open an Explorer window.
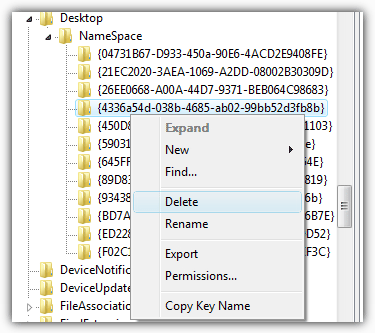
If you don’t want to play around in the registry, download the below .reg file and run it to do the same thing.
Delete Vista Public Folder Icon | Restore Vista Public Folder Icon
Removing Explorer Public Folders in Windows 7 and 8
It seems that after Vista, Windows 7 and 8 have less of a Public folders presence in Windows Explorer and the only obvious place you can find a reference to them is in the Libraries. If you don’t even use the Libraries, you won’t notice it and can probably just ignore the entries. Adding and removing an entry from a Library is very easy, so if you want to remove the Public folders, here’s how.
1. Open up an Explorer window or simply double click on Computer.
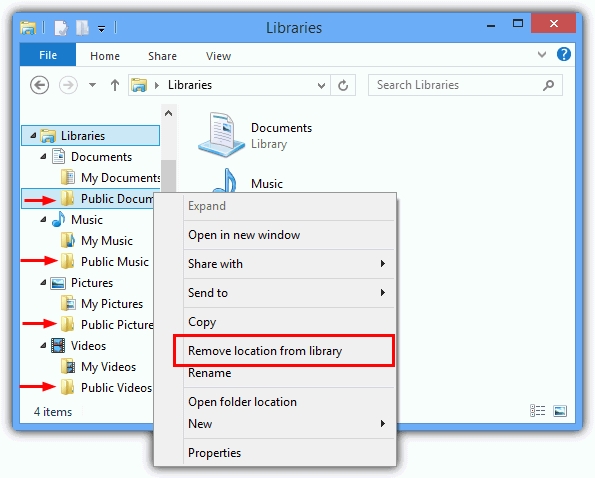
2, Expand the Libraries tree down the left, then expand Documents. You should now see 2 folders; My Documents and Public Documents.
3. Right click on Public Documents and select “Remove location from library”.
4.Expand and do the same for Music -> Public Music, Pictures -> Public Pictures and Videos -> Public Videos if you wish.
It is recommended NOT to delete any of the Public folders directly from C:\Users\Public as they are constantly used by Windows and could cause issues if not there.
If you want to stop others on a network using these folders, there’s an option in the network settings to turn it off. Right click on the network icon in the system tray -> “Open Network and Sharing Center” -> “Change advanced sharing settings”, look in the correct network profile and turn off the option under Public Folder Sharing.

If you’re the only user on the machine, those folders will no longer get used by anyone else including networked computers. If you’re one of several users on the computer, the other accounts can still access the Public folders.


User forum
8 messages