How To Make a USB Flash Drive Bootable
USB storage devices such as flash drives and portable hard drives are now pretty much the dominant media if you want to store or transfer your files and data between local computers. Floppy drives are barely used at all now and perhaps their last remaining use is flashing a BIOS or using DOS tools on an old PC.
Although CDs and DVDs aren’t as important as they were several years ago, they’re still a very important solution for installing operating systems, running offline malware scans, system repairs, installing software, password resets and etc.
Because USB storage media is very portable, cheap and mostly faster than an optical drive for installing software, running live operating systems and many other things, it makes sense to use a flash drive where possible to take over tasks where a CD/DVD or even floppy disk used to be the only solution. Once you know what to use, it’s very easy to transfer bootable optical disks or floppies onto USB to accomplish the tasks you need more efficiently.
Here we show the the easiest ways to transfer floppy or optical boot media onto USB with the minimum of effort.
Copy a Floppy Image to USB Flash Drive
Floppy drives and disks might be unfashionable these days and considered out of date, but there are still many older machine that have floppies installed. Some old software or bootable floppy disks might have only been distributed in this format at the time. Thankfully It’s entirely possible to copy a floppy disk onto USB flash drive and allow you to boot from it.
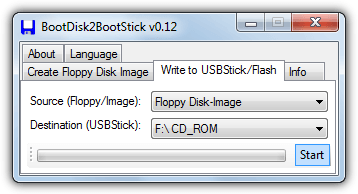
A tiny and portable little tool called BootDisk2BootStick can do this for you. Simply plug in the USB drive and insert a floppy disk, run BootDisk2BootStick and go to the “Write to USB/Flash” tab. Then select the source floppy drive and the destination USB drive from the drop downs. Finally press the Start button, it’s a pretty painless process.
Create a Bootable DOS USB Flash Drive
Creating a DOS bootable floppy disk is still very important if you need to flash the BIOS of older computers because you usually need to run the flashing process from a DOS based environment. Obviously the only way years back was to do this via floppy drive but now you can use a USB flash drive instead which is a good deal easier.

We have previously covered a selection of utilities in an article about installing DOS onto USB for BIOS flashing, so here we’ll mention a program that we never included, Bootable USB Drive Creator Tool. Launch the program after inserting your USB drive, tick the “Quick Format” and “Create Bootable Drive” options and browse for either the FreeDOS or MS-DOS folders in the Drive Creator Tool’s directory. Then click Start. After the drive is formatted you’ll have the required DOS files on the flash drive ready to add the BIOS utility or other files.
Download Bootable USB Drive Creator Tool
Copy Bootable CD/DVD Media to USB
Strangely we couldn’t find a free utility that will allow you to directly copy the contents of a bootable CD or DVD onto a USB flash drive, it needs to be a two step process. First create an ISO image file from the optical disk and then write the ISO to the USB drive.
Create an ISO Image from the CD/DVD
Many disk burning applications can create an ISO image from an optical disk, ImgBurn, Burnaware, Nero, CDBurnerXP and several more. But if you don’t have any of these tools on your computer, you don’t want to have to install one of them just to get the ISO created. For that purpose we’d recommend a tiny (182KB) portable tool called Casper ISO Creator.
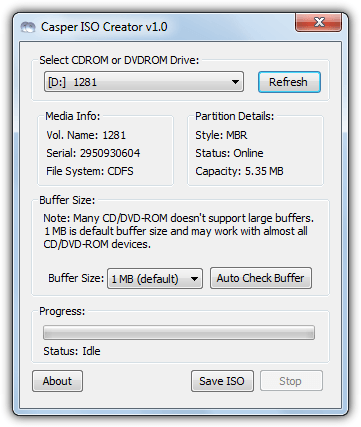
All you have to do is run the tool after inserting the CD/DVD-ROM, select the ROM drive from the drop down if it’s not already selected, click “Save ISO” and select a folder and optionally different filename. It doesn’t get much easier than that, time to complete obviously depends on the contents of the disk.
Write the ISO to USB
Writing an ISO image to USB flash drive is quite easy and there’s as many tools for this purpose as creating an ISO in the first place. One problem in this area is several tools are better converting one type of disk than another. For instance, some are better at creating USB’s from Windows based images such as WinPE rescue or Windows install disks. Others are better specifically for bootable Live Linux based distros.
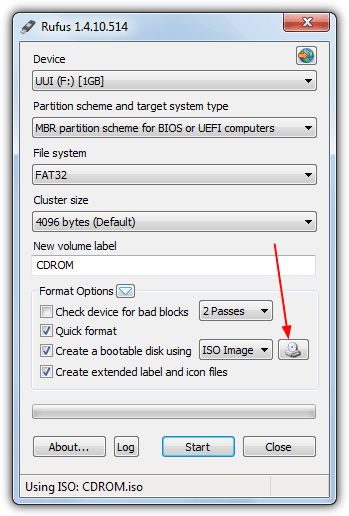
One small and portable tool we’ve mentioned before is Rufus because it’s equally at home creating a Windows install or WinPE USB as it is a Linux based rescue disk or Live CD, something many other tools are not that good at. All you have to do is insert the flash drive, launch Rufus and click the image select button (arrowed) to browse for the ISO you created earlier. This will set the File system for you so all you need to do is click Start and let it go to work. Once finished you can test the USB before rebooting.
We did try to create some bootable USB flash drives from CD/DVD using more manual methods such as the old DOS tools BBIE, BootSect and MKBT, but found them too unreliable to currently be of any real use.
Shareware ISO Tools
Some shareware applications are particularly good in this area and can create ISO images from CD/DVD, extract or write disk boot sectors and also write the disk images back out to USB, all from the same program. UltraISO and PowerISO are two such tools that can do this.
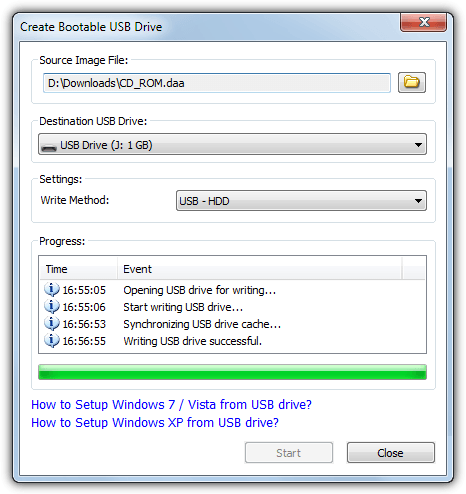
For example, in PowerISO you only need to go to the Tools menu > “Make CD/DVD/Blu-ray Image File” to create a disk image from an optical disk, and then go to Tools > “Create Bootable USB Drive” to write the image file to USB, as pictured above. The same can also be done with floppy disk to USB conversion. PowerISO and UltraISO normally cost $29.95 but are worth considering if you perform a lot of ISO creating or ISO to USB related tasks.
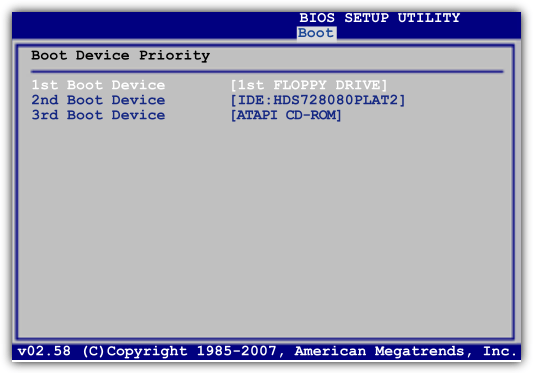
Configure the BIOS to Boot from USB
Telling you exactly where the BIOS setting is to enable booting from USB is a bit tricky because computer and BIOS manufacturers have a different interpretations of what this function should be called and where in will be located in the BIOS. For example, you may find the option in the “Advanced BIOS Features”, a simple “Boot” tab or under “Advanced Storage Configuration”. Basically you will need to consult the motherboard/laptop manual or have a look around for an option to change the boot order.
Another option which is far easier and doesn’t require you to enter the BIOS at all, is a boot menu which allows you to select from a list of bootable devices . This has an added advantage that the device you select for booting from the menu is temporary and will be reset to the normal drive at the next reboot.
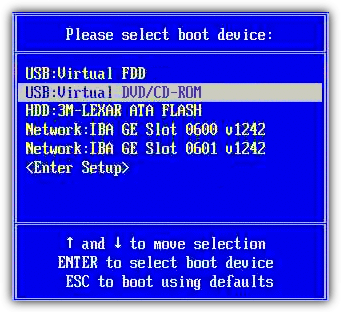
The menu is usually reached by pressing either F11 or F8 while booting past the BIOS screen, although you may need to consult the manual or watch the boot screen itself for a clue about the key combination. If you cannot find a USB option either in the BIOS or on the boot menu, it may mean your computer is too old to support booting from USB. If this is the case you will need another solution to allow USB booting on computers that don’t support it.

Improve this guide

User forum
10 messages