8 Ways to Hide Drive Letters: Step-by-Step Guide
5. Hide Drives Using Partition Manager Software
Using a piece of partition manager software to mark the partition as hidden is more secure than using the Computer Management console. That’s because once you have done this, Computer Management cannot access the partition at all. You can still see the partition but right clicking on it will not allow you to add a drive letter to make it accessible.
There are many free partition management tools available such as Parted Magic, EaseUS Partition Master Home Edition, and Partition Wizard Home Edition. For the purposes of this guide, we’re using AOMEI Partition Assistant Standard. The method to hide a partition is broadly the same whichever software you choose.
1. Download and install AOMEI Partition Assistant Standard.
2. Click on the partition in the upper list or graphical layout and select Hide Partition from the sidebar. Alternatively, right click on the target partition and select Advanced > Hide partition. Then click Apply when you’re ready to proceed.
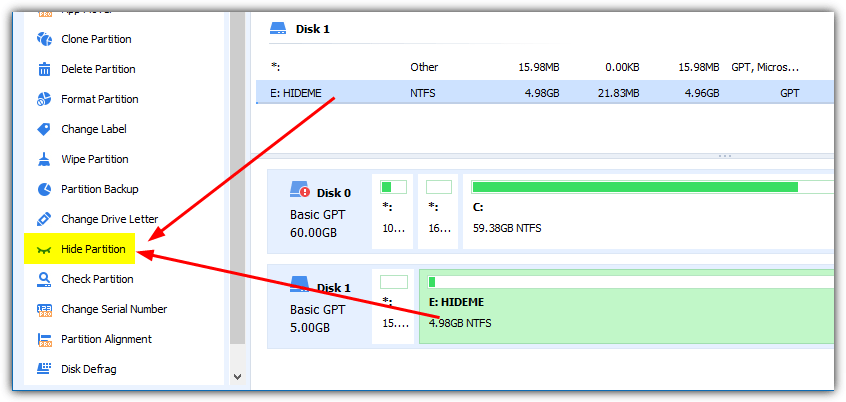
To unhide the partition again, simply reverse the procedure using the Unhide option.
6. The Computer Management Console
This method uses the process of removing the drive letter from the drive or partition completely. This renders it unusable by anyone until the drive letter is restored. A drawback of this method is that any software or applications you run that require the drive to be available won’t work.
1. Type “Computer Management” or “compmgmt.msc” into Start. Alternatively, right click on This PC on the desktop and select Manage, then click on Disk Management under Storage.
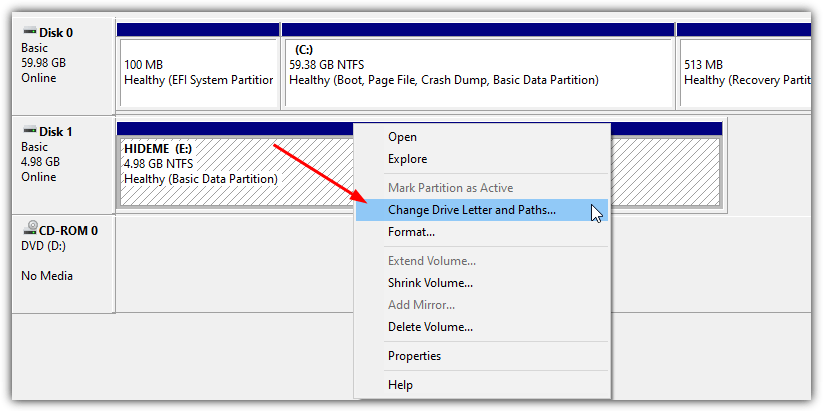
2. Find the partition you want to hide using the list or graphical layouts, right click on it, and select Change Drive Letter and Paths.
3. Make sure the drive letter is highlighted in the box and click the Remove button, then click OK.
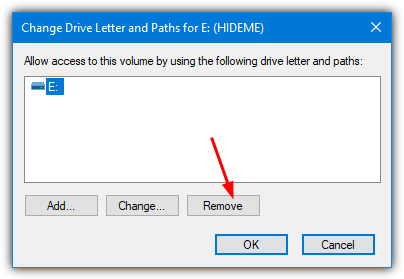
To add the drive letter back to the partition, follow steps 1 and 2 and then click the Add button. Make sure “Assign the following drive letter” is selected and there is a letter in the drop down which you can change if you want to, and click OK to finish.
7. Hide Drives Using a Group Policy
The Group Policy editor in windows is able to hide drives from Explorer but has a couple of drawbacks. Firstly, it’s not available in Home versions of Windows, and secondly, only drive letters A to D can be hidden unless you use the All Drives option.
1. Press Win key+R to get the Run dialog, type gpedit.msc, then press Enter.
2. Navigate to User Configuration > Administrative Templates > Windows Components and click on File Explorer. Double click on “Hide these specified drives in My Computer” in the right window pane.
3. Click the Enabled radio button and in the drop down box that appears below, select the combination that best matches your needs. Click OK when finished.
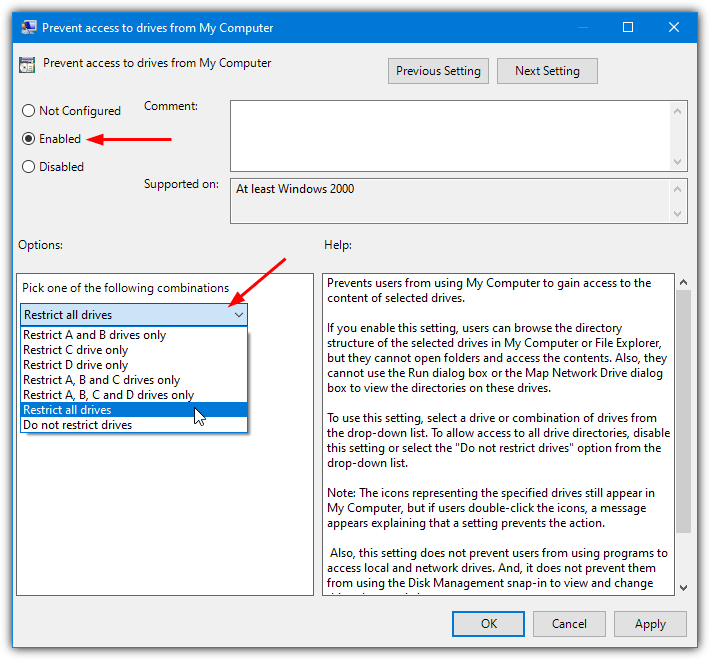
There is also another option called “Prevent access to drives from My Computer” where users can browse the folder structure of the selected drives in My Computer or Windows Explorer, but they cannot open folders and access the contents. However, this does again have the restriction of only going up to drive D unless you use the all drives option.
8. Hide a Drive Letter with Diskpart
Hiding a drive letter in this way is pretty much identical to using the Computer Management Console. The only difference is you’re using the Command Prompt to do it. This is maybe a more useful method for advanced users and command line fans.
1. Press Win+R for the Run dialog, type diskpart, and press Enter.
2. Type List Volume to get a list of all available partitions and make a note of the volume number you want to hide.
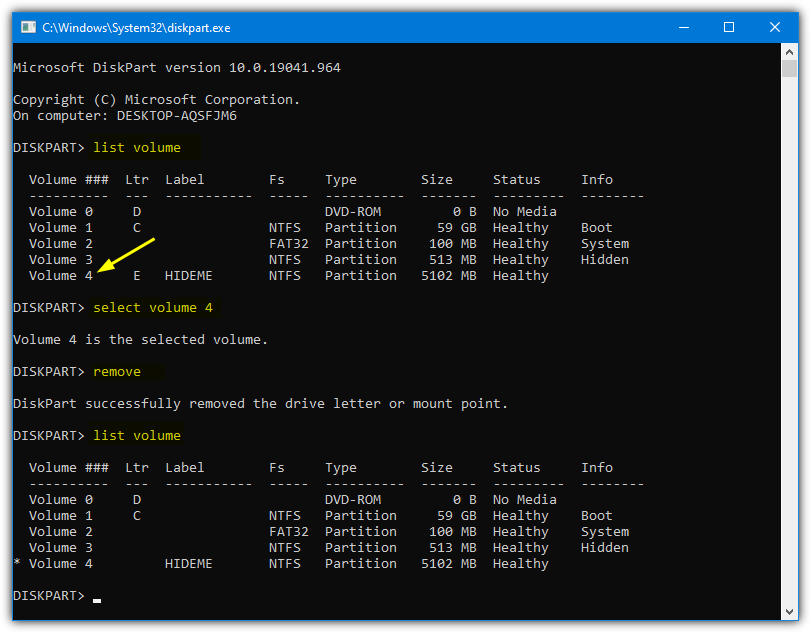
3. Type Select Volume [number] where the number is the volume number you noted from the previous step.
4. Now type Remove to remove the drive letter from the selected volume. If you type list volume again you should see the assigned letter in the Ltr column has now gone from the volume. Type Exit to quit Diskpart.
To get a drive letter back again using Diskpart, repeat steps 1-3 and then type Assign instead of Remove at step 4.


User forum
12 messages