How to Dual Boot Windows 7 and XP
Even though many computer users will have moved on from Windows XP and installed Vista or Windows 7 (or 8), there’s still no doubt that a lot of us still love to have XP around because it’s still a great operating system. The problem is obviously that you can’t get XP installed on a laptop or desktop from a manufacturer and if you want to put it onto your own computer, you will have to do it yourself.
Because support is nearly at an end for XP, it doesn’t make sense to replace your current Windows 7 or Vista install, but there’s no problems if you want to use your copy of XP alongside Windows 7 in a dual boot configuration, and have the best of both worlds.
There is a problem though when you want to dual boot between Windows 7 and XP. And that is when you install XP after installing Windows 7, it will overwrite the existing boot loader meaning you can only boot to XP, you cannot put Windows 7 into the XP boot menu. You can however, do it the other way around and put XP into the Windows 7 boot menu, which is what you have to do for both your operating systems to run alongside each other, and is what we’re going to guide you through in this tutorial.
We will assume that you already know how to install Windows and concentrate on getting the dual booting to work and not the steps on how to install Windows XP or 7. Do note that this procedure is the same if you want to use Windows Vista instead of Windows 7 to dual boot with XP.
Creating an XP Partition when Windows 7 is Already Installed
If you only have a single hard drive and Windows 7 has been installed on a partition which takes up all the available space, you need to re-partition your drive to make some space for XP. Obviously, if you’re installing XP onto another hard drive, you don’t need to do this.
Create Some Space for XP
1. In Windows 7, right click Computer and select Manage. Click on Disk Management.
2. Right click on the box that represents the drive that’s taking up the space which should be C: (Disk 0), then select Shrink Volume. If you have a System Reserved partition, leave that alone and only touch C.
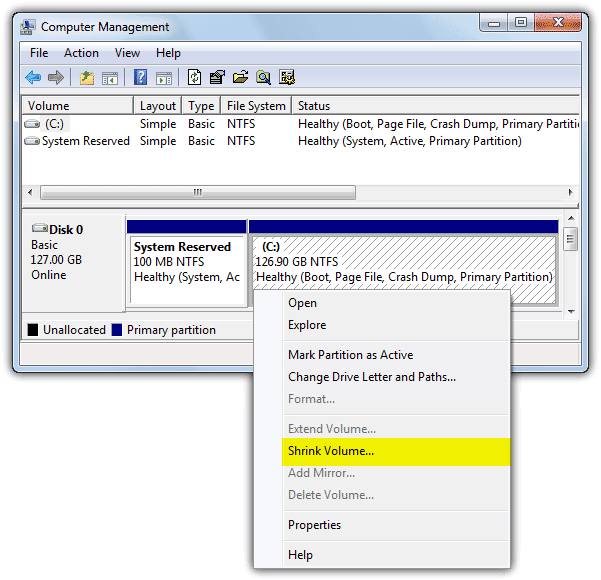
3. In the dialog box, enter the amount of space you require for XP. Don’t forget this is in Megabytes so you need to take the Gigabytes figure you have in mind and times it by 1024. You don’t need to format the drive here as XP can do that for you during install. If you want more space than what Disk Management can give you, try using a disk partition Tool such as EaseUS Partition Master Home or use a live disc like Hiren’s BootCD.
After Installing XP
1. Boot up the computer with the Windows XP CD and install XP as normal in the unpartitioned space that you’ve created. Once XP is installed, you will now find the computer will boot straight to it as if Windows 7 doesn’t exist and there will be no boot menu. This is because the Master Boot Record of the boot drive has now been told to look for NTLDR which boots XP, and not BOOTMGR which is needed to boot 7 and its Boot Manager.
2. Download and install Neosmart EasyBCD. You WILL need Microsoft .NET Framework version 2 installed first for EasyBCD to work. If you haven’t yet updated your XP install, you can download Microsoft .NET Framework 2.0 Service Pack 2 as a standalone package.
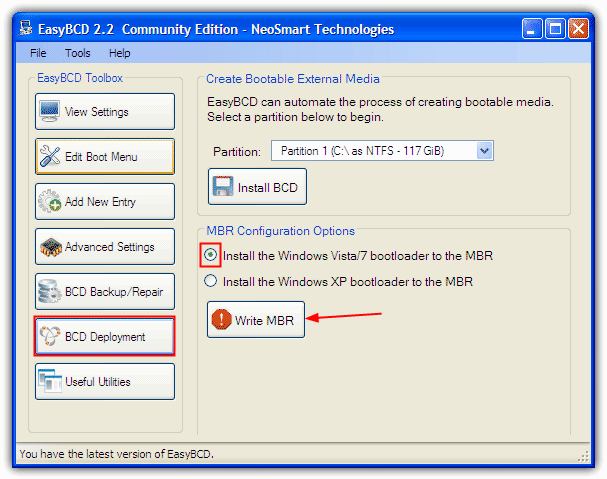
3. Run EasyBCD and click on the BCD Deployment button down the left. Under MBR Configuration Options, make sure “Install the Vista/7 bootloader to the MBR” is selected and press Write MBR.
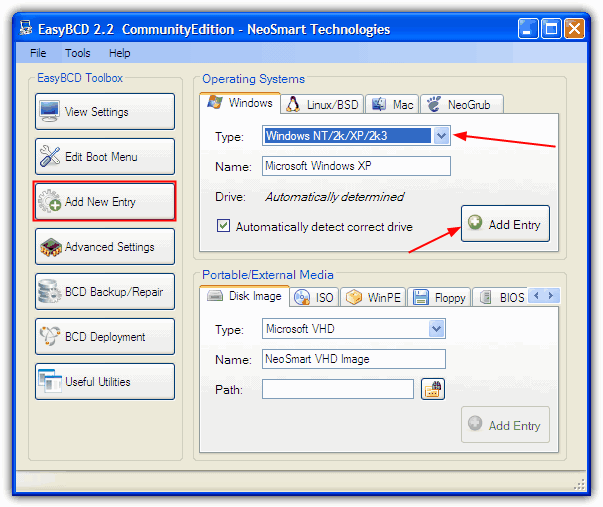
4. Click the Add New Entry button and set the Type to Windows NT/2k/XP/2k3 in the Windows tab drop down. Then press Add Entry, you can change the name before clicking to add but leave all other settings alone.
An optional measure is to change the boot order and timeout which can be done by using the Edit Boot Menu button. Simply tick the box for the default boot o/s and change the number of seconds from 30 if you want, then press Save Settings.
Note: If you receive any errors in EasyBCD about failing to add an entry to the boot menu, there is a way to get around this. Simply reboot the computer and it will now boot into Windows 7 automatically. Find and run the EasyBCD program in the XP partition\Program Files\Neosmart Technologies\EasyBCD folder, and repeat this step again.
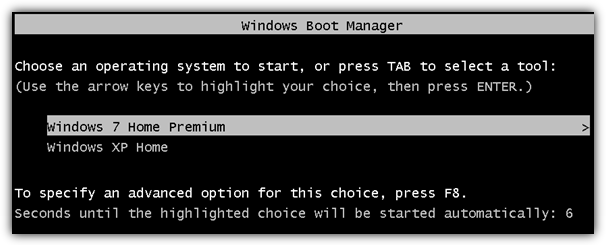
5. Reboot your computer and you should have two entries in the Windows Boot Manager with the default already highlighted. You can now boot into either operating system.
Creating a Windows 7 Partition when XP is Already Installed
Configuring a dual boot when you have XP installed first is much easier because Vista and 7’s Boot Manager is smart enough to know that you have XP already installed and will add an entry automatically for it into the the boot menu.
Create Some Space for Windows 7
First things first, you need to re-partition or shrink your current XP partition to have free space for the Windows 7 installation. Like above, you can skip this section if you already have hard drive space ready for Windows to go on.
1. Boot up your computer with the Windows 7 DVD, you can download it if you don’t already have a proper Windows 7 SP1 DVD. At the part where it asks you for the language and keyboard, press SHIFT+F10 simultaneously. This will bring up the Command Prompt.
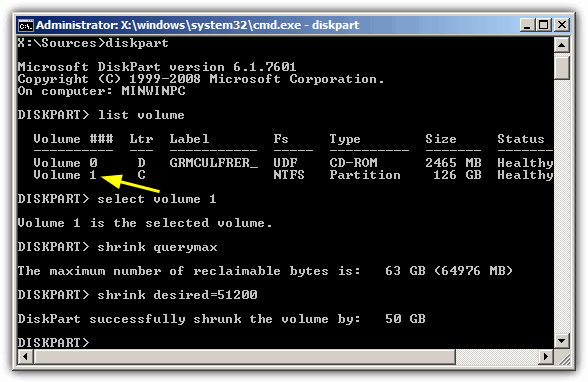
2. Type DISKPART
3. Type LIST VOLUME
4. Select the volume where XP is installed by typing SELECT VOLUME x where “x” is the number of the XP volume in the list, it could be 0, 1, 2 etc.
5. Type SHRINK and it will automatically shrink your XP partition by the maximum amount it can depending on the free space available.
Use the command SHRINK QUERYMAX before SHRINK to first see how much space your XP partition can be reduced by. This will tell you the maximum amount of reclaimable Gigabytes available.
Use the following command to set the size of the new Windows 7 partition manually, SHRINK DESIRED=[size in MB]. For example SHRINK DESIRED=51200 will shrink the XP partition by 50GB and make that space available for the new Windows. Make sure you allocate 20GB at the very least.
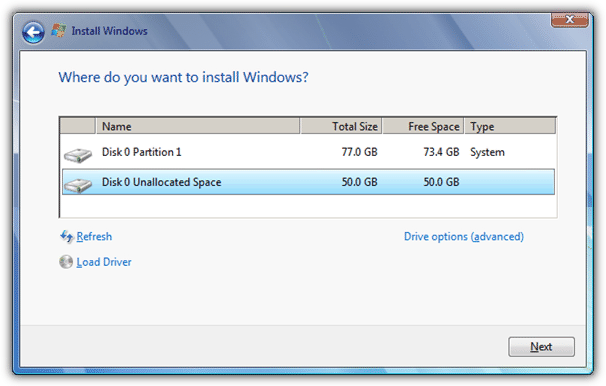
6. Close the Command Prompt and continue with the installation. When you reach the “Where do you want to install Windows?” screen, you should install Windows on the Unallocated Space which is what was created in the previous steps.
Note: If you receive an “Access is denied” error message when shrinking your partition with diskpart, boot up and partition the drive with Hiren’s BootCD and it’s Mini XP or Parted Magic software. Alternatively, you can of course use free partitioning software from within XP such as EaseUS partition Master or Partition Wizard.
After Installing Windows 7
Once Windows 7 is installed and the system reboots, you’ll be presented with a boot menu with two options; “Windows 7” and “Earlier Version of Windows”.
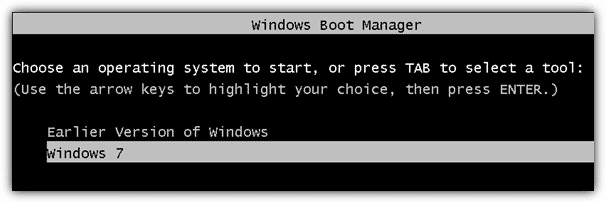
Booting to an earlier version of Windows will boot up Windows XP. It’s merely a description and you can leave it at that if you wish, but if you want to change the name “An Earlier Version of Windows” to Windows XP or something better, follow the instructions below.
1. Download and install EasyBCD in Windows 7 (or Vista).
2. Click the Edit Boot Menu button, double click on the Earlier Version of Windows entry and rename it. You can also change the default operating system to boot if you don’t press a key at the boot menu by using the Default tick box, and the default timeout. Press Save Settings when you have finished and close EasyBCD.
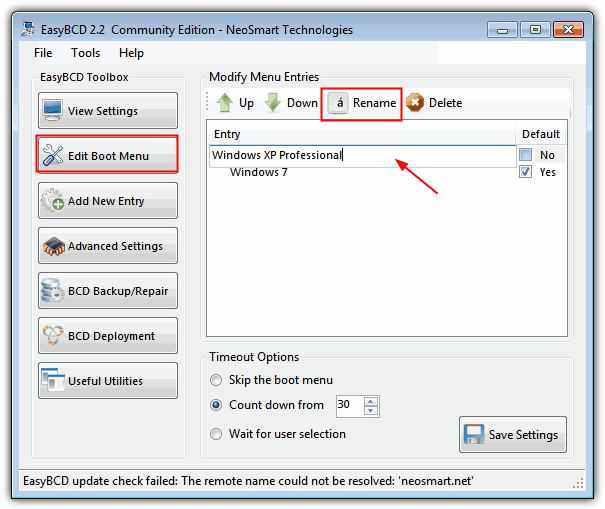
Now when you reboot your computer, the more appropriate name in the Windows Boot Manager should be visible.
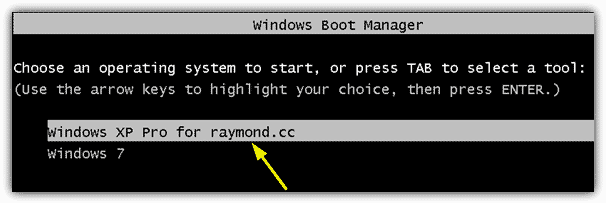
You can obviously rename any entries in the Boot Manager using this method such as changing “Windows 7” to “Windows 7 Home Premium” or “Windows Vista” to “Windows Vista Ultimate Edition” etc.


User forum
14 messages