Folder Icon Changer Software: 6 Best to Use in 2023

Windows works by using a file and folder structure and specific files can be stored in their own dedicated folders. Most files that run Windows are stored in the Windows folder while installed software is mostly stored in Program Files. Personal data will likely be stored in folders like Videos, Documents, Downloads, Music, etc. Most users know what the personal data folders are for and use them accordingly.

You can naturally create your own folders and have a custom structure that suits your needs. Keeping your files well ordered and categorized is ideal for efficiency and helps to keep things more organized. Another option to help visually locate certain folders is making them have different colored or different looking icons to the standard folder. A standard folder in Windows is yellow and it’s helpful to quickly tell one folder from another by making it look different.

Here we’ll show you some ways to change the folder icon for one individual icon at a time, multiple icons at once and even to change the system default folder icon to another icon. Manual and automatic solutions are available, all work for Windows Vista and above.

Change The Default Folder Icon or Multiple Folder Icons At Once

One of the best and easiest way to modify the folder icons in Windows is by using a piece of third party software. Although there isn’t a huge choice of programs, here are three free ones for you to look at.

Folder Marker

Folder Marker comes in 3 different versions, Free and shareware Home/Pro. You can actually use the extra functions of Pro and Home after the trial period expires although there’s a 2 minute nag window on startup. We’ll look at the free version here. While the choice of built in icons is much smaller in the free version, there is still just over 20 to choose from.

folder marker free

Alternatively, you can add your own custom icons in the User Icon tab. The supported file types that include icons are ico, icl, exe, dll, cpl and bmp. The custom icon selection is very similar to the Windows built in icon changer. In addition to changing a single folder icon, there’s also the ability to change multiple icons and choose an icon as the system default icon. Each change option has a related menu entry to revert back to the defaults. There’s also a master reset to roll back all changes you have made with the program.

folder marker context menu

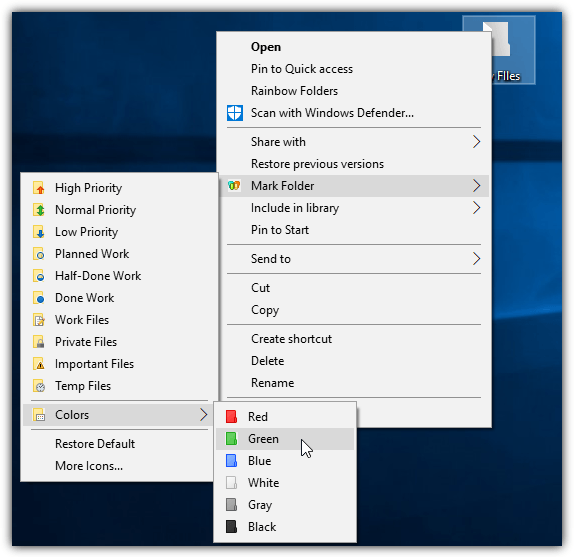
One of Folder Markers most useful options is the context menu. Right click on a folder and you get the option to instantly change to a number of preset folder type icons or 6 different colors. The option to change this menu is only available in the shareware versions of the program.

A sneaky way to get the shareware version icons into the free version is installing Home or Pro then copying the icl files from the Folder Marker ICL folder in its install directory. Then uninstall and install the free version and import any of the icl icons from the User Icons tab.

Download Folder Marker


File & Folder Tools

As well as changing folder icons, File & Folder Tools has many other useful functions. These include attribute and time/date changer, batch folder creator, duplicate finder, file shredder, file hasher, file/folder protector, advanced search, network share creator, file split and join, and take ownership. The program is a portable executable so no installation is required to use all these functions.

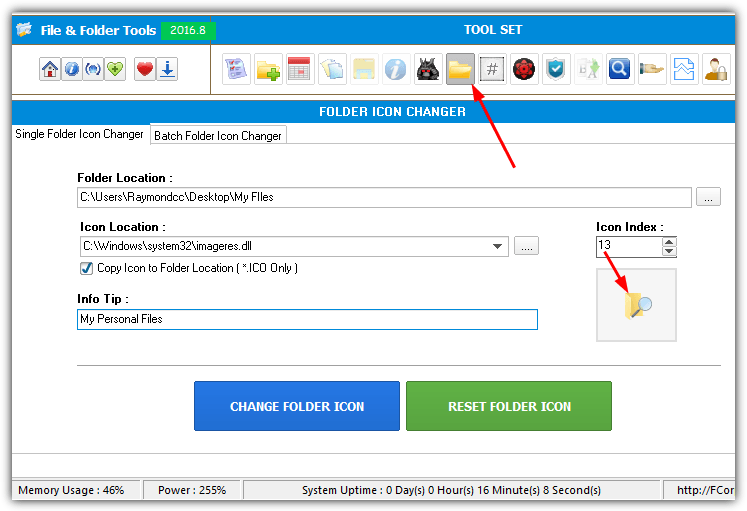
The Folder Icon Changer is split into two tabs, change a single icon or batch change several folders at once. The single icon tab is easy to use, all you have to do is browse for the folder to change and browse for the icon file that contains the icon. It supports ico files, dlls and exes but icon libraries (.icl) are not supported. Three Windows DLLs are pre entered into the drop down.

file and folder tools

Use the Icon Index buttons to browse through the available icons in the file. The Info Tip is optional and will display the entered text when you hover over the icon in Explorer. “Copy icon to folder location” will place a copy of the .ico icon in the folder which it’s being used for. The Batch Folder Icon Changer tab is pretty much the same but you get the option to drop multiple folders onto the window. Then they will all be changed at once to the icon you specify.

Download File & Folder Tools


Rainbow Folders

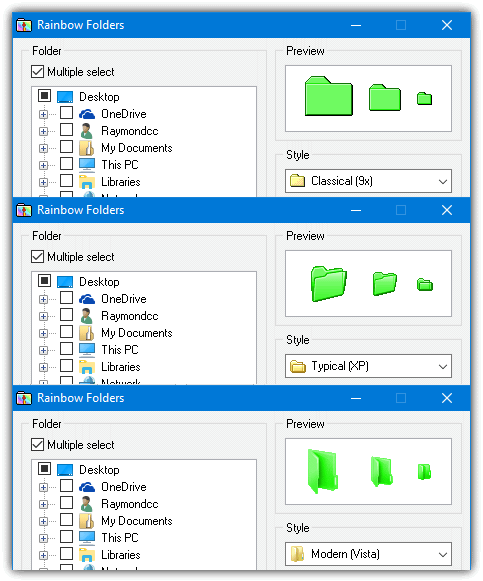
Rainbow Folders is a much older program than the other two here, dating back to 2008. It is also more focused on changing the colors of icon folders as opposed to using completely different types and shapes of icon. There are three built in types of icon; Classical (9x), Typical (XP) and Modern (Vista), there is no option to add your own icons.

rainbow folders icon types

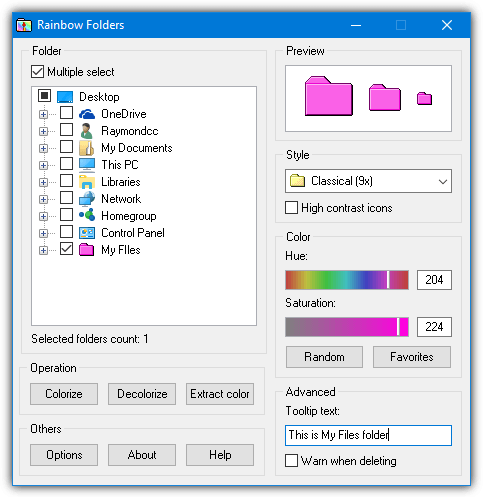
Besides selecting the icon style, you can choose an icon color by adjusting the Hue and Saturation sliders or pressing the Random button. Custom colors can be saved for later use by opening the Favorites window. Tooltip text allows you to add custom text when hovering the pointer over the folder. The Warn when deleting check box has no effect on operating systems newer than XP.

rainbow folders user interface

A useful feature is the Multiple Select checkbox at the top which allows selecting several folders to have their icon colors changed at once. Click Colorize to apply the color to the folder and decolorize to revert the icon back to normal. Like Folder Marker, Rainbow Folders has a right click context menu option although this one simply opens the program instead of letting you choose an icon from the menu.

Download Rainbow Folders

Change an Individual Folder Icon

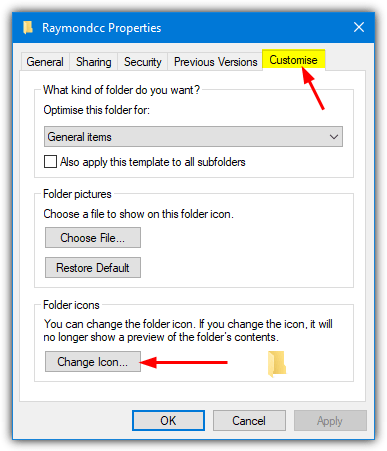
Changing several folders to different icons is easier with the methods above. However, if you want to occasionally change one or two icons, it’s simpler to do so through Windows itself. There is a simple option built in that allows you to choose a different icon for any standard folder. All you need to do is right click on the folder that you want to change and select Properties. Click on the far right Customize tab and then press the Change Icon button at the bottom.

customize icon in windows

By default, the system Shell32.dll will be selected which has hundreds of icons used around Windows. Click Browse and locate a custom icon file or a file which includes the icon you want to use. The icon changer accepts a standard icon file (.ico) and icons within icon library files (.icl), dynamic link libraries (.dll) or any executable (.exe).

change icon window

Press OK when you have clicked on and selected the correct icon. Even though you can select multiple folders and change the icon from the Customize tab, it still only affects one folder at a time.

Manually Change One Or Several Folder Icons

If for some reason the tools above are not producing the desired effect or you would like to know how to change folder icons the manual way, this is how to do it. Third party tools and Windows use the same method. It’s done by adding a file called desktop.ini inside the folder which tells Windows to use a different icon and where that icon is located.

Desktop.ini normally has its system and hidden attributes set so it’s hidden from view. To show the desktop.ini file in any folder go to Control Panel, open Folder Options/File Explorer Options and go to the View tab. Select “Show hidden files, folders and drives” and uncheck “Hide protected operating system files”. Also, make sure “Hide extensions for known file types” is unchecked so you can see the .ini extension. Click Ok when done.

show hidden and system files

1. Create a new text file in the folder you want to use a custom icon for using right click > New > Text Document, name it desktop.txt and NOT desktop.ini. The reason for this is explained further down.

2. Open the text file and you will need to add two lines, an example is below.

[.ShellClassInfo]
IconResource=C:\FolderIcon.ico,0

The first line tells Windows there are custom folder settings while the second is the full path to the icon file. The value after the comma is the index number of the icon inside the file. A .ico file has one icon so the index value of the first icon is 0. If there are ten icons in a .icl, .dll or .exe file the index of the fifth icon will be 4, the last icon will be 9, and etc.

3. After entering the two lines using your own icon path and the index value, save the file. Now you can rename it to desktop.ini. It is important that you rename the file to desktop.ini and not create a file directly called desktop.ini or it won’t show the custom icon.

4. You need to make this next change or the desktop.ini gets ignored and the custom icon won’t be displayed. Set the Read-only attribute for the folder itself. This cannot be done from the Windows user interface so Command Prompt is an easy option. Make sure to use quotes if your path has spaces.

attrib +r [pathtofolder]

attrib read only folder

Setting either the System or Read-Only attribute for a folder simply tells Windows it’s a folder that can have its view settings customized. The desktop.ini will be ignored until one of those attributes is set. Unlike files, the Read-Only attribute does not affect whether the folder can be deleted.

5. This step is optional and sets the attributes for the desktop.ini file to match those when set by Windows. This will hide the ini file and stop it being edited or deleted, providing you revert the view settings in Folder Options to the defaults.

attrib +s +h [pathtofolder]\desktop.ini

attrib desktop.ini

The folder should change immediately to the custom icon but if not, it will usually do so after several seconds and you go into the folder or refresh the view in Explorer.

Create a Desktop.ini Using a Batch Script

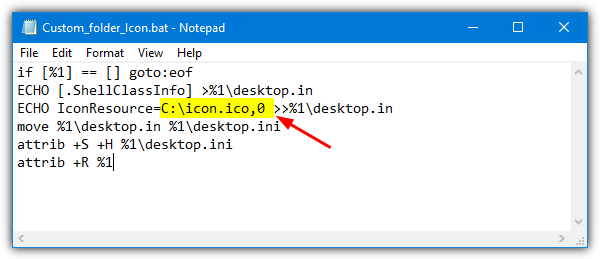
To make things a bit easier, you can also do the same using a batch script. We have created a simple script that will create a desktop.ini file with the name of the icon file you specify. Download the Custom Folder Icon .Bat file and open it in Notepad. Edit line 3 to match the name and path of your custom icon file and also its index value like in step 2 above. Save the batch file.

custom folder icon batch

Now all you have to do is drop a folder onto the .Bat file and its icon will change to the custom icon. The script creates the desktop.ini and then sets the attributes for both it and the folder. You can easily create several batch files using different icons. Drop one folder onto the batch icon at a time as only the first folder is processed. Remember it may take some seconds for the new icon to show.

Tip:  Sometimes the icon just won’t change and it looks like you might have done something wrong. The problem is often related to the desktop.ini file being recognized and used by the system. Sometimes simply renaming desktop.ini to something else and then back to desktop.ini is all takes to get everything working properly and the new folder icon to show. This is also the case if you edit the desktop.ini directly.

24 Comments - Write a Comment

  1. Mark 5 years ago
    • Mark 5 years ago
      • HAL9000 5 years ago
  2. AA 5 years ago
    • HAL9000 5 years ago
      • AA 5 years ago
        • HAL9000 5 years ago
          • AA 5 years ago
          • HAL9000 5 years ago
  3. MH 6 years ago
  4. Charles Barnes 6 years ago
    • HAL9000 6 years ago
  5. pc novice user 6 years ago
    • HAL9000 6 years ago
      • pc novice user 6 years ago
        • HAL9000 6 years ago
          • pc novice user 6 years ago
          • HAL9000 6 years ago
    • Ozmosis 5 years ago
  6. pc novice user 6 years ago
  7. Gaudy 6 years ago
  8. barry 6 years ago
    • HAL9000 6 years ago
  9. jamedom 7 years ago

Leave a Reply

Your email address will not be published. Required fields are marked *

Note: Your comment is subject to approval. Read our Terms of Use. If you are seeking additional information on this article, please contact us directly.