3 Ways to Change a Windows User Account Into an Administrator

As most computer users know, while you are using Windows, you are logged in with an account. There are different types of account to reflect the amount of control a user is allowed to have on the system, User and Administrator. The default account created on a new Windows is an admin account, and for other users you can create additional user accounts which are limited in what they can do and are useful for less experienced users or to deny high level access to others.
If you have a standard user account, there are simple ways to to promote it to a full administrator account, such as knowing the administrator account password if there is one and simply selecting the option from the Users Control Panel. If you’re unable to do it this way, there are other workarounds to turn a user into an administrator. One option is to use a piece of software from a bootable CD to do it for you. Here are 3 ways how you can do this.

1. PCLoginNow
PCLoginNow is an easy-to-use tool in the form of a bootable Linux CD that can reset local administrator and other account passwords. All version of Windows are supported and worked on 64-bit as well as 32-bit versions of Windows Vista and 7 when we tested it. In addition, PCLoginNow can also hide accounts from the system you don’t use, lock an account, and also do what we’re looking at here which is elevate a user into an administrator.
Only a few simple steps are required to turn a limited user account into administrator.
1. Download PCLoginNow and burn it to a CD.
2. Boot up the computer with the PCLoginNow CD.
3. Click the Next button when you see the message that says “PC Login Now! is ready to start, please click NEXT to continue…”
4. Click on your Windows install that is found by PC Login Now program. If you have more than 1 Windows operating system, choose the one you want. Click Next.
5. Select the user account that you want to edit, check the “is Administrator” box and click Next.
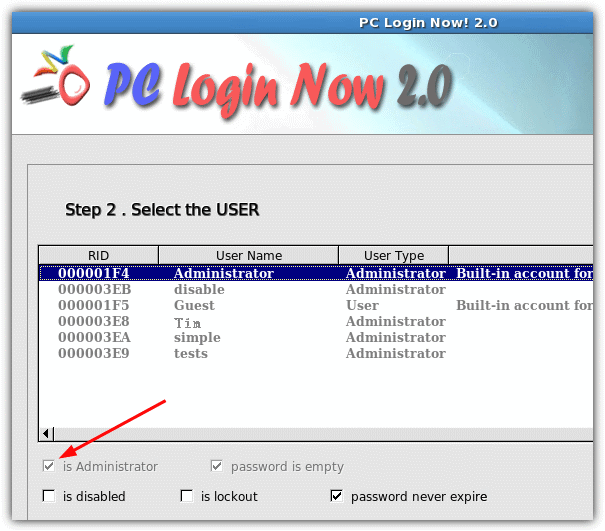
6. Reboot and the user is now a local administrator of the computer. On testing, it sometimes needed another reboot for the change to take effect.
Because PCLoginNow bases itself on an old version of SysLinux, some users are unable to get this tool to work or boot properly. If you can’t get it working, try the next solution…
2. Offline NT Password and Registry Editor
This tool is completely text based and can do pretty much the same as PCLoginNow, but has a few extra functions such as a registry editor and the ability to display your Windows product key etc. Of course, it can also reset account passwords, unlock or disable an account, and elevate users into administrators. The good thing is, this tool is present on Hiren’s Boot CD so you can use it on a disc already full of other useful tools.
1. Download Offline NT Password and Registry from the official website, CD ISO and USB ready versions are available, then boot it. Alternatively, Download Hiren’s Boot CD and use the “Offline NT/2000/XP/Vista/7 Password Changer” option from the main menu.
2. To make the program easier to read, type “boot vga=0” on the initial screen to keep the text a bit larger and more readable. At Step One, find the number of the volume that contains your Windows and type it in.
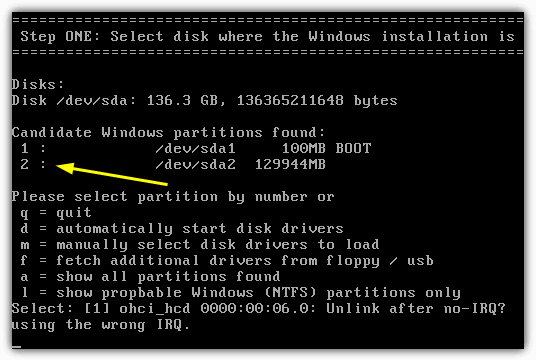
3. At Step Two, press enter to accept the default path to the registry, then type 1 to enter the SAM System Security screen. Type 1 again to edit user data and passwords.
4. Now you need to type in the user name of the account, it IS case sensitive. As you can see, there is a column which shows who the administrator’s currently are.

5. Press 3 to “Promote user (make user an administrator)”. Make a note of the warning and then press Y if you’re happy to carry on.
6. Press Shift+1 (!), then Q, then Y to write the information to the registry. Pressing N will finish the process and you will be prompted to use Ctrl+Alt+Del to restart the computer after removing the disc.
3. Password Renew for NT from Hiren’s Mini XP
This method is accessible from the Mini Windows XP component on Hiren’s Boot CD and as the tool only works on a 32-bit Windows, we’ll assume you have a copy of Hiren already either on CD or written to USB, and have booted into Mini XP.
1. From the Hiren tray menu, go to Password / Keys -> Windows Login -> “Password Renew (Reset user password – NOT 4 Vista/7 64bit)”.
2. In the bottom right of the program, click on “Select a target” and locate the Windows folder on the drive. This will cause the “Turn existing user to Administrator” link to become clickable.
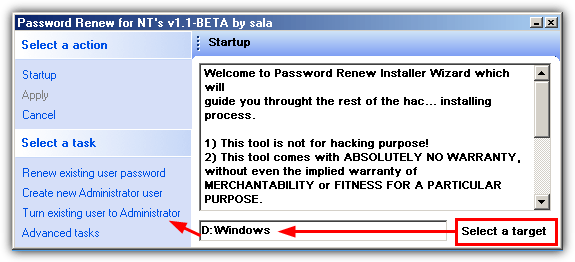
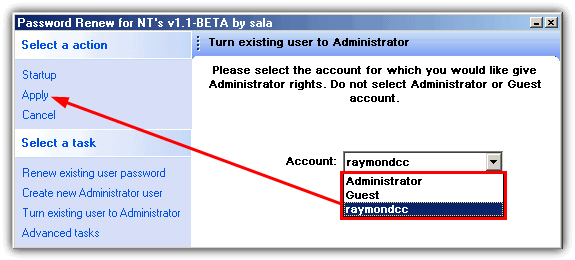
3. Now choose the user from the drop down and click Apply. After a short pause, you should get a success box. You can now quit out of Mini XP and reboot the computer.
Deleting an Elevated Administrator Account
Although as we’ve shown, it’s easy enough to turn a standard user account into an administrator, it becomes almost impossible to reduce the account back down to a normal user account. It’s also the same issue when you want to delete an account that has been elevated in this way. Try to remove the administrator account and it will delete the user’s files but won’t delete itself completely, and using the DOS Net command or Computer Management will most likely produce an error.
To remove the remaining components of the account such as getting the name out of the Users Control Panel and the logon screen, we had to resort to editing the registry offline. After several hours use, there seemed to be no adverse effects, but if you’re going to follow the instructions below, please make sure you have experience editing the registry, adequate backups and do this AT YOUR OWN RISK!
1. Download Hiren’s Boot CD if you don’t have it already, burn the ISO to CD or write to USB and boot from it, select Mini Windows XP from the main menu.
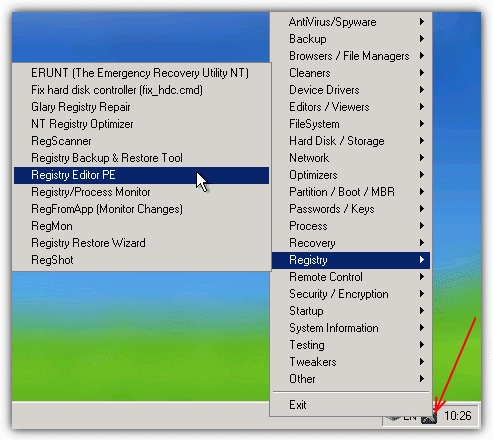
2. Click on the Hiren icon in the tray and go to Registry -> Registry Editor PE. When asked to, set the offline Windows directory (usually C:\Windows) and press OK.
3. Click on Load to open each of the registry hives in turn, when asked to load NTUSER.DAT, press No.
4. In Regedit, expand HKEY_LOCAL_MACHINE and the offline hives will appear with the _REMOTE_ prefix. Navigate to:
_REMOTE_SAM\SAM\Domains\Account\Users\Names
5. Click on the name you want to delete and note the value under Type in Default. You should see a key called that in the Users key.
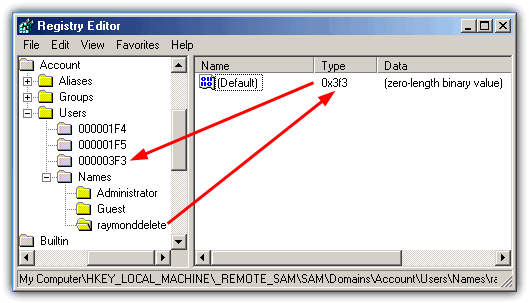
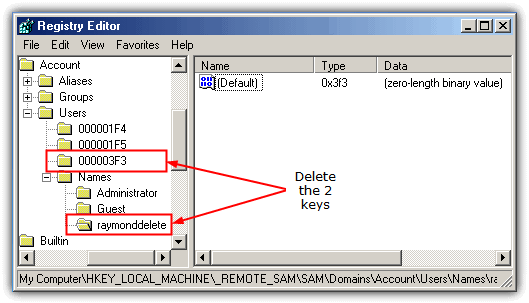
6. Now right click and delete the named user’s key in Names and the matching Type value under Users.
7. Close the registry editor, wait for it to unload the hives, then reboot the computer back into your operating system. Now the administrator account should be gone from Windows, any leftover files can be deleted from Users or Documents and Settings.


User forum
13 messages