Hide or Remove “Safely Remove Hardware” Tray Icon
Do you notice that whenever you plug in a USB device such as USB flash drive or an external hard disk, a USB flash drive icon with a check mark will appear at the notification area? The purpose of the icon is for you to safely eject your hardware. Even though USB is hot-pluggable which means it can be inserted and removed when Windows is running, it is advisable to eject the device before removing it to prevent data loss because you might still have a locked file that’s still in use and forcefully pulling the device out will cause the file to get corrupted.
If you want to hide the “Safely Remove Hardware and Eject Media” icon from the notification area, it may seem impossible because the most you can do is set it to “Hide icon and notifications”. Setting this option will hide the icon from desktop but still can be accessed by clicking from the arrow icon pointing upwards to show the hidden icons.
Fortunately we’ve managed to figure out how permanently hide the Safely Remove Hardware icon from the system tray even if there is a removable USB device connected to the computer.
The easiest way is to download a freeware program called Icon Remover where you can easily show or remove the Safely Remove Hardware icon with a click of a button. It used to be a shareware that cost $10 for personal license, $195 for educational license and $395 for commercial organizations but has turned into a freeware.After installation, run the program and click the action button that you want. The changes takes effect instantly without restarting the computer. If you wonder how to safely eject the USB drive without the icon, you can just right click on the drive letter at My Computer and select “Eject”.
Do take note that Icon Remover must be installed in order to hide the Safely Remove Hardware icon. It means that even if you click the “Remove the ‘Safely remove Hardware’ Icon” and then uninstall the program, you will notice that the icon will be restored when you restart the computer. After an extensive research and testing, we found that changing a registry value and running the systray.exe file to refresh the setting can hide the Safely Remove Hardware icon but then the registry value will be automatically reverted back to the default when you restart. So what Icon Remover does is it sets the registry value and run systray when Windows is booted up.
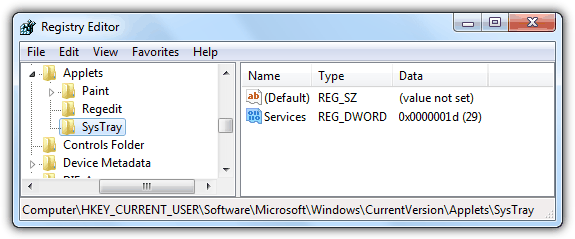
If you think it is unnecessary to install a third party program just to hide the safely remove hardware tray icon, you can just download the batch file below and put it at Startup folder which actually does the same thing as Icon Remover. This batch file and Icon Remover program will work on XP, Vista and 7 without UAC elevation.
First of all, I’d like to point out how ridiculous it is that THREE YEARS after MS made it unnecessary to use this, they’re still forcing this icon into users’ trays. Anyways, I spent a fair bit of time writing both a batch and powershell script to automate this process, thinking I could post it here for people who can’t figure out how to do this manually to use, only to find that changing this registry setting IS ONLY A PARTIAL FIX. It causes the icon to be hidden when booting up, and therefore will get rid of it a majority of time for most users, but if explorer.exe crashes or is restarted by the user, it comes back. Windows basically says FU to the user and decides that even though you went through the effort of changing that value, it’s going to just change it back. So the entry needs to be modified and systray.exe needs to be run EVERY TIME EXPLORER LOADS to completely fix this issue. Unfortunately, AFAICT there’s no way to do this with a script or simple registry tweak, but I did figure out how to do it.
To fully solve this, a task needs to be created (in task scheduler) to run every time the RunOnce registry key is run, as that happens every time explorer.exe loads. You can’t simply put the command in there, because RunOnce entries are cleared after running, so it has to be a task triggered by that. Here are the details for setting it up manually and, if it lets me, the xml for the task to allow for more-or-less automating it’s creation:
Name (can be whatever you want): Remove Safely Remove Hardware Tray Icon
Run as user, only when logged on
Trigger: On an event (Basic — Log: Microsoft-Windows-Shell-Core/Operational ; Source: Shell-Core ; Event ID: 62170 ; advanced settings all disabled except, obviously, enable the task itself)
Actions: Start a program (see below*)
Conditions: All unchecked
Settings: Probably doesn’t matter, but I set it to allow task to be run on demand, stop if runs longer than 3 minutes, force it to stop if it doesn’t end when requested, and don’t start a new instance
*Actions: The first pair runs it hidden, which requires extra commands and won’t work if wsh or vbs are disabled. Recommend to try it first and, if it doesn’t work, use the second pair, which will flash a command window when it runs, though it should be very brief. Make sure to include the ENTIRE line, and modify the timeout value (timeout /t x) up or down as needed. Recommend not removing or lowering less than 5 as explorer may not be loaded fully enough and it may not work, and in fact more time may be needed on slower systems, but I’ve tested it at 5 seconds extensively and it’s worked flawlessly.
Use one OR the other:
Program/script: mshta
Arguments: vbscript:Execute(“CreateObject(“”WScript.Shell””).Run “”cmd /c timeout /t 5 & reg add HKCU\Software\Microsoft\Windows\CurrentVersion\Applets\SysTray /v Services /t reg_dword /d 29 /f & systray””, 0:close”)
Program/script: cmd
Arguments: /c timeout /t 5 & reg add HKCU\Software\Microsoft\Windows\CurrentVersion\Applets\SysTray /v Services /t reg_dword /d 29 /f & systray
To import the task instead of creating it from scratch, copy and paste the following into a file and save it as “Remove Safely Remove Hardware Tray Icon.xml” (or whatever you want to name the task). Then open Task Scheduler and click “Import Task…” on the right, browse to the file you just created, and open it. Once it imports, it should open a “Create Task” window, in which you will need to make one change. On the General tab, click the “Change User or Group” button (or press Alt+u), then “Advanced” (or Alt+a), then “Find Now” (Alt+n), then finally scroll down and find your Windows account username, select it, and hit enter three times to close it all out and save it. That’s it. I could easily make a batch file to do ALL of this automatically, since even with these steps I’m sure some will be overwhelmed, but files can’t be posted in comments. If the site admin would like me to do so, for them to post it on this page, please let me know.
And here’s the content to paste into the xml:
2022-06-27T00:15:39.1874766
\Remove Safely Remove Hardware Tray Icon
~~SID~~
InteractiveToken
false
true
PT3M
IgnoreNew
true
false
<QueryList><Query Id=”0″ Path=”Microsoft-Windows-Shell-Core/Operational”><Select Path=”Microsoft-Windows-Shell-Core/Operational”>*[System[Provider[@Name=’Microsoft-Windows-Shell-Core’] and EventID=62170]]</Select></Query></QueryList>
mshta
vbscript:Execute(“CreateObject(“”WScript.Shell””).Run “”cmd /c timeout /t 5 & reg add HKCU\Software\Microsoft\Windows\CurrentVersion\Applets\SysTray /v Services /t reg_dword /d 29 /f & systray””, 0:close”)
Apparently this site’s commenting system doesn’t handle xml well at all, so ignore the xml content at the end and just do it manually, or you can (hopefully) find the same instructions elsewhere, as I posted them to a few sites to help people find them, but of course there’s no telling if they’ll actually be accepted or not, especially since they use Disqus(ting) which I’ve had constant issues with.
I like the batch file but unfortunately it runs before the startup process is complete. Any way to add a say a 5 second time delay to it?
If you’re using Vista or above, simply open the bat file with Notepad and insert a new line at the start with ‘Timeout /t 5’, which will pause the script for 5 seconds. It does however leave the Command window open for 5 seconds as well, not a problem if you don’t mind.
There is also software around that will delay startup programs or you can delay the script via a Scheduled task for 30 seconds. Not the easiest thing to do, but I can show you if you really want to know.
Thank You