5 Ways to Extract Frames from Video: Best Extractors in 2025
Grabbing frames from videos is easy if you just need one still image—pause, screenshot, done. But videos are really thousands of still images played fast (24–30 frames per second), and pulling out a whole sequence manually is a pain.
Instead, here are 5 simple software you can use to extract multiple frames automatically and save yourself the hassle
Best Video Frame Extractors
Here’s a quick overview of the best file extracting tools we selected. You can find more details about each of them in the dedicated min-reviews below.
| Tool | Best For | Key Strength | Limitations |
|---|---|---|---|
| Free Video to JPG Converter | Quick, flexible extraction | Easy UI, multiple extraction modes | Bundled software (opt-out needed) |
| VLC Media Player (GUI) | Casual users & short clips | Built-in tool, no extra install required | Requires real-time playback |
| VLC (Command Line) | Automation & precise control | Scriptable with start/stop frame control | Command line use required |
| VirtualDub | Fast bulk extraction | Super fast, supports frame ranges | Needs plugin for modern video formats |
| FFMpeg | Power users & advanced setups | Extremely flexible and format-friendly | No GUI, steeper learning curve |
1. Free Video to JPG Converter – Best for quick and flexible extraction options
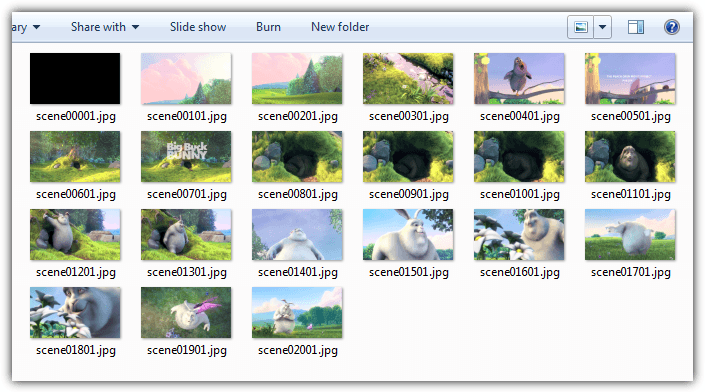
The program itself will save frames from a video file to a sequence of JPG images. There are four extraction methods to choose from, extract an image every number of frames, extract an image every number of seconds, take a total number of frames from the video or extract every single frame.
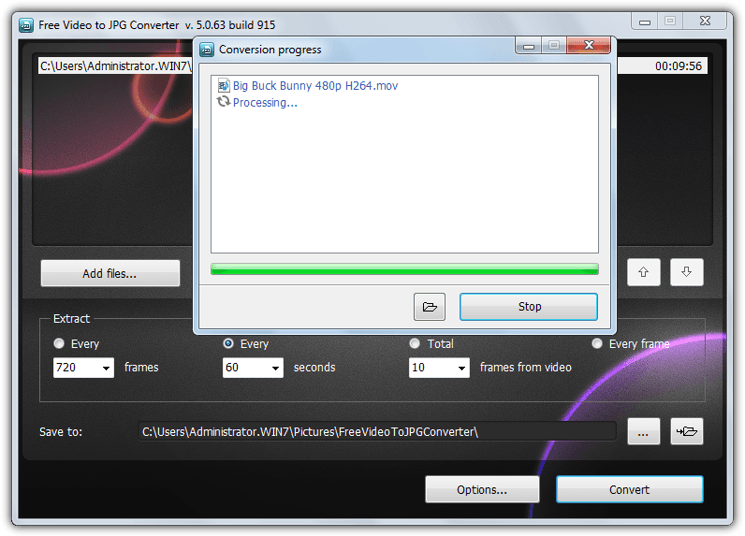
Add any number of video files by using the Add files button or drag and drop, most video formats are supported like MP4, MKV, AVI, VOB, WMV, MOV, FLV and etc. Set your extract criteria and optionally a different save location to the default, then start the process. Extraction times are reasonable and will differ depending on video length and how many frames are being extracted.
There are a few issues with one or two of the preset values or if you enter a custom value in the frame boxes. For instance, the total frames from a video setting of 10 doesn’t produce an expected equal split of 10 frames across the whole video. It’s still a useful tool though and worth checking out because Free Video to JPG Converter is still faster than extracting images in real time.
If you have Windows 10 but not .NET Framework 2/3.5 then it will be offered on install.
Download Free Video to JPG Converter
Note: Like all DvdVideoSoft products, Free Video to JPG Converter always comes bundled with something you don’t really want. At the moment it’s just a DVDVideoSoft product hub which you can delete the shortcut for on your desktop and a stats option on install which is opt in. That could change to anything else at any time though so you just need to pay attention during setup.
2. VLC Media Player – Best for casual users already using VLC
VLC is a popular open source media player that can save sequences of images from any video you choose to play. This can be achieved through the main user interface while more advanced users can use Command Prompt. First we’ll deal with the user interface method.
1. If you haven’t already, Download VLC media player and install or Download Portable VLC media player and extract to a folder of your choice.
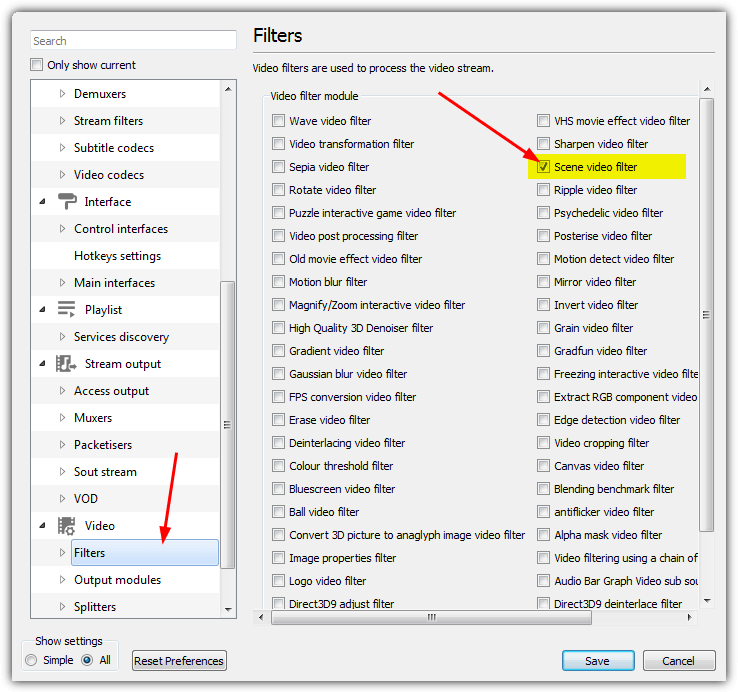
2. Open VLC, go to Preferences (Ctrl+P) and click on Show All Settings at the bottom left.
3. Expand Video > Filters in the tree and click on Scene Filter. Set the image format (png/bmp/jpg etc), the path to save the files (leave blank to save to your Pictures folder) and the recording ratio. The ratio will save an image every xx number of frames, so if your video is 30 frames per second, a value of 150 will save an image every 5 seconds.
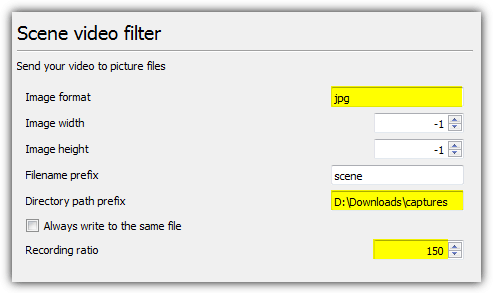
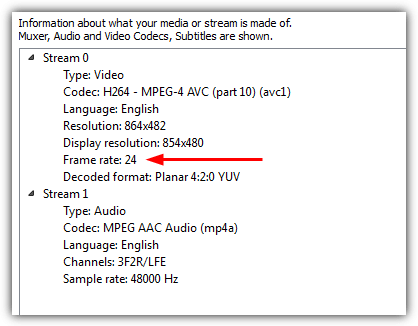
Tip: If you’re not 100% sure of the video’s frame rate, play it in VLC, press Ctrl+J and look for the frame rate number. Using multiples of that value will give you a recording ratio in seconds.
4. Click on Filters in the Advanced Preferences tree (don’t expand it) and tick the Scene video filter box near the top right, press Save.
5. Play the video file and the images will automatically start saving. They will continue to save until you press stop, even if you pause or skip through the video.
Note: If after following these steps images are not being created, close VLC after step 4 and re-open it, then play the video. For some reason more recent versions of VLC do not recognize the scene filter is enabled until you close and re-open the program.
Once you are done saving frames the option needs to be turned off again or it will do the same with every video you play. Follow steps 1 and 3 above then untick the Scene video filter box. The biggest drawback with VLC is that you have to leave the video running while taking the images, for this reason we recommend VLC for shorter clips only unless you plan to watch the video anyway.
3. Extract Images with VLC from the Command Line – Best for targeted, automated frame extraction
Using the Command line to extract image frames with VLC is similar to the GUI method which will save the specified number of frames. Open a Command Prompt and change the directory to where vlc.exe is located, then type in the command below:
vlc.exe “pathtovideo” –video-filter=scene –vout=dummy –start-time=300 –stop-time=600 –scene-ratio=250 –scene-path=”pathtosaveimages” vlc://quit
Pathtovideo is the name and path of the video file, –scene-path is the target folder for the images while –scene-ratio is the frame save interval. An advantage over the GUI method is the ability to use –start-time and –stop-time to start and stop saving frames at specific times (in seconds). Leave those switches out if you want to play the whole video. Refer to the complete list of commands at the Videolan website.
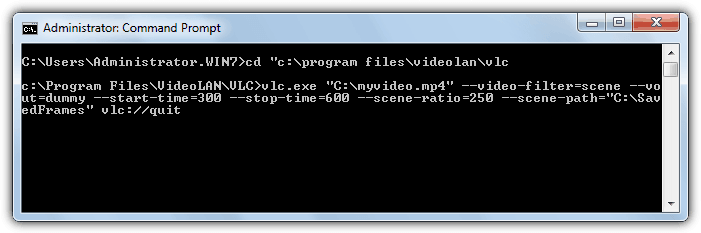
VLC will run and start the playback but without the screen. Once finished, it will automatically exit.
4. VirtualDub – Best for high-speed extraction and precision control
VirtualDub is a video processing tool that seems to have been around for ever, but it’s still a popular and useful program. The main issue with VirtualDub is lack of support out of the box for opening video files like MKV, MP4 and MOV, but this problem can be rectified by installing the FFMpeg plugin pack. Here’s how to extract video frames to images with VirtualDub.
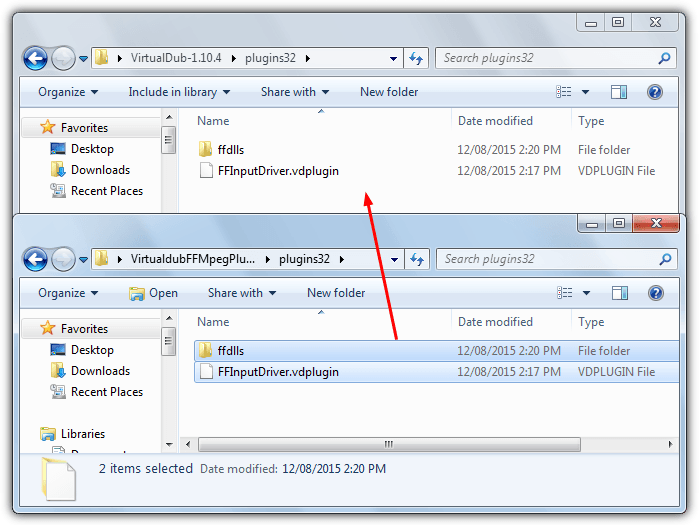
1. Download VirtualDub 32-bit version and also the VirtualDub FFMpeg Input Plugin from Sourceforge. Extract both zip archives.
2. Go to the VirtualdubFFMpegPlugin\Plugins32 folder, copy FFInputDriver.vdplugin and the ffdlls folder, then paste both into the VirtualDub\Plugins32 folder.
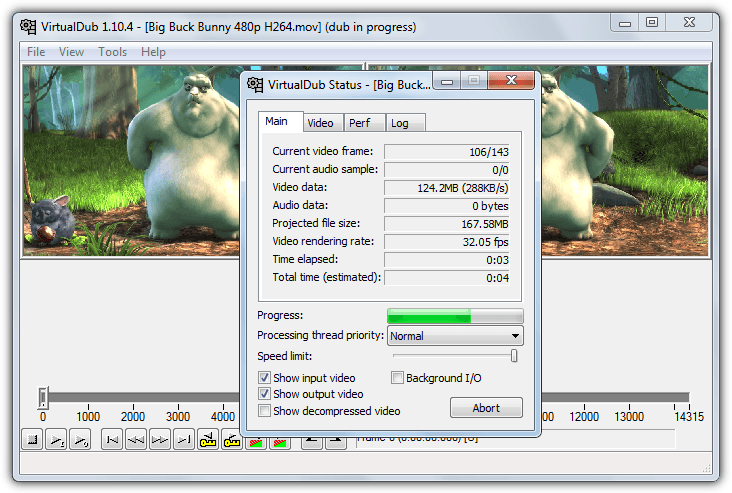
3. Run Virtualdub.exe and open the video file by using File > Open or drag and drop. If you wish to save every frame of a small video file to images, skip to step 5.
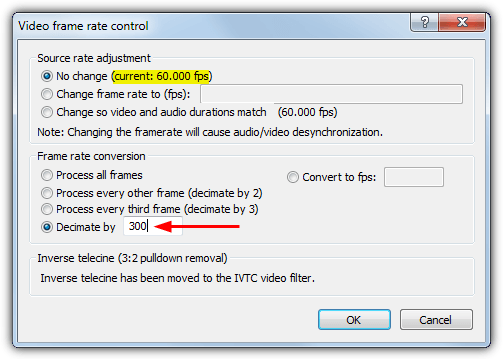
4. Go to Video > Frame rate (Ctrl+R) and select Decimate by, then enter a number to save an image every xx number of frames. The No change option at the top will tell you how many frames per second the current video uses. Click OK.
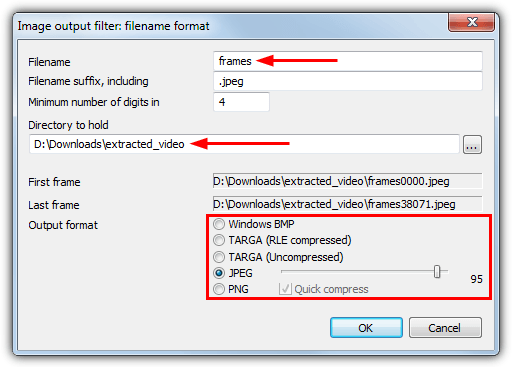
5. Click on the File menu > Export > Image sequence. Enter the filename to save as, the folder to save into and the output format of BMP, TGA, JPEG or PNG. Then click OK and VirtualDub will begin to process the video.
If the method of extracting every set number of frames is what you are looking for, VirtualDub is by far the best tool to use because it’s incredibly fast to extract the images and much faster than VLC and Free Video to JPG Converter.
An additional option in VirtualDub is setting a specific range inside the video itself so only images between the two points are saved.
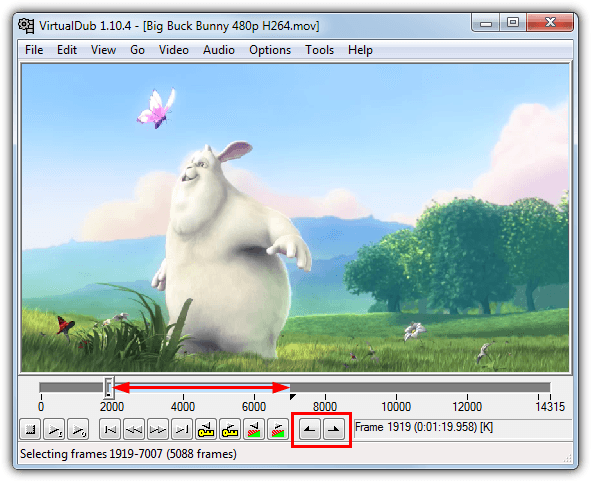
Before saving at step 5, use the slider and frame controls to set the start range and press the Home key or selection start button (in the red box above), move the slider to the end of the range and press the selection end button or the End key. Now when you save the images, only the selected frames will be saved between the start and end selection points.
5. FFMpeg – Best for power users and automation
FFMpeg is a framework for encoding, muxing, transcoding, streaming and playing video files, and is the backbone of a vast array of video converters and players. It runs only from the command line so is better suited to experienced users. FFMpeg should handle just about any video file you throw at it. Here’s a simple command line argument.
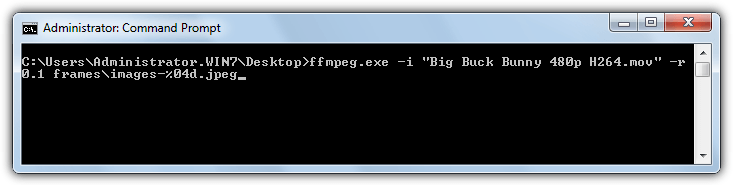
ffmpeg -i videofile.mpg -r 1 image-%04d.jpeg
The -i is the input video file with path and the jpeg filename simply saves jpegs (you can also use png, bmp, tiff etc) with the name and 4 place holding numbers, e.g. image-0001. The -r command is the frames to capture and the reverse of how you would expect it to work. 1 will save a frame every second while 0.5 will save every 2 seconds, 0.2 every 5 seconds, 0.1 every 10 seconds, 0.0167 for 60 seconds and etc. Use 1/seconds in Windows Calculator to get the ratio you need.
More advanced usage can add a starting point in the video file with the -ss command before -i, while -t can also be used to add a duration. Both use an [hours:]minutes:seconds argument.
ffmpeg -ss 04:00 -t 03:00 -i videofile.mpg -r 0.033 image-%04d.jpeg
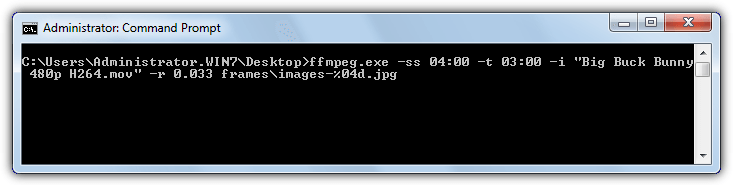
The above command will start at 4 minutes in, then save a .jpg at 30 second intervals for 3 minutes.
The are hundreds of commands and you really need to read the FFMpeg documentation to understand how it can be fully utilized from the command line and in scripts.
Final Note: There are obviously other tools around that can do a similar task, Batch Video to image Extractor would have been included but it’s quite unstable and has been discontinued by the developer. Daum PotPlayer and GOM Player are media players that work in a similar way to VLC, meaning you have to play the video in real time to get the selected frames.
If you’re just starting out and want to know more about working with video files, check out our guide on how to display thumbnail previews of video files on Windows—a simple way to identify frames quickly. For those needing to capture screenshots or extract specific images from videos, we’ve got you covered with a straightforward approach. And if you’re working with GIFs, be sure to explore how to split or break GIFs into individual frames to get a closer look at every detail.

Improve this guide

User forum
64 messages