How tp Disable or Enable USB Write Access via Registry

With everybody who owns a computer seemingly having at least 1 USB pen stick or portable hard drive to hand these days, it’s now easier than ever to quickly transfer data from one machine to another. While this makes it great for portability, it does also mean that it’s easier than ever to just plug the device in to a USB port and copy files over, whether you want to allow them to be copied to a removable storage device or not.
Obviously you could go into Device Manager and disable all of your USB ports, or perhaps just the front ports on your desktop PC, but that’s not exactly the best way to go about it. While it does work, those USB ports are completely inaccessible until you go back into Device Manager and they are enabled again.
We have previously written an article about how to disable removable storage devices such as USB drives while still allowing your USB scanner, keyboard, and mouse working. But what if you want to disable any data from being written to the removable storage device, but still want to allow it to be accessed and data read from it? It is possible for some USB flash drives with a write-protect switch making the drive read only but it’s very rare nowadays.
Thankfully, Microsoft have thought of this scenario, and there is an option in Windows that allows you make USB storage devices read only. By design though, this option is not available in an obvious place like the Control Panel, it’s not even available in the Group Policy Editor. It’s a switch inside a registry key in the registry.
Here’s how to disable (and re-enable) write access to removable storage devices such as USB pen sticks and portable hard drives:
Using ready made .reg files
The registry key and value that enables and disables write access is not present on all systems by default. Therefore the easy way to do it is to download and run a ready made .reg file. which you just double click to disable write access.
Download the following file to disable write access. This creates a new registry value named WriteProtect with a value of 1 to enable write protection.
Download this file to re-enable write access again. This changes WriteProtect from 1 to 0.
Download this file to delete the WriteProtect value from the registry entirely. This is more of a troubleshooting measure and not essential if you have no problems.
Download DeleteWriteProtectValue.reg
Simply download and execute which one you want, and when asked, import into the registry.
Editing the Registry Yourself
If you prefer to edit the registry and do it yourself, it’s pretty easy and only involves creating and editing a single key value.
1. Go to Start -> Run -> Type regedit and hit Enter or click on the OK button. For Vista and 7 go to Start -> type regedit into the search box, hold Ctrl+Shift and press Enter. Ctrl+Shift opens regedit as Administrator.
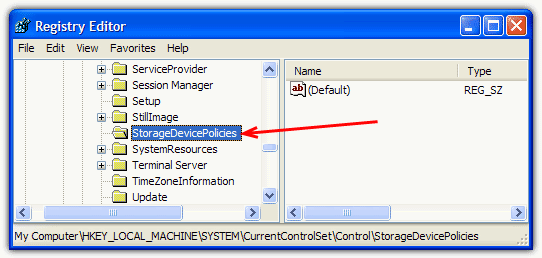
2. Browse to:
HKEY_LOCAL_MACHINE\SYSTEM\CurrentControlSet\Control
Look for a key in Control called StorageDevicePolicies. If you have a key with that name go to step 4. If not, follow step 3.

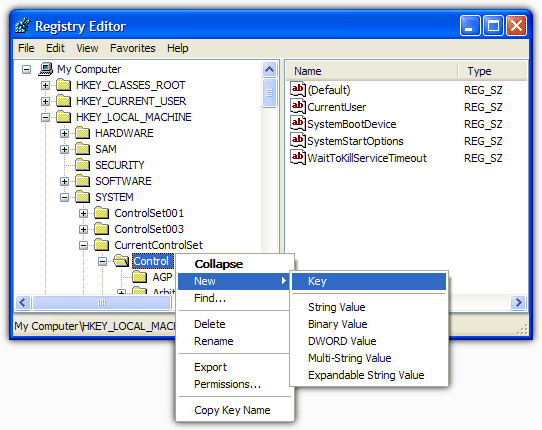
3. You need to create a new key called StorageDevicePolicies. Right click on Control, select New -> Key and type in StorageDevicePolicies. Make sure not to include any spaces before or after.

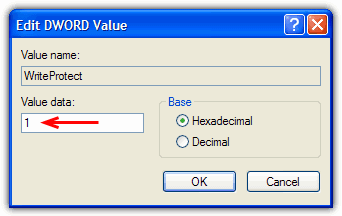
4. Right click on the StorageDevicePolicies key and select New -> DWORD Value, or DWORD (32-bit) Value for 64-bit operating systems, and call it WriteProtect. Double click on WriteProtect and set the value from 0 to 1.

This will prevent users from writing to USB drives with the message “The media is write protected”.

The procedure to allow writing again to USB storage devices is simply setting the Write Protect value back to 0. To avoid any potential issues it’s best to perform this procedure while you don’t have a USB storage device plugged in. Although I simply unplugged my USB stick and reinserted it for the registry change to take effect, it might avoid any other problems that might occur.
The good thing about this is you don’t need to restart, I’ve been able to test this method several times without rebooting either XP or Windows 7 once. This is confirmed to work perfectly fine on Windows 7 32-bit and 64-bit.
If you want to use a piece of software which can completely disable write access on the USB stick meaning it can be write protected on any PC, you might like to have a look at USB Disk Manager. Another option is to fill the USB stick up with dummy data meaning writing to it is impossible.


User forum
12 messages