To Skip Disk Checking Press any Key: How to Disable it
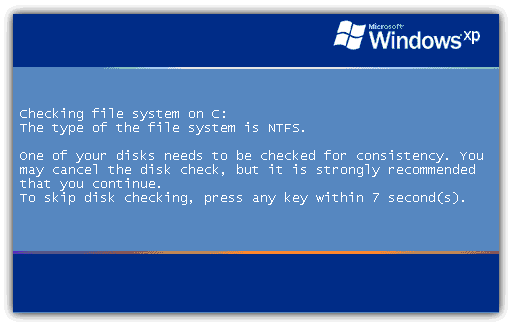
One of Windows annoying so called “features” is the Windows disk checker (Chkdsk) being automatically executed whenever you don’t shut down your computer properly. The blue colored screen appears on Windows XP or black colored screen for Windows Vista and 7 during boot that says:
Checking file system on C:
The type of the file system is NTFS.
One of your disks needs to be checked for consistency. You may cancel the disk check, but it is strongly recommended that you continue.
To skip disk checking, press any key within 10 seconds(s).
Simply pressing any key would stop Check disk from running but when you restart your computer, you’ll get this prompt again because Windows still thinks the drive needs scanning and will keep reminding you until it is checked. Sometimes, even after letting Check disk scan the drive that it wants to, the checking process would still automatically run at next boot and it wants to check the drives again.
What we have found out is that when Windows detects there has been an improper shutdown or a drive such as a USB flash drive has been ejected before the system has finished with it, a secret value is stored on the drive to let Windows know about the issue and force a Check disk request. This value is known as a “Dirty bit” and is a single hex value (2 values for Windows 8) that Windows looks at on boot for system drives or when the the external device is inserted.
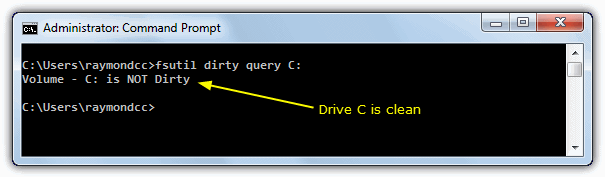
One easy way to determine if a drive letter is marked as dirty and will require auto chkkdsk on boot is to run the command fsutil dirty query C: in Command Prompt. If the fsutil tool reports that the drive letter is not dirty, the disk checking process will not want to run for that drive. However, when a drive letter is being marked as dirty, we discovered the location of the hex values on the drive that are being modified and resetting the dirty bit hex value to default will magically stop the auto disk check on boot.
While resetting the dirty bit manually would be the best solution for many situations, it is more difficult to do on system drives such as C because they will be locked and not allow editing from within Windows to change the bit value. Another option for these drives is to simply instruct Windows not to bother checking whether they have been marked as dirty on boot, so you’ll never get a request to auto check them again. Here’s how to disable or stop Check disk from scanning your drives in Windows boot for Windows XP, Vista, 7 and Windows 8.
There are people who suggest editing the registry to do this which works if done properly, but the recommended and safer way to disable auto Check disk from starting up is using the /x switch via the chkntfs command in Command Prompt. This switch will exclude a drive from the default boot time check. To get to the Command Prompt, go to:
Start -> Run (or Win key+R) -> type cmd and press enter
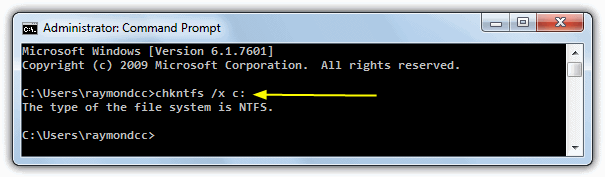
If you have drive C: as the drive you want exclude, then the command to disable chkdsk from scanning the C: drive would be:
chkntfs /x c:
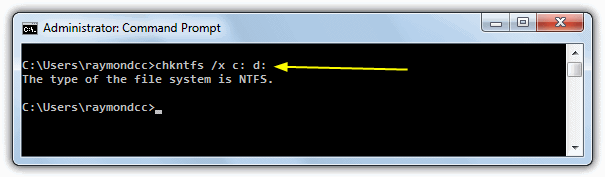
If you have a second drive to exclude, C: and D: for example, you can disable Check disk with the command below. Simply add all the drives you want to exclude in this way, separating them with a space.
chkntfs /x c: d:
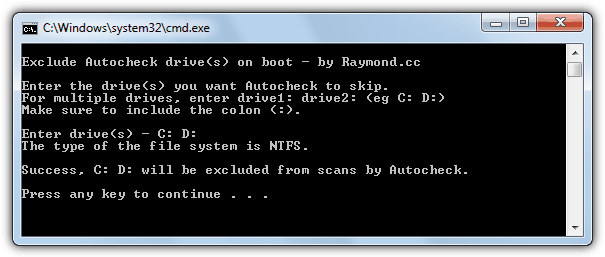
Sometimes users don’t like editing the registry or using the command prompt, which is why for your convenience, we have created a simple batch file to run the command for you. Download and run the .bat file, then enter the drive letter(s) to exclude from autocheck when prompted, the rest is automatic. Make sure to right click and “Run as Administrator”.
Download Autocheck Boot Exclude.bat
There are some experts who believe that it’s better not to disable Check disk from scanning your hard drive. But sometimes it makes sense if you don’t want it to scan your hard drive because if it finds anything bad, damaged files will be changed to File00001.CHK. When that happens, you will have to use data recovery software or some third party tools to recognize and recover the CHK files.
There are other important functions the Windows chkntfs command performs you should know about, which are discussed in more detail on page 2.

Improve this guide

User forum
135 messages