6 Ways to Disable F8 Key & Safe Mode in Windows
Whenever Windows is not working properly, most of the time the first thing that knowledgeable users will do is boot the computer into Safe Mode and see if the problem still persists. If Windows will only boot into safe mode and not normal mode, then typically it has a major problem such as disk corruption or the installation of poorly configured software or hardware driver that prevents the operating system from successfully booting normally. Windows in safe mode will have reduced functionality, but the task of isolating problems is easier because many non core components are turned off.
Although Safe Mode is very useful for troubleshooting computer problems, it can also be used to bypass some security software that will auto start with a normal Windows boot. An example is if you installed an internet monitoring software which restricts or watches your children to use the computer at certain times, they can simply boot in to Safe Mode if they know how and use the computer the whole day. There are times when we need to disable Safe Mode for extra security.
There isn’t one single setting to disable Safe Mode in Windows, but a number of hacks and workarounds. Here’s some for you to have a look at.Disabling Safe Mode in Windows XP
Firstly we’ll show you some ways you can disable safe Mode if you’re using Windows XP.
Editing the Windows XP Registry
Quite a well known method is to modify your system registry with the idea of renaming the keys that Safe Mode relies on to boot, this in turn causes the computer to reboot or throw up a blue screen of death if anyone tries to get into Safe Mode. Just follow the steps below on how to accomplish it.
1. Go to Start -> Run (or Win key+R), type regedit and press enter.
2. Navigate to:
HKEY_LOCAL_MACHINE\System\CurrentControlSet\Control\SafeBoot
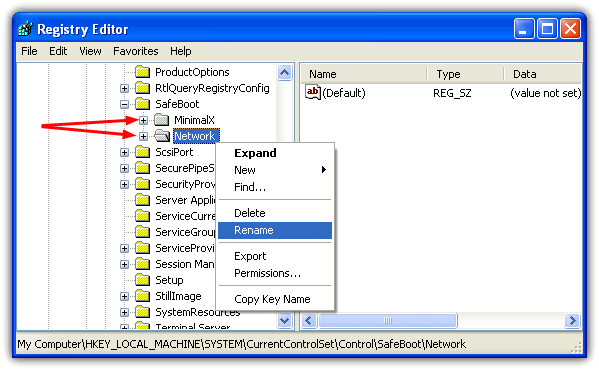
3. Expand the SafeBoot key and you should see 2 sub keys with the names Minimal and Network. DON’T delete them, but rename both of the keys to something else, for example, Minimal to MinimalX and Network to NetworkX.
Now if you try to boot in to Safe Mode, it doesn’t matter if you select the normal Safe Mode, Safe Mode with Networking or Safe Mode with Command Prompt, the computer will either auto reboot or throw up a blue screen of death (BSOD) with a STOP error.
To enable Safe Mode again, just go back into the registry and rename MinimalX to Minimal and NetworkX to Network. This solution isn’t perfect because anyone who knows about this trick can simply modify the registry to re-enable Safe Mode. If Windows doesn’t boot and you want to get into Safe Mode, you will need to edit the registry keys offline using a boot CD. Follow the instructions in our article “How To Edit Registry Key Values without Booting into Windows“.
Enable/Disable Safemode Tool
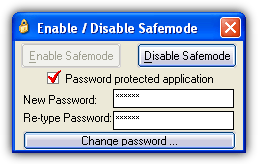
If you’re not comfortable in modifying your system’s registry, here’s a small free tool called Enable/Disable SafeMode which does just that. Basically it does the exact same thing as above which is renaming the SafeBoot Minimal and Network keys. You can also set an application password to prevent unauthorized access to this tool.
The program is easy to use and is pretty much self explanatory, click the buttons to enable or disable and optionally supply a password to stop any unauthorized use of the tool. Actually, if you can create a Limited User account, you wouldn’t need to use this registry hack because a limited user cannot access the registry. These registry edits are solutions to those that for some reason don’t want to create a Limited User.
Download Enable/Disable Safemode
Hacking the NTLDR Boot Loader
This method is to hex edit the hidden NTLDR file in the root of the drive where the operating system is installed. This won’t work on anything above XP because newer operating systems use BOOTMGR/Winload.exe. Follow the steps below.
1. Assuming that your XP Windows install is currently the C: drive, press Win key+R and type in the following to unhide and make the file writable:
attrib -r -s -h -a c:\ntldr
2. Go to the C: drive and make a backup copy of NTLDR and either keep it in the root of C: as “Copy of NTLDR”, or keep it in a safe place.
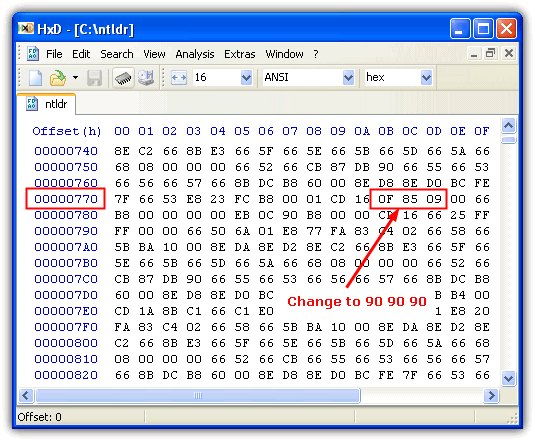
3. Download HxD, a freeware portable hex editor, extract and run HxD.exe. Drag and drop the ntldr file onto the HxD window to open it for editing.
4. Scroll down the window a little and look for the offset line “00000770”, then change the values “0F 85 09″ to “90 90 90″.
5. Click the Save button (Ctrl+S) and close HxD. It will also create backup of the file with a .bak extension.
6. Go back to the Run dialog (Win key+R) and type the following to set the read only, hide and system attributes back to default:
attrib +r +s +h +a c:\ntldr
The next time you restart your computer F8 will no longer work and have no effect before starting up Windows. This hack totally disables all keyboard input. There are still drawbacks to this method though because you can still get into Safe Mode using the /SAFEBOOT option in the Boot.ini tab from Msconfig. Obviously if you multi boot with different operating systems, you will also need access to the boot menu and keys to select the O/S.
If you want to boot in to Safe Mode and Windows is unable to start, you can boot up the computer with a Live Linux or rescue disc such as Hiren’s Boot CD and rename the “Copy of ntldr” file to ntldr. This way you can use the F8 key again and get back into Safe Mode.
On the next page, we’ll show you how to disable the F8 key to access Safe Mode in Windows Vista, 7 and 8.
Disabling Safe Mode For Windows Vista, 7 and 8
Now we’ll show you how to disable Safe Mode in Windows Vista, Windows 7 and also Windows 8.
Disabling the Advanced Boot Options menu
There is a simple way to completely disable the Safe Mode options when you press F8 on boot in Windows Vista and 7. This works by editing the Boot Configuration Data (BCD) information from the Windows Command Prompt. Here’s how;
1. Press the Win key and type CMD in the search box, then hold Ctrl+Shift and press Enter to launch the Command Prompt with administrator privileges.
2. Type the following command into Command Prompt:
bcdedit /set {bootmgr} displaybootmenu no
This turns off the Advanced Boot Options menu completely and pressing F8 doesn’t do anything. To enable it again, simply type the following into Command Prompt:
bcdedit /set {bootmgr} displaybootmenu yes
The drawbacks are similar to the editing of NTLDR in Windows XP because you can still use the Safe Boot option from MsConfig and hiding the menu isn’t very useful for multiboot systems. Another loophole is the boot menu will show after an improper startup/shutdown or sudden loss of power, and Windows will ask if you want to repair etc. But this way does at least still deter the average user or kids from pressing the F8 key to access Safe Mode.
Editing the Windows Vista, 7 and 8 Registry
Vista, 7 and 8’s Safe Mode also relies on the same registry keys as Windows XP does (Minimal and Network), and renaming them does also work which will cause a blue screen of death if anyone attempts to enter Safe Mode. The main difference is that these keys are protected and extra steps are required to change the permissions for each key. The procedure for Windows 8 is broadly the same apart from a few buttons being in different places etc.
1. Open regedit by typing it into search in the Start menu or Run dialog (Win key+R), and navigate to the key:
HKEY_LOCAL_MACHINE\System\CurrentControlSet\Control\SafeBoot
2. Right click on the Minimal key -> Permissions -> Advanced -> Owner tab. Click on your user name in the “Change owner to” box and then tick “Replace owner on subcontainers and objects”. Click Apply. The new name should appear in the Current owner box.
3. Now click on the Permissions tab -> Add -> and type your user name into the box, pressing Check Names will make sure you have typed it correctly. Click OK.
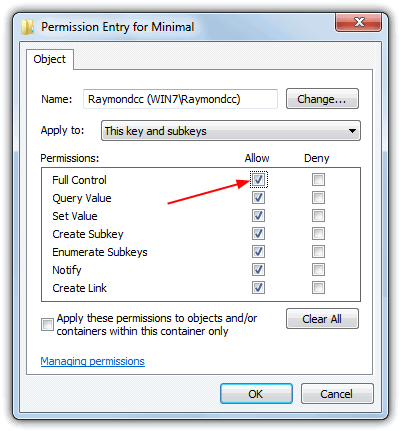
4. In the next window, tick the Allow box for Full Control (top left tick box), this will automatically tick all other allow boxes. Click OK.
5. Your name should now appear in the main Permissions window with full control and not inherited permissions. Highlight your user and tick “Replace all child object permissions with inheritable permissions from this object”. Then untick “Include inheritable permissions from this object’s parent”, click the Add button in the security warning window that pops up, then finally click OK -> Yes -> OK.
6. If the instructions were followed correctly, you should be able to right click on the Minimal key and rename it to MinimalX or similar. Follow steps 2 to 5 again for the Network key and then rename it.
The effect is exactly the same as with XP, if anybody attempts to boot into Safe Mode using normal, with networking or with Command Prompt, the computer will produce a blue screen of death. A non booting Windows will mean that to get back into Safe Mode, you will need to edit the registry keys offline using a boot CD.
A Few Shareware Solutions to Disable Safe Mode
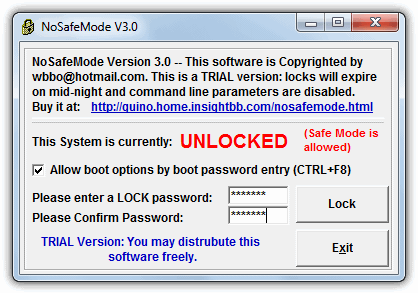
If you want to disable the F8 key for just about any operating system from windows 2000 up to Windows 8, a shareware tool called NoSafeMode could be an option. It’s a simple tool of around 60KB, portable, and does not hack or modify the operating system files or registry.
NoSafeMode has a password option to allow only authorized users to access all boot options by using the lock password and pressing Ctrl+F8 on boot. After studying how NoSafeMode does this trick without touching the registry or system files, we tracked the changes down to the program modifying the hard drive’s boot sector and writing its own custom sector with the password and key disabling code. NoSafeMode does have a trial mode where the lock will disable itself at midnight on the day you install the lock, the personal edition costs $14.95 and for business you’ll have to pay $89.95 for the professional edition.
Another option is a small command line tool called DisableSafeMode that works on Windows Vista and above and is $19 for personal use or $99 for business. This tool doesn’t change the hard drive boot sector, but the author doesn’t explain what it does to disable Safe Mode. Usage is simple, open an admin Command Prompt and type “DisableSafeMode.exe start” or “DisableSafeMode.exe stop” to turn it on or off.
After tracking down what this program actually does to disable the Safe Mode menu, the error recovery screen and also the system recovery options screen, it appears to be a simple collection of commands using the Windows Boot Configuration Data Editor (BCDEdit) which anyone can type in themselves. Here are the commands we believe it uses:
bcdedit /set {current} bootems off
bcdedit /set {current} advancedoptions off
bcdedit /set {current} optionsedit off
bcdedit /set {current} bootstatuspolicy IgnoreAllFailures
bcdedit /set {current} recoveryenabled off
If Windows fails and isn’t bootable, you would have to boot using your Windows DVD and choose Repair your computer -> Command Prompt and type in the reverse commands from those above (off -> on, ignoreAllFailures -> displayallfailures). Unless it does something else we haven’t tracked, DisableSafeMode only seems to insert a few system commands which you can do yourself for free.
So i have windows 7 with a bad screen. So i just plug it into a monitor. Except i enabled safe mode to avoid a crash on start up. (Bad website . ) However now it wont show the monitor screen any more to access the computer. HELP! Please
ThankYou!!!!!!!!!!!!!!!!!!!!!!!
Will any of these tricks work on windows 10 ?
yes, the registry hack worked for me!
Thanks Raymond!
i owe my friend .. can’t thank u enough
Hi,
You can turn off the automatic windows repair mode feature by using the following commands:
o bcdedit /set {default} recoveryenabled No
o bcdedit /set {default} bootstatuspolicy ignoreallfailures
o or
o bcdedit /set {current} recoveryenabled No
o bcdedit /set {current} bootstatuspolicy ignoreallfailures
i had a terrible night rest until God showed me this link this morning and i promise to share it with others.
a million thanks in a million languages is what i have to say for now. RIVERS OF JOY FLOWING IN ME.
How can i get back to the normal safe mode screen,if i am getting a blue sceen.I am selecting safe mode and any other options and it is not going through..Please Help.
How did you disable Safe Mode and which OS are you using?
Amazing….this is a handy web site.
THANKS ray
Like you say, in the case of an abnormal shutdown, machines normally go into Safe Mode anyway, so all these are essentially moot fixes at best. Any ideas on how to edit the boot menu to make “Safe Mode with Networking” disappear?
thank you very much. this tutorial is all i need for my software to prevent bypassing my security… thanks again
Thanks !!
Thanks Raymond. That is pretty cool. It works now i could away loser from my computer.
This is good
Enlightening product Ray. A must have for the security conscious people.
Thank you Raymond nice trick ;-)
Wow!
Thanks RAY.
Another great tip thanks mate!
Thanks Ray.
Nice find. Thanks a lot :)
Excellent tip!
Thanks Raymond
Good find. I think I’ll need this just in case I mess up and stuff or accidents happen