3 Ways to Create an Event in the Windows Event Viewer
Whenever a computer develops an issue or becomes unstable, the first thing an experienced user will want to do is start troubleshooting. There are many tools around that can help fix a number of problems, but the first approach should be to look at the logs Windows creates to check for possible warnings or errors. The Windows Reliability Monitor is one Windows function that gives relatively easy to read details, but that gets its data from somewhere with even more information, and that is the Windows Event viewer.
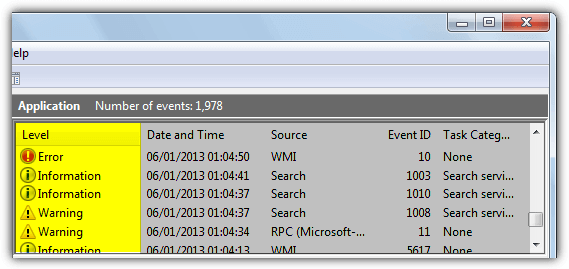
Event Viewer is the user interface to display the Windows Event Logs, and with it a vast array of information is available to tell you what Windows components and third party software has been doing. If there’s something wrong the logs will often tell you by showing a warning or error for the entry, from there you can troubleshoot deeper and narrow down possible causes to the problem.
Even though the logs in Event Viewer are created automatically by Windows or installed applications, the end user can also add their own entries to create a log of anything they wish, a common use would be for monitoring when an application is opened or closed. Adding a log entry is done using a built in windows command called EventCreate, so you can create an event from Command Prompt or even from your own scripts or programs.
The Eventcreate command works on Windows XP up to and including Windows 10, but note that it requires administrator privileges to work. Open a Command Prompt by typing cmd into Windows Start search and press Ctrl+Shift+Enter to launch in admin mode.
Using the EventCreate Command
Typing eventcreate /? will show the list of available arguments, here’s what they do:
/T – The level of event to create which can be one of Success, Warning, Error or Information (Success is not available in XP).
/ID – Any whole number between 1 and 1,000 is accepted.
/L – Specify which Windows Log the event will be created in, either Application or System.
/SO – A name for what is creating the event, best to keep it short and related to what you are creating the event for. This will show in the Source column in Event Viewer, make sure to enclose in quotes if your name includes spaces.
/D – A description of the event which can be anything you like, make sure to enclose the phrase in quotes.
/S – Connect to a remote system by supplying the target computer’s name.
/U – User name to create event under alternate credentials on local or remote computer.
/P – Password to create event under alternate credentials on local or remote computer.
Putting some arguments together in a simple line to create an event is easy, open an admin Command Prompt and type in the eventcreate command with the required arguments:
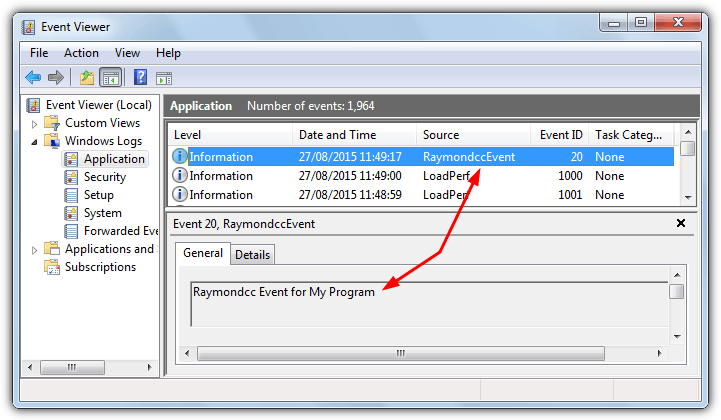
eventcreate /T Information /ID 20 /L Application /SO RaymondccEvent /D “Raymondcc Event for My Program”
The Eventcreate command will immediately add an event to the specified Windows Application or System log with the parameters provided. To check an event has been created open Event Viewer by typing Eventvwr.msc into a Run or Start search box or via Control Panel > Administrative Tools.
For creating an event on a remote computer add extra arguments /S RemotePCname /U Username /P Password.
Creating a Custom Event Script
Simply creating a custom event in Command Prompt has it’s uses but you can do more by incorporating events into a script, such as a batch that creates an event when you launch a program. Here’s an example you can add into a batch script that creates events when you launch and close Firefox.
eventcreate /T Information /ID 123 /L Application /SO MozillaFirefox /D “Firefox launched”
“C:\Program Files (x86)\Mozilla Firefox\firefox.exe”
eventcreate /T Information /ID 124 /L Application /SO MozillaFirefox /D “Firefox closed”
The above script is very basic but it creates a custom information event with an ID of 123 to say Firefox has launched, then launches Firefox. Once the browser is closed another event with the ID 124 is created.

This method has a drawback because it opens a Command Prompt window in addition to any application. If you want to hide the window from end users, some extra steps are required. Using the below method you can place the shortcut icon on the desktop in place of the normal shortcut and no ordinary user will know the difference.
1. Download LaunchQuiet.vbs and place it in a convenient location such as C:\Users\yourname\ (Using the Users folder will help if you have UAC enabled). This small piece of Visual Basic launches a batch file of your choosing without opening a cmd window.
2. Put your batch script in the same place as the vbs file, ours is simply called Firefox_events.bat.
2. Right click on the desktop > New > Shortcut, enter the following in the location text box:
Wscript “{path to vbs file}” “{path to bat file}”
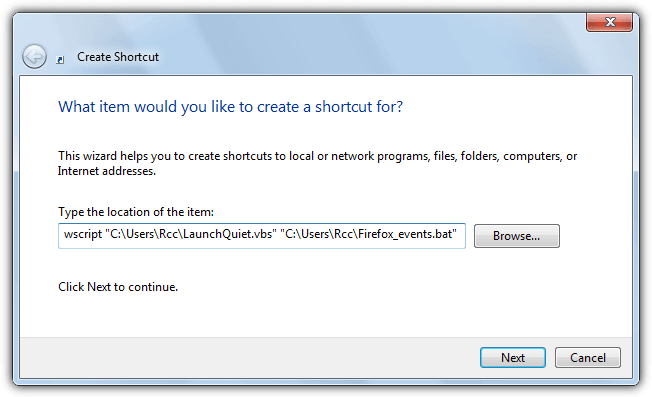
3. Click Next and give the shortcut a name, for our example we’re calling it Firefox. Click Finish.
4. The icon for the shortcut will be the Wscript icon, if you want to change it to the application you are running in the batch, right click the shortcut > Properties > Change Icon and browse for the executable.
In our example launching the shortcut will silently run Firefox while creating an event for it opening and closing. Of course you can substitute Firefox for almost any program you wish and adjust the event arguments to whatever best suits your needs.
Attach a Custom Task to an Event
You can go further than simply creating a batch and attach a scheduled task to the event. The trigger can launch another program or script, send an email or popup a message on screen. This is useful if for example you want to run a privacy or junk cleaner automatically after closing your browser or send an email when someone launches an instant messaging program.
To launch another program when the event monitored program is closed, such as when you close your browser you want to run CCleaner automatically, here is a simple example.
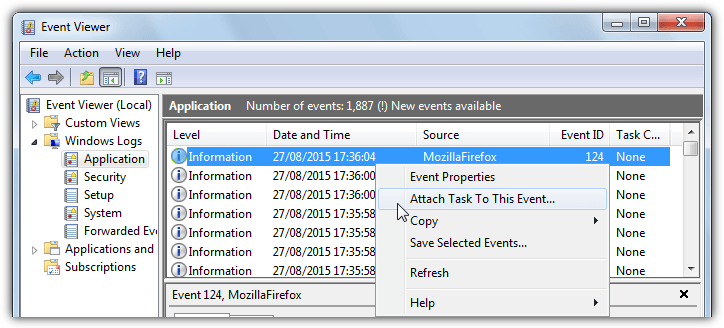
1. In Event Viewer right click on the event that was created for the program when closing and select “Attach Task To This Event”. Give the task a name if the default isn’t descriptive enough, click Next twice.
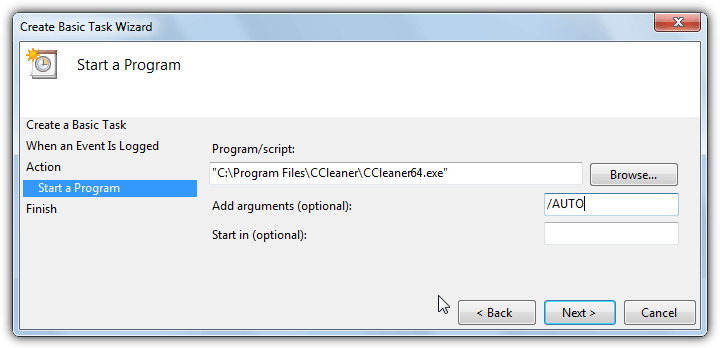
2. In the action window make sure “Start a program” is selected and click Next. Browse for the script or program you want to launch or simply enter its path into the box. For any extra arguments add them to the box below. For this example, we’ll add the /AUTO argument which tells CCleaner to automatically run a clean in the background. Click Next and then Finish.
Now when you run the event script it will create a launch event and start the program. When the program is closed it will create the close event which will in turn trigger CCleaner in the background. There are many possibilities for creating custom events and their usage can be as simple or advanced as you like.
An important thing to note about the send email option in scheduled tasks is it doesn’t accept authentication so services like Gmail will not work. For that you will need to use a third party command line emailing tool like SendEmail and then setup the task to run the SendEmail program.

Improve this guide

User forum
21 messages