How to Boot an ISO from Windows Boot Manager: Step-by-Step
Today we’ll show you how to boot an ISO from your hard drive. This method allows for faster recovery without needing a USB or CD.
Follow the steps to add an ISO entry to the Windows Boot Manager and boot it directly.
Windows Boot Manager ISO: Table of Contents
- Why Boot an ISO from Hard Drive?
- What is EasyBCD?
- How to Add an ISO to Windows Boot Manager
- Limitations & Important Notes
- Final Thoughts
Why Boot an Iso From a Hard Drive?
One thing you do want when using a system that you know is going to have issues is a complete backup of the operation system.
The System Restore option or snapshot software like Comodo Time Machine might get things back running, but there’s nothing like restoring the Windows installation to a completely clean and stable state.
Bearing that in mind, I made a bootable USB stick and created some backups using EaseUs Todo Backup Workstation.
Unfortunately, I put the recovery files on a slow stick and it took forever to boot into the backup software. It was then I remembered that there exists the ability to take an ISO image and get it to boot from hard drive using the Windows Vista and 7 Boot Manager.
This would make booting into the recovery environment far quicker and also removes the need to use a CD or plug in a USB stick every time.
What is EasyBCD?
The software I used to achieve this is EasyBCD from Neosmart Technologies and it’s free for non commercial use.
EasyBCD has a large amount of options for editing and creating entries for the Windows Bootloader and has helped me out quite a few times. Although the program does not come as a portable version, you can simply create your own by opening the installer and extracting it with 7zip.
There are also options to mount Virtual Hard Disk images, WinPE Ram disks, Floppy images and Raw disk / partition images.
The option to be looked at here is the ISO function which will put an entry into the boot menu and then boot from the ISO you have selected. Firstly start the program, you will begin in the View settings window which shows the current entries in the Boot Manager.
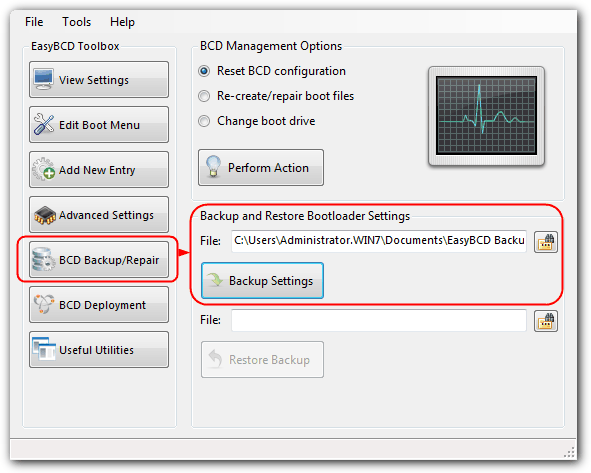
As incorrectly making changes to the Boot menu could potentially cause none of your operating systems to boot, it’s a good idea to make a backup of the Bootloader settings first. Click ‘BCD Backup/Repair‘, choose a location to save the backup to and then click ‘Backup settings‘.
How to Add an ISO to Windows Boot Manager
Backup Bootloader Settings
Before making any changes, back up your current bootloader configuration:
- Open EasyBCD.
- Click on BCD Backup/Repair.
- Choose a location to save the backup.
- Click Backup settings.
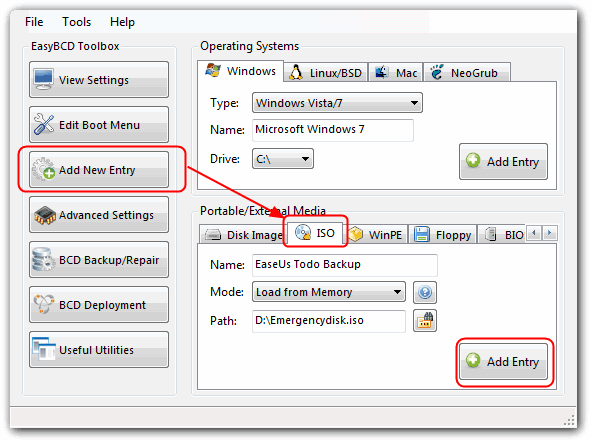
Create an ISO Boot Manager Entry
- Click the Add New Entry button.
- In the Portable/External Media window, click the ISO tab.
- In the Name: box, enter the text to appear on the Windows boot menu.
- For the Mode: dropdown, choose Load from memory for smaller ISOs (under ~200MB) or Run from Disk for larger ones.
- In the Path: box, browse and select the ISO file you want to boot from. (Ensure you don’t move or rename the file afterward.)
- Click Add Entry.
Return to the View Settings window to confirm the new entry. EasyBCD creates a folder named NST in the root partition where the bootloader resides—do not delete it.
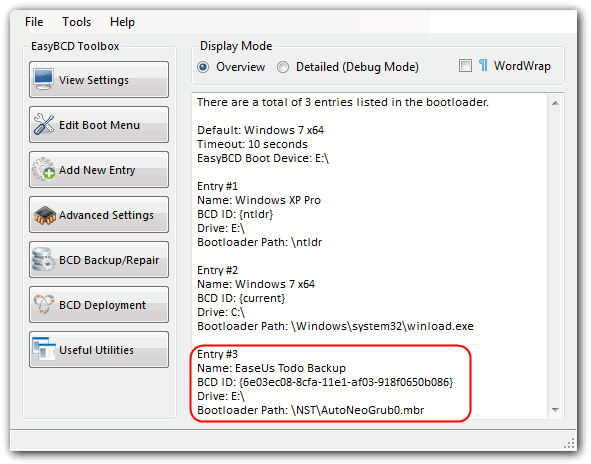
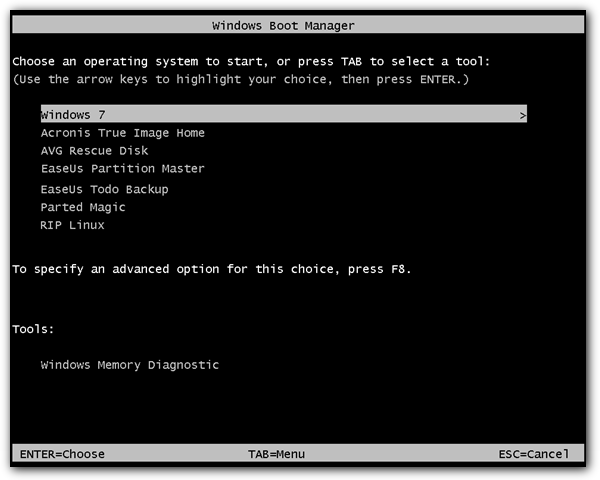
On reboot, the new ISO entry will appear in the Windows Boot Manager. If you have multiple entries, you might need to scroll down to see them all.
Limitations & Important Notes
- Not all ISOs are compatible with this boot method.
- Some Linux distributions might not boot properly.
- For example, Parted Magic on Hiren’s Boot CD may not work, though standalone images typically do.
- Kaspersky Rescue Disk 10 is known not to work.
- Windows 7 installations have reportedly been booted using this method.
- Caution: This method depends on access to the Windows Boot Manager. Avoid using it on your primary machine unless you’re completely confident in the process.
Final Thoughts
Booting an ISO directly from your hard drive with EasyBCD offers a convenient recovery and installation option without relying on external media.
While it’s a powerful method, ensure that your ISO files are compatible and always back up your bootloader settings before making changes.

Improve this guide

User forum
18 messages