6 Ways to Get Windows to Auto Sync Time on Startup
- Sync your PC’s clock automatically on startup.
- Choose from tools that support customizable sync intervals and reliable servers.
- Use Task Scheduler to run syncing tools at startup for seamless time updates.
How to Auto Sync Your PC Clock on Windows Startup
When your PC clock doesn’t sync automatically, you might face issues like wrong timestamps on files, emails, or even expired software trials. Here’s how to fix this issue by automatically syncing your clock when Windows starts.
Why It’s Important to Sync Your PC Clock
Having an accurate system time is critical for:
- File timestamps
- Properly syncing emails
- Preventing issues with software licenses
Without auto-sync, manual time adjustments can become a hassle, especially when using software that depends on an accurate system clock.
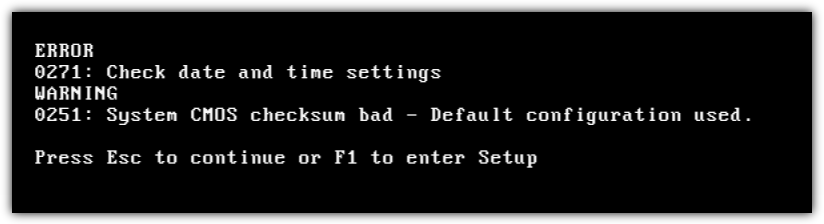
Changing the integrated battery on the motherboard will solve the problem and it’s quite easy to accomplish on desktop computers but can be much harder to do on laptops.
If you don’t want to or can’t take things apart, here are a few ways to automatically synchronize your PC clock on Windows startup. This way you don’t have to manually change the time settings each time you power up your computer.
Tools to update time and date automatically Windows 7 on startup
1. Time-Sync
Time-Sync is a free and simple to use Windows time correction tool that installs and runs itself as a Windows service. After install, the default configuration is to run at Windows startup and automatically perform a time synchronization when the service is started. You can verify sync status from the Protocol tab.
In the Settings tab, you can configure event logging and the update interval. The update interval contains selections as fast as every half a minute to once every day. If your computer is having battery problems and not maintaining the time, select “Synchronize every day” so that the program doesn’t unnecessarily perform time synchronizations.
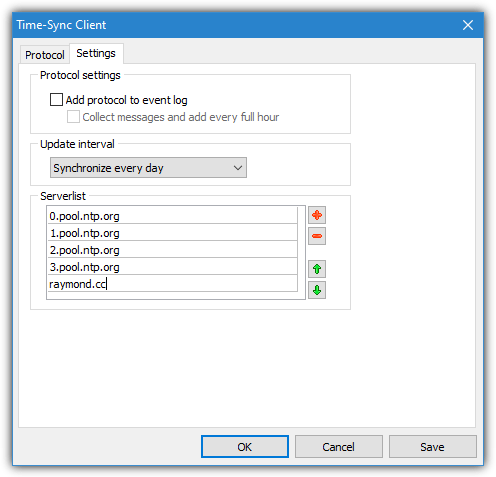
Time-Sync supports up to five time servers which can also be configured in the Settings tab. It uses the first server on the list and automatically attempts the next one if it fails. The default pool.ntp.org entries should be very reliable with over four thousand time servers worldwide. Make sure to install the default client version during install and not the server version. Otherwise, your computer will turn into its own time server!
2. NetTime
The last stable release of NetTime was back in 2012 although there is an alpha 3.20 build from 2017. Compatibility is fine though and it works on the latest Windows 10. NetTime can be used in two different ways; either syncing the time in the background using a Windows Service or launching the main program and letting it sync then sit in the system tray. The second option requires administrator privileges.
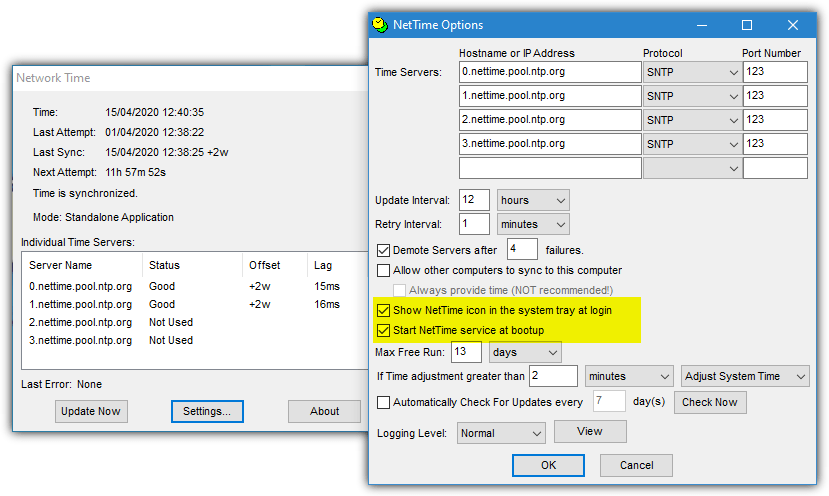
During install, NetTime defaults to running as a service which is recommended. Turn the option off to run the sync manually or from the main program. The default settings will query four pool.ntp.org servers although you can edit or add your own. It will keep trying every minute and update every 12 hours. If you want to let the service update the time in the background, uncheck “Show NetTime icon in the system tray at login”.
To run without the service, NetTime has to be permanently run as administrator (even if you are an admin). Go to the NetTime folder in Program Files (x86), right click on NetTime.exe > Properties > Compatibility > “Run this program as administrator”. In the Settings, leave “Show NetTime icon in the system tray at login” checked but uncheck “Start NetTime service at bootup”.
3. Meinberg NTP
Like some of the previous tools, Meinberg NTP uses a Windows service for its time syncing. The program is based on source code from NTP.org who also list thousands of worldwide time servers. The newer versions of NTP support IPv6 and Windows XP or newer systems while there is another version from 2010 available for older PCs. NTP requires administrator privileges to install.
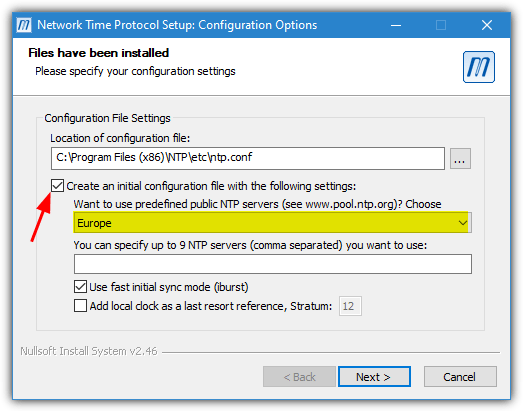
During the install process, you can leave the main settings at the defaults until the Configuration File Settings window appears. Check “Create an initial configuration file with the following settings” and then select a region or country from the pool.ntp.org drop down list. Click Next and then click No to not review the generated config file and at the next window leave everything alone. Click Next and Finish.
The Meinberg NTP service will set the time after the install is complete and on every boot. It is configured to keep checking for a network connection on startup in case there is a delay before your network adapter is initialized. If you want to sync the time during a session, the service will have to be restarted. You can do that from the Start Menu, the Program Files folder, the Services Control Panel applet or the command line.
4. Dimension 4
Dimension 4 is one of the most well known time syncing tools for Windows. Sadly, the project appears to have been abandoned with no updates since 2013 and the website disappeared in early 2020. Although Dimension 4 has a huge list of time servers that it can cycle through, because of its age a number of them don’t work. As a result, you might get several sync failures before a success.
To help with this issue, bad time servers can be removed and you are also able to add your own. Dimension 4 can be told to use a specific server from the Advanced menu if you want it to use just one and not the rest of the list (as long as you’re sure it’s a reliable time server).
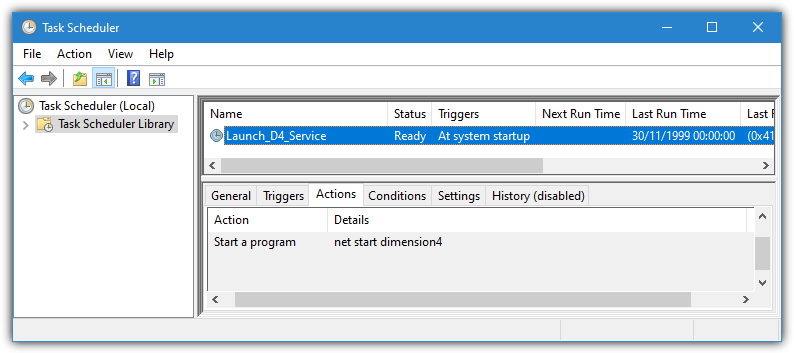
One problem is getting Dimension 4 to work on boot, usually for Windows 10 systems. It pops up a window asking for administrator privileges to start the service, even if you are already an administrator. A trick to get around that is to manually start the Dimension4 service on boot using a scheduled task. We have included a batch script to add a new scheduled task in the Zip archive, simply right click and run it as administrator.
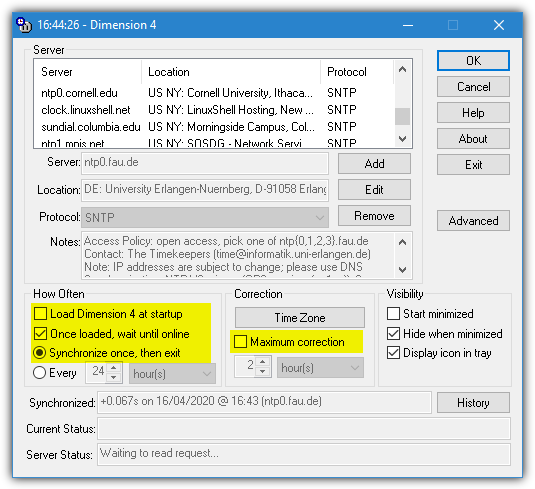
There are a few settings that you need to take note of in the main program window. Make sure “Once loaded, wait until online” and “Synchronize once, then exit” are checked. Uncheck “Maximum correction” or the time will only sync if it’s currently within the specified time range. If you are running Dimension 4 without using the scheduled task, “Load Dimension 4 at startup” can also be enabled.
Download Dimension 4 inc Scheduled Task Fix
5. Neutron
If you prefer a simpler tool that just syncs the time without too much fuss, check out Neutron. What makes Neutron stand out is the small file size (10KB), it’s portable, it automatically retries the next time server when the current one fails and has the ability to sync on startup. Importantly, Neutron can also exit after the time has been synced so nothing runs in the background. Neutron’s an old tool dating back to 2008 but it still works in Windows 10.

Download and extract the Zip, launch Neutron and click the arrows at the bottom right to open the options panel. Check the “Auto sync at program startup” and “Exit after time has been synced” boxes, then close Neutron. It will automatically sync the time and quit. Edit the Neutron.ini settings file to add your own custom time servers. There is a problem because Neutron is portable and doesn’t have the ability to start itself on boot. Help on how to do that is below.
How to Run Neutron on Windows Startup
Neutron can automatically check the system time during boot by creating a scheduled task. In newer operating systems like Windows 10 and 8/8.1 placing a shortcut in the Startup folder or creating a registry Run key no longer works due to administrator privileges.
A scheduled task has some advantages such as bypassing UAC restrictions completely and optionally only launching after the system has connected to the network. That is useful if your network adapter takes several seconds to initialize.
Here’s how to do it:
a) Extract and set up the Neutron options
Extract and set up the Neutron options as explained above. Copy the Neutron folder to the root of your C: drive. The path should look like this:
C:\Neutron\Neutron.exe
b) Simplify the process with task scheduler
To try and simplify the process we’ve already created a scheduled task to be imported into your Task Scheduler. Download NeutronTime_Task.zip, extract it, right click and “Run as administrator”.
c) Type in the password
Type in the password for the current user account, if the account has no password just press Enter.
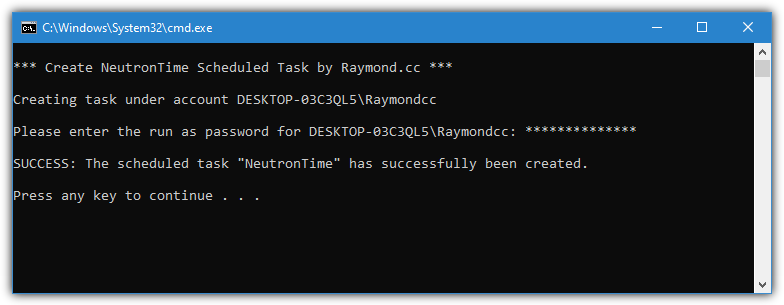
A new task will appear in Task Scheduler which runs whenever the system boots and/or the network is initialized. Neutron will start, sync the time and close after 5 seconds.
The batch script relies on the Neutron folder being in the root of C. If you want to change the location, open NeutronTime.xml with Notepad and change the path to Neutron.exe near the bottom. Then (re)run the batch file.
Note:
A small issue you might encounter with Neutron is the clock sync being out by one hour but all time zone settings are correct.
To fix this, click on the taskbar clock > Adjust Date/time > Change time zone (Windows 7 only), choose a different time zone from the drop-down (make sure it has a different + or – time), then change it back to your original time zone. This fixed the issue for us.
There is lots more information on synchronizing time servers and using third-party time servers on page 2.
6. Synchronize The Clock on Boot With Windows Time
As we’ve mentioned, Windows resyncs the time using a scheduled task once a week which isn’t very useful if you need to resync the clock every time the computer starts. The solution is starting the Windows Time Service on boot which will automatically synchronize the time. This can be done by creating a new scheduled task.
Windows 7 doesn’t have its own time service task to run on boot but Windows 10 already has one built in. Therefore, creating a new task for Windows 10 isn’t really necessary. However, if you are having time syncing issues in Windows 10 and wish to try this method, the steps will be the same.
Create The Windows Time Scheduled Task
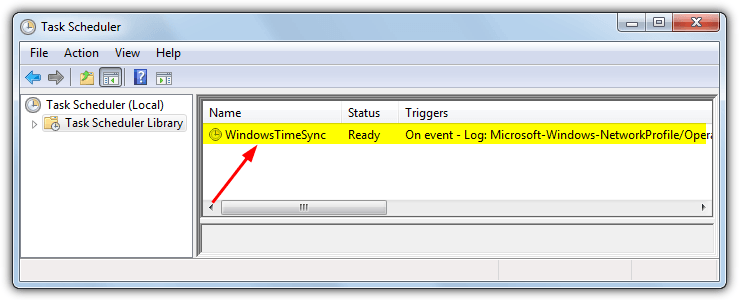
Like the Neutron tool, you can create a new scheduled task by importing one we’ve already made although in this case it’ll start the Windows Time Service, sync the time and then the service will stop again upon completion.
To do that, download WindowsTimeSync.zip and extract it. Run the Create_WindowsTimeSync_Task batch file making sure to right click and Run as administrator if you don’t have full privileges. A new task called WindowsTimeSync will appear in Task Scheduler which will run whenever you boot or manually enable the network adapter.
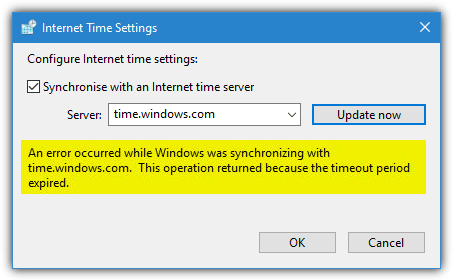
A drawback of using the Windows Time service is sometimes the Internet Time server fails to synchronize the clock. Third party tools we’ve mentioned in this article solve the problem by automatically attempting to sync with another server when the default fails but Windows Time will just fail if it cannot contact the default time server.
Windows Time Sync Errors and Required Checks
Although the sync on boot scheduled task might work smoothly, there are some system settings you might need to check for it to work correctly. There’s also a common error message you might need to rectify.
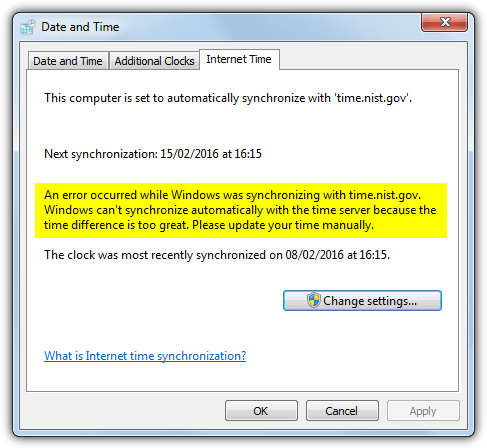
Fix The Time difference Is Too Great Error
If the clock is out by weeks, months or even years, when trying to sync the time in Windows 7 it could fail. An error might show saying “Windows can’t synchronize automatically with the time server because the time difference is too great. Please update your time manually”.
The error is caused by a hidden setting in Windows which only allows the clock to resync when the time difference is less than 15 hours. Increasing this to something bigger requires two settings to be edited in the registry called MaxPosPhaseCorrection and MaxNegPhaseCorrection. Their default hexadecimal values are d2f0 (15 hrs), changing to a larger number such as FFFFFFFF (35 years) lets the time sync work.
To make things as easy as possible and to avoid editing the registry yourself, download this ready made reg file and run it to make the changes in your registry.
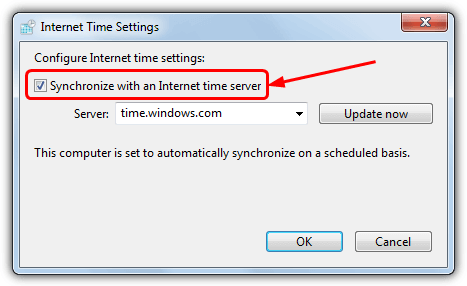
Make Sure The Windows Time Service is Not Disabled
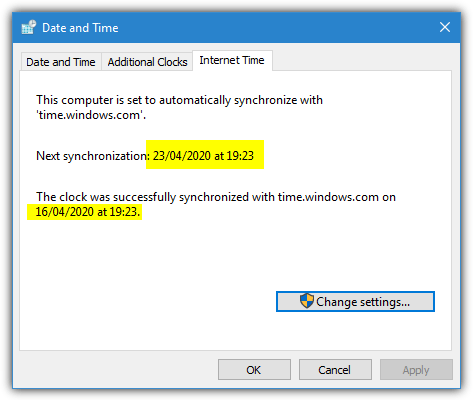
In order for the Internet Time task to work you have to make sure the service itself is not disabled, which it will be if Internet Time is not set to synchronize once a week. To make sure, go to Control Panel > Date and Time > Internet Time tab > Change settings and make sure “Synchronize with an internet time server” is checked. Click OK to confirm.
Make Sure Your Computer Has The Correct Time Zone
Besides syncing the clock to the right time and date, another important setting in Windows is to have the right time zone. If you live in Europe for example, and the time zone is set to the USA your clock could be out by as much as 10 hours. Making sure you have the correct time zone relative to your location will solve the problem.
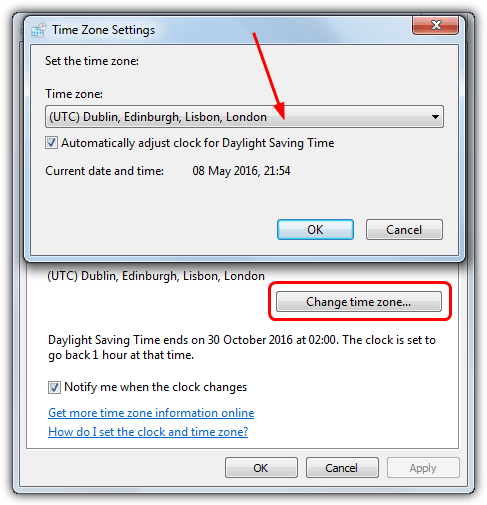
Right click on the clock in the tray and select Adjust date/time, Windows 7 users will need to additionally press the Change time zone button. Click on the drop down and find the right time zone for your area, also make sure the daylight saving time option is enabled if your country uses DST.
Using a More Reliable Time Server
As the Windows Time servers supplied by Microsoft are not 100% reliable, it’s possible to get server not responding or timeout errors. This is more likely if you live outside the United States as all the Windows time servers are US based. For a more reliable time server, it’s best to use one closer to where you live. This is recommended for all versions of Windows as they use the same time servers, including Windows 10.
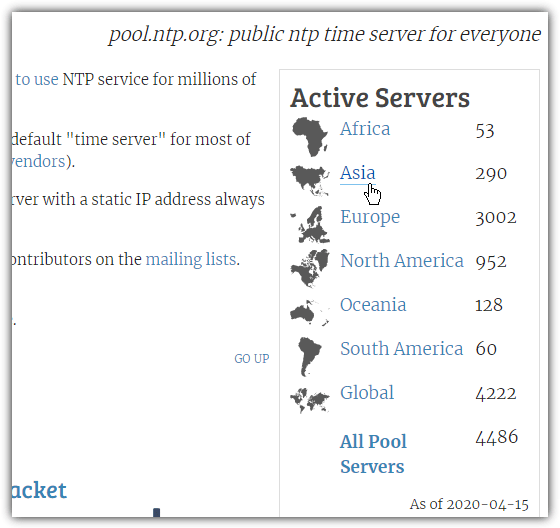
The NTP Pool project is a service with over four thousand time servers available worldwide. The generic global address of pool.ntp.org works for everybody and will try to sync with a server in your local area. However, it’s preferable to manually choose closer servers to you if possible.
a) Visit the NTP Pool Project
Visit the website and click on the link for your region on the right of the page in the active servers list.
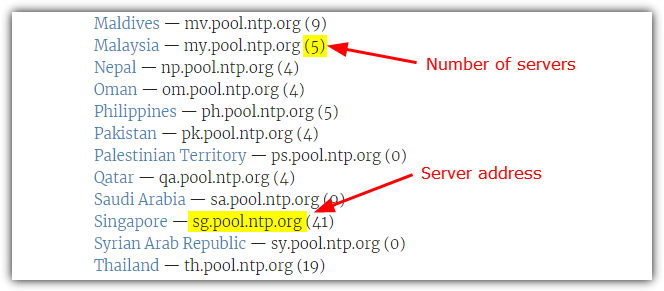
b) Locate your country
Inside the region page, locate your country or the closest country to you and check how many servers there are in brackets.
If the server number is small (low single figures), try to choose the next closest country with a higher number. This is simply for fallback purposes and if one server fails, there are plenty of others available to try. Note down the server address (xx.pool.ntp.org).
It’s also possible to use the regional time server listed at the top of the page next to the region name. For example, europe.pool.ntp.org, north-america.pool.ntp.org, or asia.pool.ntp.org.
c) Change the default time server
To change the default time server in Windows to an NTP Pool server go to Control Panel > Date and Time > Internet Time tab > Change settings. Ensure the Synchronize option is checked and enter the Pool server address into the box, then click OK.
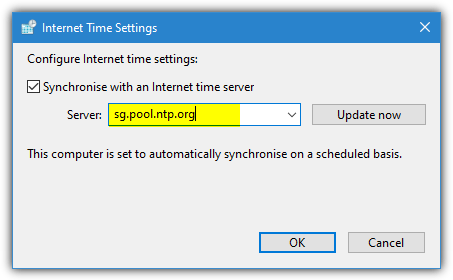
When Windows tries to sync the time according to the schedule or by pressing the Update now button, local NTP Pool servers will now be used to sync from instead, which should be faster and more reliable causing fewer errors from the Windows Time service.
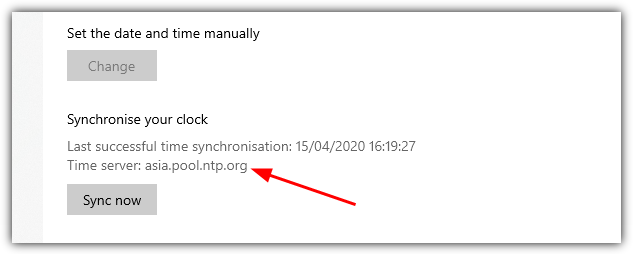
In the Data and Time Settings in Windows 10, the Time server will change to the time server you added in the Control Panel.
Conclusion
These six tools will ensure your PC’s clock stays accurate without manual effort. Whether you prefer a lightweight tool like Neutron or a more robust service like Meinberg NTP, there’s an option for every need. Make your system run smoothly with these automatic time-syncing solutions.

Improve this guide

User forum
45 messages