Auto Enter Product Key When Installing Microsoft Office XP, 2003, 2007, 2010 and 2013
One of the frustrating things you will come across as a PC user, is having to enter a long serial number to play a game, or when you install Windows, or even when you need to install a commercial application. If that’s not bad enough, it gets even worse when the packaging for the software has become misplaced or damaged in such a way that the product key is not readable or available when it needs to be entered to use the software. Of course, there are ways to retrieve product keys from a running computer, and this is where keeping a backup of your license keys is a good idea.
As many product keys are quite long, it’s a bit tiresome having to enter them in every time you install a piece of software, Windows and Microsoft Office being two products that both come with long product keys. The handy thing about Microsoft’s programs though, is that both of them can have their installations modified to make the install process less interactive or even almost totally silent. One simple trick you can do for Office is have the setup automatically recognize your own license key during install, so you don’t have to remember, look for or try and decipher it.
Here’s a simple step-by-step guide on how to do insert your Office product key into the setup process so you don’t have to enter it manually again.
First things first, you will need to insert your Microsoft Office CD/DVD and copy all the files from it to a folder on your hard drive. An ISO image of an Office disc is also acceptable.
Office XP / Office 2003
1. Open the Office folder on the hard drive and go to \Files\Setup, right click on the Setup.ini file, select Properties and uncheck Read-only if your CD is an original.
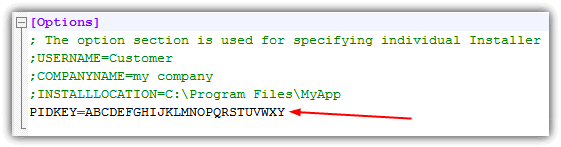
2. Open up the Setup.ini in Notepad, locate the section called [Options], then insert a line with PIDKEY=ABCDEFGHIJKLMNOPQRSTUVWXY. Replace the letters with your genuine Office product key, but don’t include the dashes “-” in the key.
3. Now save the file. You can also optionally set the user name and company name if you wish, just remove the semicolon from the line.
Office 2007 / Office 2010 / Office 2013
For Office 2007, 2010 and 2013, the file that you need to modify is different and the file structure of the CD/DVD contents is also not quite the same as Office XP/2003.
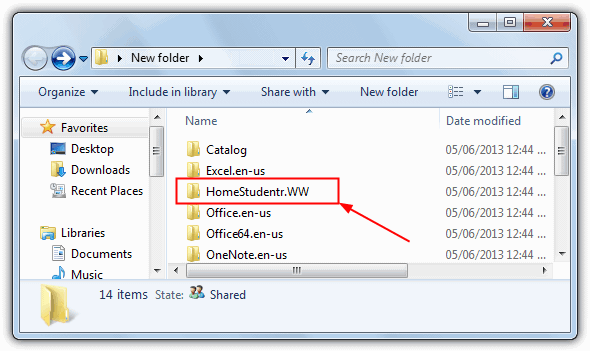
1. Open the Office folder copied to your hard drive and look for a folder such as ProPlusr.WW, Standard.WW, Pro.WW or HomeStudentr.WW. Depending on your Office version, there will be a folder with that name and a “.WW” extension. Go into the .WW folder.
2. Open the config.xml file in Notepad and remove the comment (“<!–” and “–>”) out of the code for PIDKEY and enter the 25 digit Office CD Key WITHOUT dashes. then save the file.
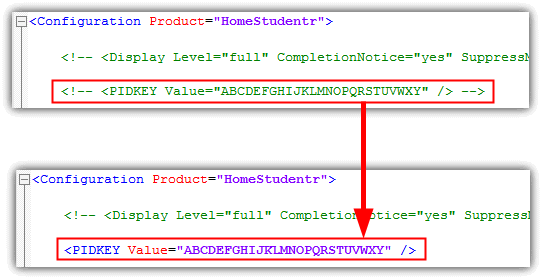
For Office 2010 and 2013 this line will likely be missing from the xml file so you have to manually add it in yourself. Just insert the line with your own key:
<PIDKEY Value=”ABCDEFGHIJKLMNOPQRSTUVWXY” />
Save the xml file and now when you run Microsoft Office setup, you will still see the dialog window where it asks you to enter the product key but it’s been automatically inserted for you. No more memorizing the CD key, or wasting any precious time trying to find it. A simple trick to make our tech life easier.
After doing this, you might want to write Office back out to CD/DVD for future use. It’s easily possible to use one of the many pieces of software that can burn files to disc by simply adding all the files from the folder on your hard drive to the project and burning the media.
Working with an Office ISO Image
Although you can install Office from the hard drive after it’s been extracted from disc and the ini/xml file has been edited to include the product key, if you have an ISO image of Office, it’s also very easy to extract the ini/xml file and then add add it back to the ISO without extracting the whole disc contents.
Most of the dedicated ISO editing tools around are shareware and have 300MB size limits for editing, but an old freeware version if WinISO is able to edit ISO files of CD images without limitation. Using this you can edit Office CD ISO files.
1. Download and install WinISO Free 5.3, enter the registration information from the included readme file.
2. Open the Office ISO image and locate the appropriate file from the instructions above depending on your version of Office. Then right click and extract it to a folder or drag and drop to the desktop etc.
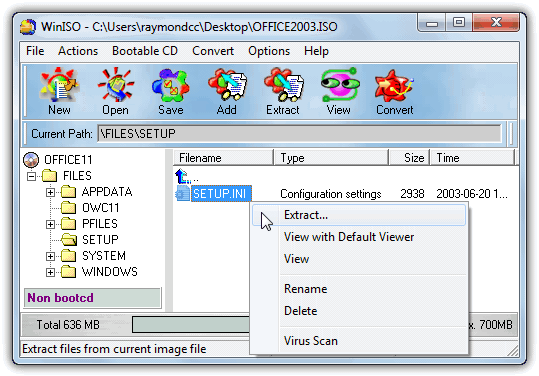
3. Right click on the file in the WinISO window and delete it. When you want to add the edited file, simply drop it into the same folder or right click -> Add Files to replace the deleted ini or xml. Click Save to overwrite the original ISO image or go to File -> Save as to create a new one.
You now have an ISO image with the product key built in which can be burned to CD or mounted with ISO mounting software.

Improve this guide

User forum
24 messages