4 Ways to Automatically Disable Wireless Network Connection when Local Area Connection is Enabled

These days a wireless internet connection (WiFi) is the standard way for laptops, netbooks and even desktops to connect to the internet in the event an Ethernet connection isn’t available. It’s quite obvious that most of the time a direct cable connection to the router is going to be faster than via wireless, so it’s a good idea to plug in a network cable if one is close at hand. One of the problems with enabling an Ethernet connection while on WiFi is that many computers will continue to use the WiFi connection unless you disconnect or disable it manually which isn’t terribly efficient.
Although Windows is often smart enough to prioritize and set the wired connection above the WiFi, sometimes it isn’t and even manually setting the network priority yourself doesn’t always work. If the wireless connection is not in use, it makes sense to disable it until needed again, not only to avoid any possible routing issues, but it might also save a little bit of battery life as well. If you find yourself sometimes having to switch between WiFi and Ethernet connections but think it’s a hassle to manually disable or enable the devices, here are 4 ways you can do it automatically.
1. Using a Visual Basic Script
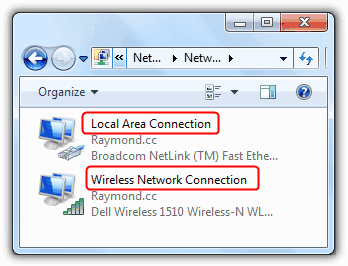
Steve Wiseman from IntelliAdmin has written a Visual Basic script that automatically disables the wireless adapter when Ethernet is available and vice versa. First you need to identify the names of the connections used by Ethernet and WiFi, go to Control Panel -> Network and Sharing Center -> Change adapter settings, and make a note if the names are different from the defaults below.

Once you’ve identified both the LAN and WiFi connection name, download the correct NetSwitch vbscript file according to your Windows operating system from the links below. Then rename the file extension from .dat to .vbs (e.g; NetSwitch.vbs).
NetSwitch.dat for Windows 2003, Vista, 7, and 2008
NetSwitchXP.dat for Windows XP
To put the wired connection as first priority and the wireless connection as secondary, type the following command at the Command Prompt. This means that whenever the wired network connection is connected, the vbscript will automatically disable the wireless connection. If the wired network connection is unavailable, the vbscript will then fallback to and enable the wireless connection.
NetSwitch.vbs “Local Area Connection” “Wireless Network Connection”

This script requires administrator privileges to run. If you want to start the script with Windows, the easiest way to do it is create a shortcut of the the script, right click on it -> Properties and append the “Local Area Connection” “Wireless Network Connection” arguments in the Target box. Then place the shortcut into the Startup folder.
2. Lenovo ThinkVantage Access Connections
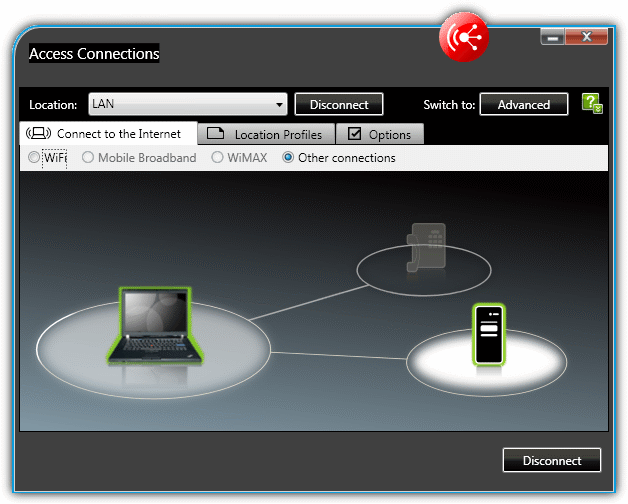
A lot of laptop software installed by the manufacturers can include some form of wireless connection monitor which may include the switching option, so it’s worth checking the documentation. What makes the Lenovo Thinkvantage software more special is it seems to work on just about all laptops and WiFI adapters, not just those from Lenovo. It’s a pretty hefty download of 25-40MB depending on the version of Windows, but if you like a program with a smart interfaces, you’ll love ThinkVantage Access Connections.

Setting it up is a little bit of a bind, here’s how:
1. During install you will be asked which connections are to be supported by the program, it’s advisable to only click what you require. After installing and a reboot, you will be asked for an Ethernet location name, click Cancel.
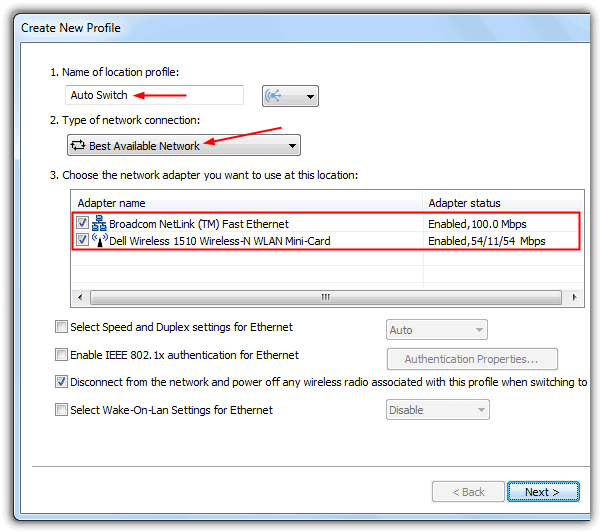
2. On the task bar you’ll see a new network icon which will open the main interface if you click on it. Click Create to make a new Profile and then give it a name. The network connection should be set to Best Available already, the wireless and wired adapters should be selected and you can set a few options such as Ethernet duplex and Wake-on-Lan if you know what they do. Click Next.

3. Because ThinkVantage Access Connections will take over your WiFi connection you need to manually enter your wireless settings such as SSID and security type/password. Click Next.
4. On the next window you can setup some more complex options like connection sharing, override TCP/IP settings, Enable a VPN connection, and set a new default home page and proxy. Unless you specifically want to change the settings, leave them alone and click Finish and then Yes to apply the profile. Close the program interface.
Now you can switch between Ethernet and WiFi, the wireless adapter doesn’t actually completely disable but instead the WiFi’s radio is turned off which is similar to what most laptop wireless Fn+hotkey combinations do. ThinkVantage Access Connections also has an option available to setup a wireless hotspot for other wireless devices to connect to. We tried the program on 3 or 4 non Lenovo laptops that didn’t have wireless adapters on the supported list, and they all worked fine. There are separate versions of the program for Windows XP, Vista and Windows 7.
Download ThinkVantage Access Connections For XP | For Vista | For 7
3. BridgeChecker
Unfortunately BridgeChecker is shareware these days, but there’s still an older free version from 2009 on the internet. It does have a drawback though of not working properly on a 64-bit Windows so is recommended for 32-bit systems only. Although it isn’t, the program looks and acts a little bit like a frontend for the vbscript above but with a couple of extra options.
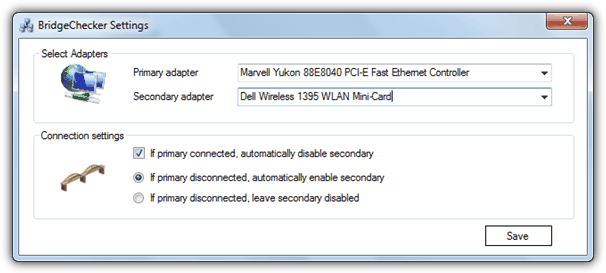
When you start BridgeChecker it goes straight to the system tray, right click the icon to open it and you will be asked for a password which can be custom configured later on, the current default is 123. In the main window select the Primary adapter from the drop down which will have priority over the Secondary adapter you select below it. There are extra options to choose whether to disable the second adapter or not and what to do when the Primary adapter disconnects.

Rather oddly there is no option within BridgeChecker to start the program with Windows so you will have to drop the shortcut into your Startup folder. Although it seemed to work fine in Windows 7 32-bit and enables/disables the WiFi on command, we did observe a few moments where BridgeChecker seemed to be causing an increase in CPU usage while running, killing its processes stopped this. We can’t be sure whether this is a common problem or a local issue on our test laptop.
Download BridgeChecker 1.2 (via Softpedia)
The fourth and final method of wireless/LAN switching on page 2 is perhaps the most interesting because it requires no extra software, and is currently the preferred method we use on a few of our laptops.


User forum
16 messages