8 Ways to Open Hard Disk Image Files via VDI & VHD Explorers
Virtual disk files, like VDI, VHD, VHDX, and VMDK, are used by different virtual machine software. Sometimes, you may need to access or copy data from these virtual disks without booting the virtual operating system. In this guide, we’ll show you how to open and manage these disk images easily using VDI Explorer.
What’s a virtual operating system?
A virtual operating system, of course, needs a virtual hard disk to store its files. Software companies each have their own implementations of a virtual hard disk.
Oracle VirtualBox uses Virtual Disk Image (VDI), VMWare uses Virtual Machine Disk (VMDK) and Microsoft products like Virtual PC or Hyper-V use Virtual Hard Disks (VHD or VHDX). Virtual disk formats are sometimes interchangeable between products. For instance, VirtualBox supports VDI, VHD, VMDK and a few more.
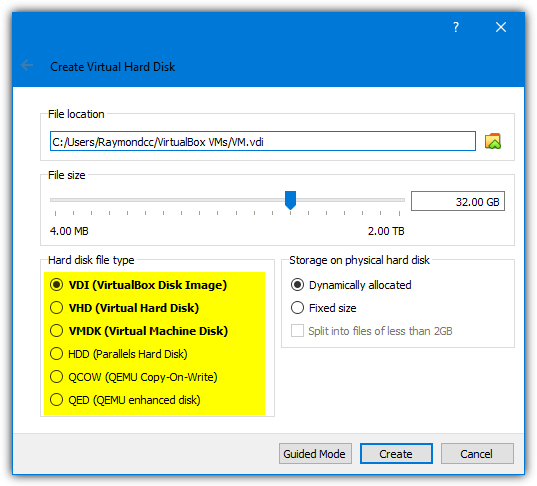
Sometimes it might be useful to read data or copy files from a virtual hard disk to your computer without booting into the virtual operating system. In that situation being able to open the virtual hard disk and read the contents is important. Also, you might want to delete, move or add files to the virtual operating system in the same way, perhaps to perform repairs to a non booting system or run offline Windows updates.
Here we show you ways to open virtual disk images with both read and write access for major virtual disk file formats VDI, VHD, VHDX, and VMDK. They are separated into read only and read/write methods. Make sure your virtual machine software is not running before trying to open the disk image, it also works more reliably when there are no snapshots attached to the virtual disk.
Read Only Access for Virtual Disk Files (VHD, VHDX, VDI, or VMDK)
There are many different ways you can access the contents of a virtual disk without actually booting into the virtual operating system itself. Here’s a selection of easy solutions.
1. Aomei Backupper
The Aomei Backupper is one of the most effective tools on the market. The application is designed to protect and restore data on Windows-based devices. Users can use Aomei to open hard disk image files by mounting them as virtual drives. So, it becomes possible to access the content of the files without restoring it on a physical hard drive.
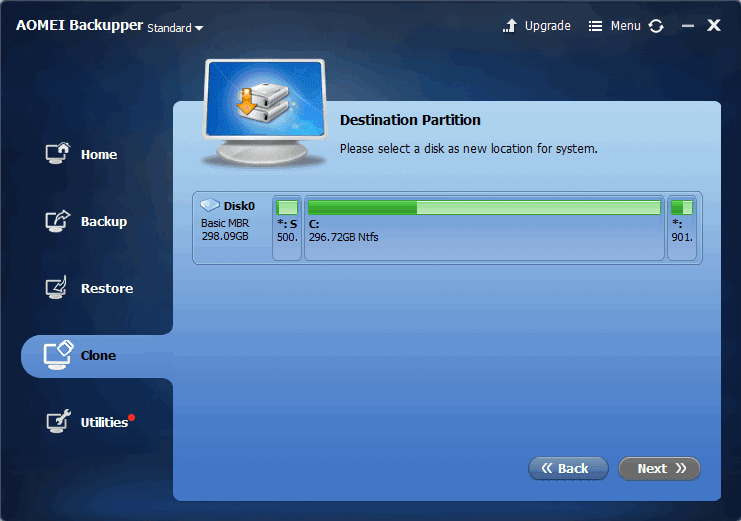
Furthermore, you can use the application to create complete system backups like the operating system, applications, and personal data. This feature is particularly useful when you need to restore data after a disaster. The application offers a range of backup and restore features. Some of them include disk backup, file backup, clone disks/partitions, incremental and differential backups, and backup scheduling.
2. 7-Zip (VHD, VHDX, VDI, and VMDK)
7-Zip is probably the most popular free archiver and it includes the ability to open VHD, VHDX, VDI, and VMDK disk images. You can easily extract whatever files are required from the virtual operating system using drag and drop or copying to another location with the Extract button.
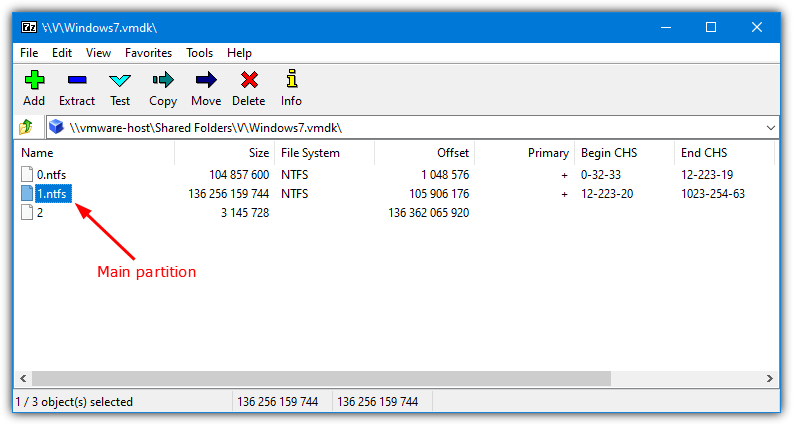
To open a virtual disk, right click on it and select Open archive from the 7-Zip context menu or open 7-Zip File Manager and manually browse for the virtual disk. Only single volume VDI’s are supported which means if there is more than one partition the VDI image won’t open. Multi volume VHD and VMDK files are supported although opening a VHDX image seems to be very hit and miss.
3. Passmark OSFMount (VHD and VMDK)
Passmark OSFMount can handle VHD and VMDK virtual hard disks but does not support VDI image files or VHDX. The virtual disks are mounted as drive letters in this program which means they behave much like an ordinary hard disk while connected but are read-only.
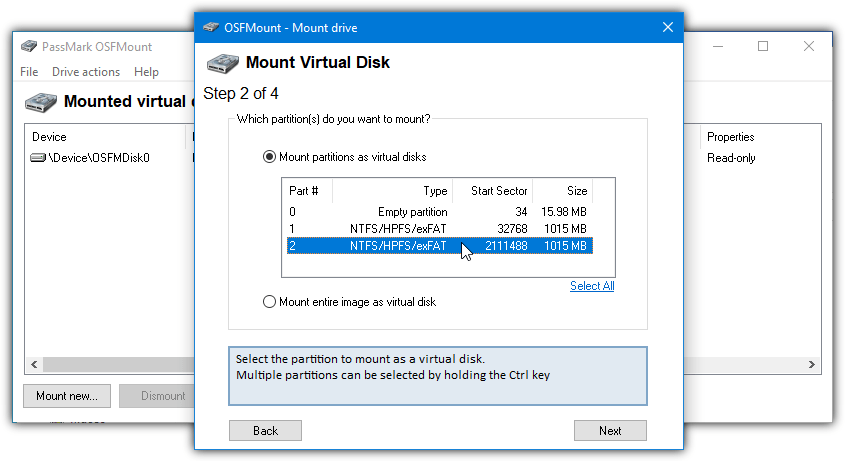
After installing and launching OSFMount, press the Mount new button, this will bring up the mount virtual disk wizard. Firstly, browse for a virtual image file and then select a partition to mount from the available list. The wizard will jump to step 4 where you don’t need to change anything apart from maybe the drive letter. Then simply press Mount.
To remove the virtual drive, open the OSFMount user interface, highlight the drive in the list and press Dismount or “Dismount all & Exit”.
Read more:
4. PowerISO (VHD, VDI and VMDK)
Although PowerISO is a shareware program costing $29.95, the trial version can be used indefinitely with a nag window on startup. It allows you to open and access disk image files, including VHD, VDI and VMDK images. The good thing about PowerISO is its ability to handle multi partition VDI virtual disks in addition to VHD and VMDK. Please watch out for the adware offered during install.
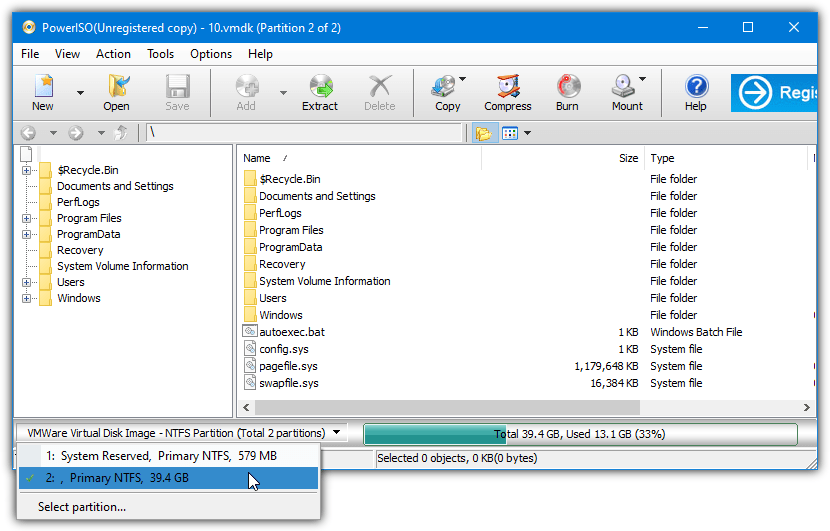
Click the Open button and browse for the disk image to load. A window will ask you to select which partition to import, only a single partition can be loaded but all usable partitions in the image file will be available. You can then drag and drop folders or files out of the window or click the Extract button and browse for a save location. The information bar offers a drop down to swap between available partitions inside the image file.
Read and Write Access for Virtual Disks (VHD, VHDX, VDI, or VMDK)
Being able to read and copy files from the virtual hard disk will probably be enough for many users, but there will be others that need to write files into the image without booting the operating system. These options can also be used for read only access in addition to the three above.
5. Mount VHD, VHDX, VDI, and VMDK Disk Images Using ImDisk Toolkit
ImDisk virtual disk driver creates and mounts virtual hard disks, optical disks, and floppies. ImDisk Toolkit uses the ImDisk driver but has an easy to use interface making the whole process much simpler. Both are open source.
1. Download ImDisk Toolkit and install it. If you don’t want to make use of the ImDisk RamDisk feature it can be deselected during setup. Double click the “Mount Image File” desktop shortcut or right click on the disk image > “Mount as ImDisk Virtual Disk”.
2. Drag and drop the virtual disk image or use the browse button to locate it. A drive letter will be preassigned which can be changed from the drop down. For just read access tick the Read-only box. When using multi partition images you can select the partition to mount from the list at the bottom. Click OK to mount the virtual drive to the selected letter.
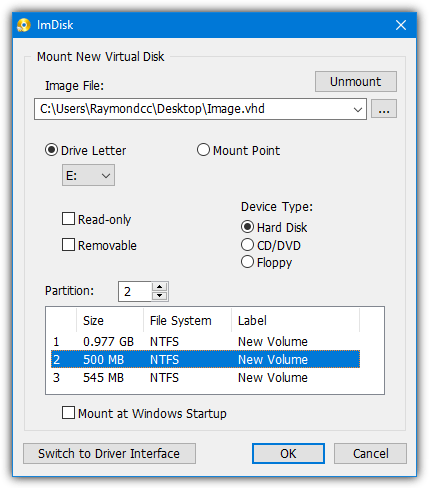
The virtual drive will appear in Windows like any other hard drive complete with read and write access. ImDisk Toolkit is able to mount static, dynamic and multipart virtual disk images. Because it uses its own driver, Windows 7 users can also open and edit VHDX files.
Unmount Virtual Disk Files From ImDisk
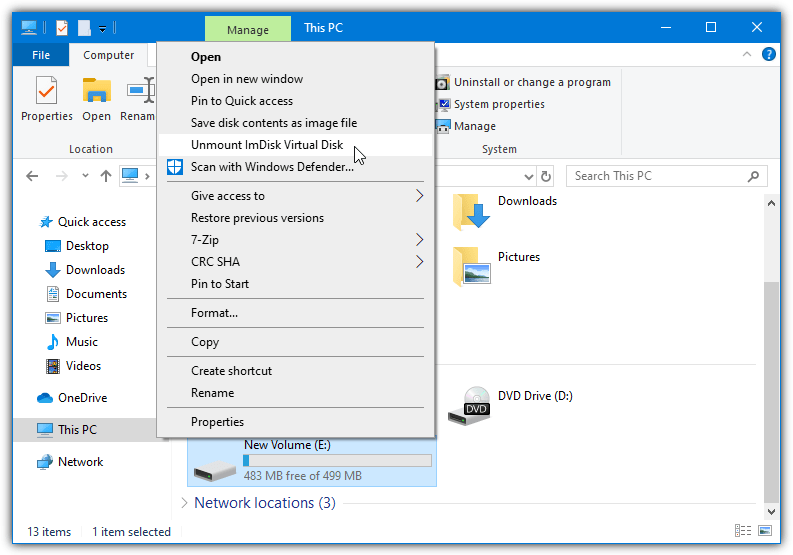
The easier option if you allowed the context menu shortcuts to be installed is to open Computer or This PC, right click on the virtual drive and select Unmount ImDisk Virtual Disk.
You can also use the ImDisk driver Control Panel applet. To unmount a drive open the “ImDisk Virtual Disk Driver” desktop shortcut or type ImDisk into Start, click on the virtual drive and press the Remove button.
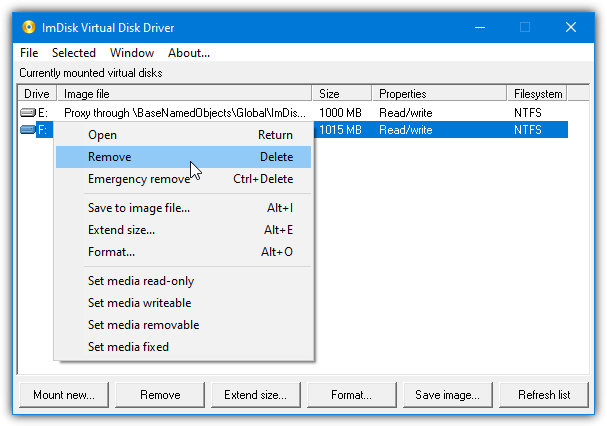
There is also an Emergency remove option in the context menu to forcibly unmount the virtual drive.
6. Mount VHD, VHDX, VDI, and VMDK Disk Images Using Paragon Image Mounter
Image Mounter is a dedicated application from Paragon that includes support for VHD, VHDX, VDI, VMDK, RAW disk images, and Paragon’s own pVHD format. One of its drawbacks is you have to create a free online account and the software can only be used on a single PC at a time. The license has to be released for use on another PC. You could also, of course, just create another free account.
1. Download Paragon Image Mounter and install.
2. After launching the program, click the plus button and browse for a supported file. It will be added to the My Images list.
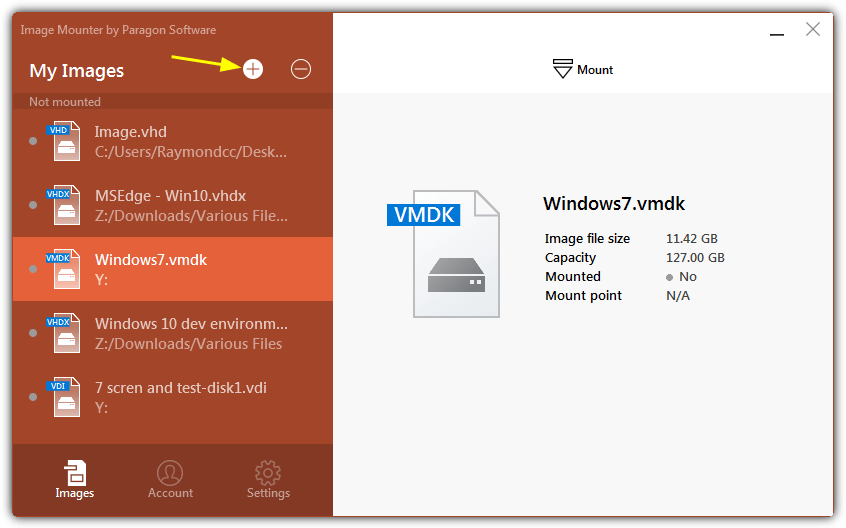
3. Highlight the image in the list you want to use and click Mount at the top. Select the mode of Read-Write or Read-only and click Mount.
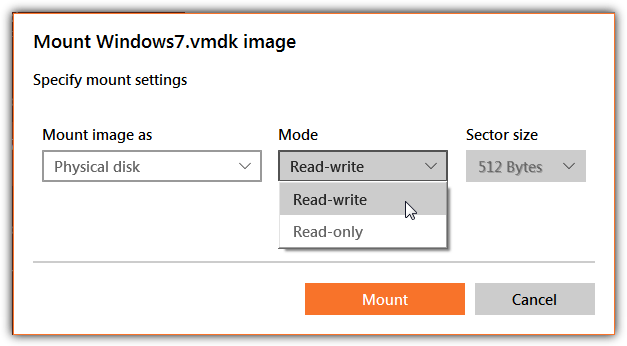
Drives that had a drive letter in the image should be mounted to separate drives on the host system. However, we did notice in Windows 7 that multi-volume VHD images were only loading the first available partition.
Unmount Virtual Disks From Image Mounter
Removing a virtual disk from the system with this program is very easy.
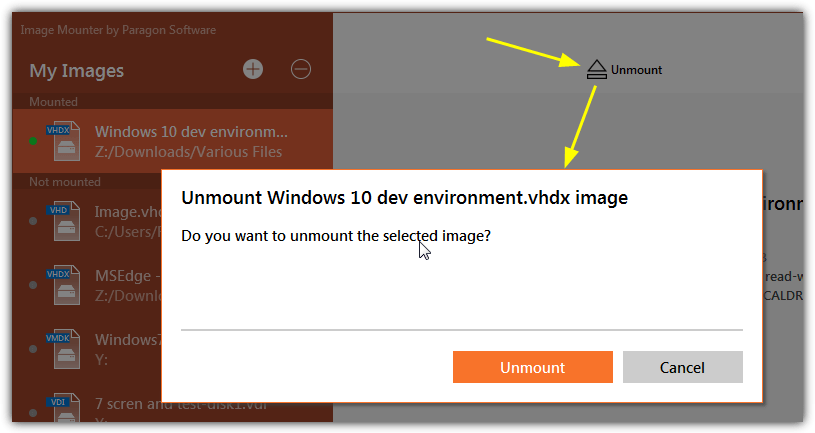
All you have to do is select a “Mounted” file from the My Images list. Click Unmount at the top of the window and then press the Unmount button.
7. Mount VMDK and VHD images With The VMWare DiskMount Utility
If you are someone that primarily uses VMDK and VHD disk images then a dedicated disk mounting tool from VMWare is a useful option. The DiskMount utility can also mount multi-volume VHD files for read and write but VDI and VHDX are not supported.
1. Download Virtual Disk Development Kit (VDDK) for vSphere 5.1.4 from VMWare which is 32MB. You will need to create a free account at VMWare before downloading any files from their website. Do not download a newer VDDK version as the DiskMount utility won’t be included. Install VDDK.
2. Open a Command Prompt, the utility is located in the following location, for ease of use make it the current directory:
64-bit: cd “C:\Program Files (x86)\VMware\VMware Virtual Disk Development Kit\bin”
32-bit: cd “C:\Program Files\VMware\VMware Virtual Disk Development Kit\bin”
3. The commands are quite simple, this one will mount the first volume in the virtual disk:
vmware-mount.exe [drive:] [path to vdisk]

The above will automatically mount the first volume in Image.vhd to drive V. To mount a volume which isn’t the first in the virtual disk, add the /v:[number] argument. You can first check how many volumes are in the image with the /p argument:
vmware-mount.exe /p [path to vdisk]
vmware-mount.exe /v:[number] [drive:] [path to vdisk]

The first command above lists how many volumes are in the VHD file and the second mounts volume 2 to drive V.
Note: Because this tool dates back to 2008, it has a major limitation when it comes to the virtual disk partition structure. It will not load GPT partitioned disks but MBR partitioned disks work as expected.
Unmount Virtual Images With VMWare DiskMount
To dismount a virtual drive from the system and free the drive letter, use the command:
vmware-mount.exe /d /f [drive:]

Only the /d command is required for dismounting, the /f is optional and tries to force a dismount if the /d option doesn’t work on its own.
Mount Virtual Images Easily With a DiskMount Batch Script
For convenience, we have created a simple batch script that will automatically mount the selected volume in a virtual disk to drive letter V.
Download DiskMount Batch Script
Download and extract the zip, then drag and drop a VMDK/VHD file onto the Mount_Virtual_Disk.bat file. It will list the available volumes and ask which one you want to mount. Press the corresponding number key and the volume will mount to the V drive with read and write access.
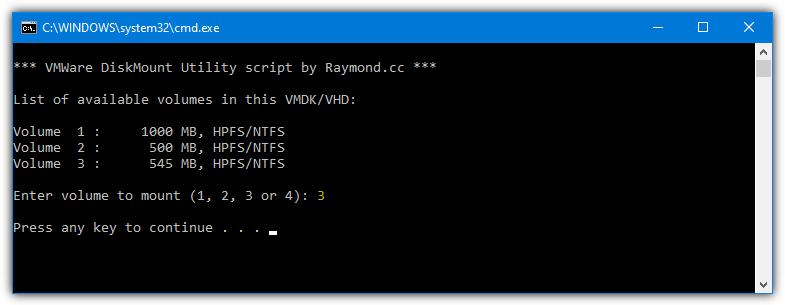
Run the batch file again for the option to dismount the drive or execute Unmount_Virtual_Disk.bat to silently dismount. Note that the VDDK needs to be installed to the default location in Program Files for the script to work. You can change that, the number of selectable volumes and the assigned drive letter yourself by editing the batch file.
8. Mount VHD and VHDX Using Windows 7, 8.1 and 10 Disk Management
Microsoft introduced a way of mounting VHD files as virtual drives starting with Windows 7. Like many Windows features the option is a bit hidden away. Do note that VHDX is supported in Windows 8 and Windows 10 but is not supported in Windows 7.
a) For Windows 10 users, it is incredibly easy to mount a virtual drive. All you have to do is go to the image file in Windows Explorer and double click on it or right click and select Mount.
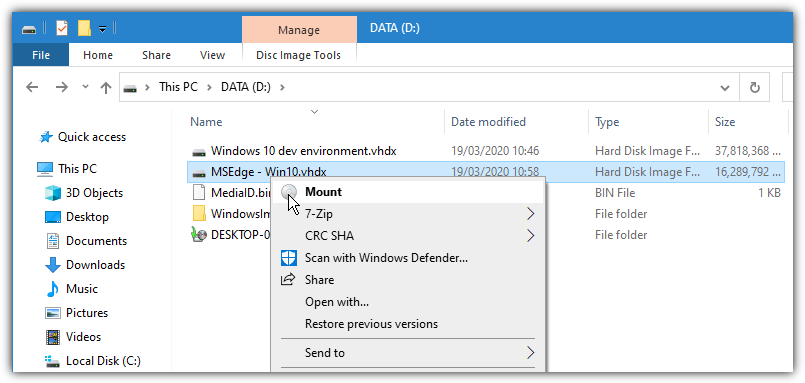
b) Sometimes the context menu/double click is not available. This can be the case in Windows 7 and in Windows 10 if third party software has changed the VHD/VHDX file association. As an alternative, you can mount disk images through the Disk Management window.
1. Either type Compmgmt.msc into the Start Menu search box or right click Computer/This PC and click Manage.
2. In Computer Management, click on Disk Management and let it enumerate the disks on the system. Then right click on Disk Management and select Attach VHD.
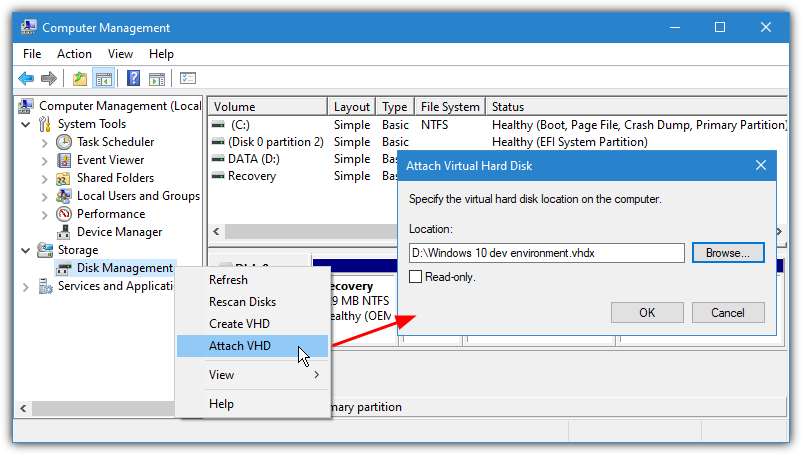
3. Browse for the VHD/VHDX file or enter the path manually. Check the Read-only box if you want to read or extract files but not alter the image. Click OK when ready.
The VHD will be mounted and given a drive letter. If there are multiple partitions they will each be given additional letters. Mounted virtual drives will appear with pale blue icons in both the lower and upper panes of the Disk Management window.
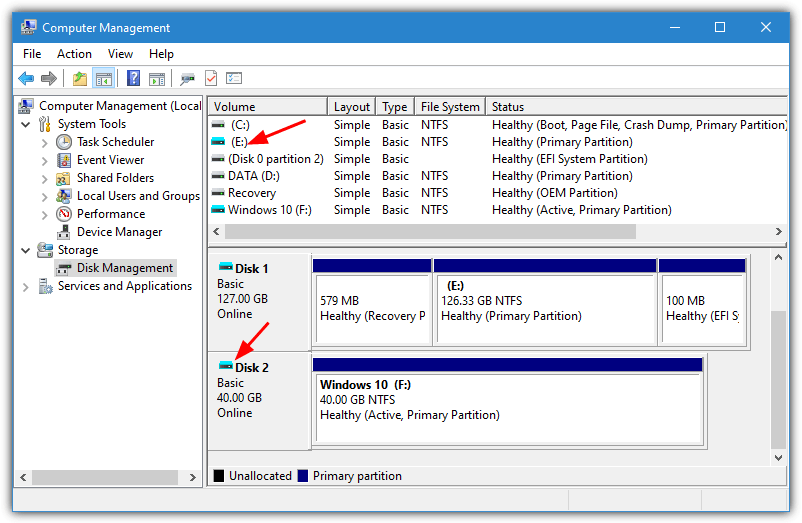
The mounted virtual VHD will now be listed as a standard hard drive in Explorer with read and write access.
Detaching The Virtual Hard Disk
VHD files mounted in this way only stay mounted for the current session. When you reboot or shut down the computer they will automatically be detached. Here’s how to manually remove the VHD or VHDX from the system.
a) You can detach all mounted volumes within the image by going to File Explorer, right clicking on any of the mounted drives and selecting Eject.
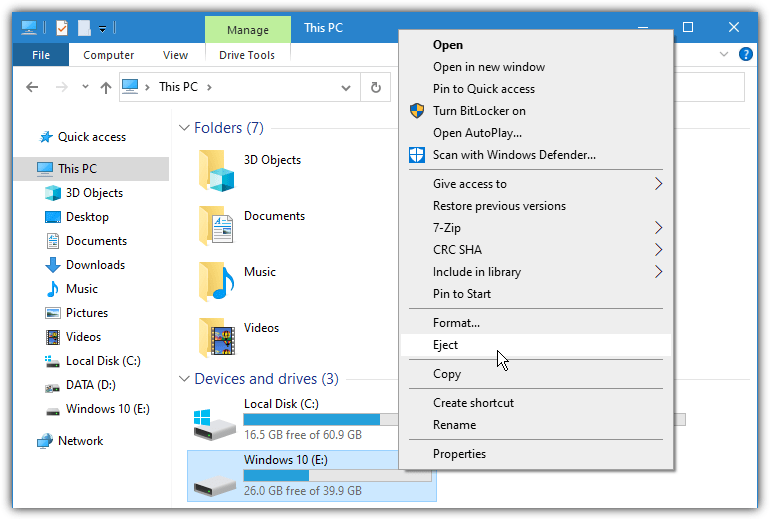
b) If you don’t have the Eject option in Explorer available, you can again use Disk Management.
1. Open Disk Management and find the virtual hard disk you want to remove. Right click on the drive information in the lower window (where it says Disk #) and click Detach VHD.
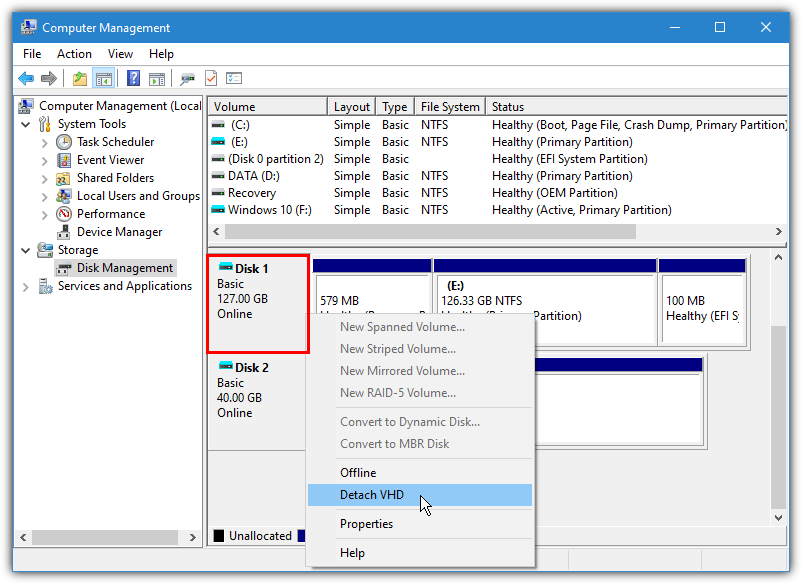
2. Click OK to confirm the detach. This will remove all the mounted volumes in that image.
We have previously mentioned that Daemon Tools Lite is able to mount VHD, VDI, and VMDK images, and it still can. However, we think there are too many drawbacks with it and there are better options available.


User forum
13 messages