What is Recycler Folder in Windows? Is it Safe?

As you might expect, there are many files and folders hidden away in Windows that deal with important tasks such as keeping the system running or allowing certain features to function. A couple of examples of this are Hiberfil.sys and Pagefile.sys that reside in the root of your C drive.
You have to enable the show hidden files and protected operating system files settings in Control Panel Folder Options for these and other files to become viewable. More folders in the root of C which also become visible after unhiding are $Recycle.bin or Recycler and System Volume Information. But just what are these folders for?
The first thing about hidden files and folders in general is that they’re usually not made visible for a reason, which is often a sign that you’re not supposed to play around with them. But also, like many things in Windows, if something isn’t behaving correctly or the behaviour looks odd, you might want to have a closer look.
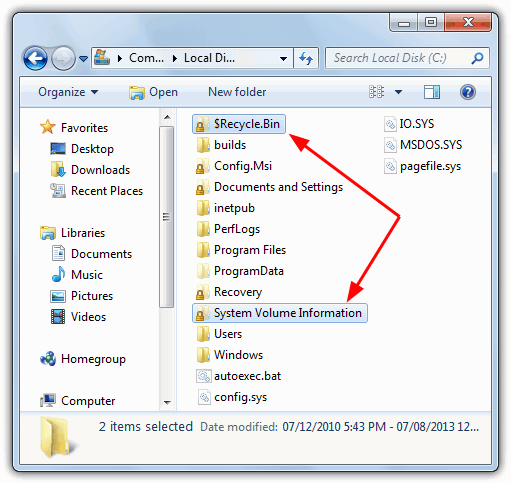
So what are the $Recycle.bin, Recycler and System Volume Information folders all about?
First we’ll look at the generically named System Volume Information.
The System Volume Information Folder
The System Volume Information folder is a hidden folder in the root of your C drive that the Windows System Restore tool uses to store its information and restore points. It’s not just System Restore data that gets stored in here though and the Windows Indexing Service uses it to store search databases, the Volume Shadow Copy Service creates live system backup data and also Distributed Link Tracking stores database information to repair shortcuts and linked documents. Check Disk logs are also saved here.
There will actually be a System Volume Information folder created on every partition on your computer, including external hard drives and even sometimes flash drives. Because it’s the storage location for System Restore points, if System Restore backs up files that are infected with viruses or other malware, it becomes a problem. Most antivirus software cannot delete viruses from System Volume Information because it’s a highly protected folder. To verify this yourself, simply double click on the folder and you will receive an error “C:\System Volume Information is not accessible. Access is denied”.
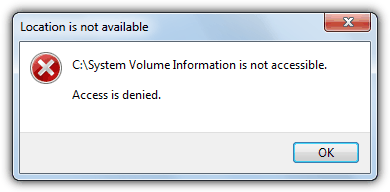
What you need to do is either give the appropriate permissions to the currently logged on user for full access to the System Volume Information folder, or delete all the previously created restore points to remove any viruses attached to them. Here we show you both methods.
Turning off System Restore
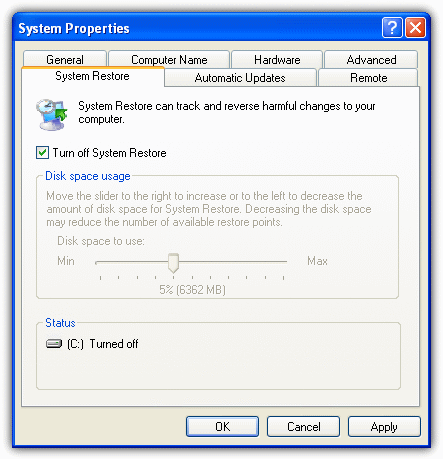
Turning off System Restore completely will remove all your restore points from the System Volume Information folder, removing anything malicious attached to them. After turning System Restore off, restart your computer and then re-enable it again once your system is free of viruses. It will then create a new and clean restore point. By default, System Restore is automatically turned on in all versions of Windows that have it, and you can turn it off from:
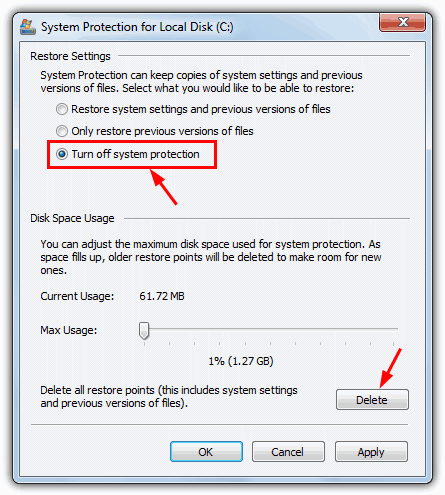
1. Go to Control Panel -> System and click on System Protection (XP users simply click the System Restore tab)
2a. For Windows XP, simply click the “Turn off System Restore” box and press OK. You can also adjust the percentage of the drive System Restore can occupy.
2b. For Windows Vista and above the process is slightly more complicated. Look in the list of available drives, click on any that have Protection set to On and press the Configure button. Then select “Turn off system protection” and click OK. Users just wanting to empty all restore points to free up some space, simply click on Delete.
To free up space by deleting restore points you can also use a utility like the popular CCleaner although it won’t delete all restore points and will leave the most recent point in tact.
Accessing the System Volume Information Folder
As mentioned earlier, the System Volume Information folder is protected by Windows and you can’t simply open it up and look at the contents because an access denied error message will popup. However, it is possible to gain access by setting the appropriate permissions for the folder, here’s the easy way to do it.
For Windows XP
Because Windows XP deals differently with accessing folder security permissions depending on whether you’re using Home or Professional, the easiest solution is to use a context menu shortcut that works on both with a single click.
1. Download Take Ownership XP and extract the zip file.
2. Copy Subinacl.exe, TakeOwnershipFile.cmd and TakeOwnershipDir.cmd to your C:\Windows folder, then double click on Install_Take_Ownership_XP.reg to install the menu entry into the registry. SubInACL is a Microsoft utility to change user security for files, registry keys and services.
3. Now, go to the System Volume Information folder, right click on it and select “Take Ownership” from the menu.
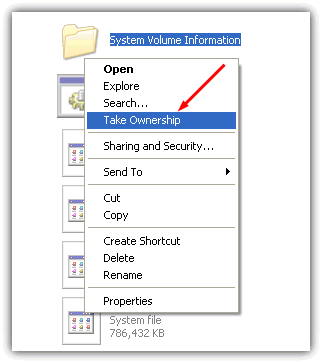
You should be able to enter the folder and have a look around without receiving the error. To remove Take Ownership again, run Remove_Take_Ownership_XP.reg and delete the 3 files from the Windows folder. It’s still not possible or recommended to start deleting stuff from System Volume Information, more on that later.
For Windows Vista and above
This method also uses a Take Ownership context menu shortcut but is even easier to install as newer operating systems have a built in tool called Takedown.
1. Download Take Ownership and run the InstallTakeOwnership.reg inside the zip file to import the context menu shortcut.
2. Right click on System Volume Information and select “Take Ownership”, then you can get into the folder straight away.
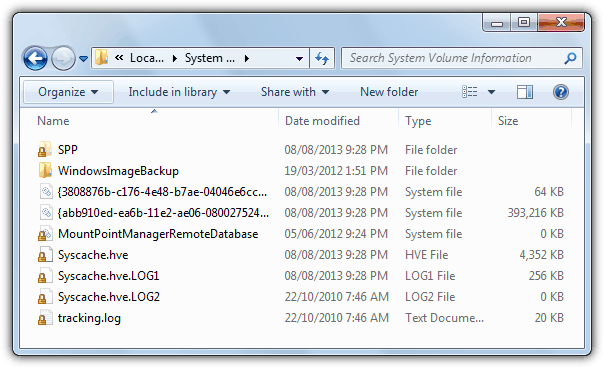
On the next page we’ll show you how to delete the System Volume Information folder and its files, and also talk about the $Recycle.bin and Recycler folders.
Deleting System Volume Information or its Files
Once you have gained ownership of the System Volume Information folder, it’s then possible to access and delete any of the files inside or the whole folder itself. We highly recommend you DO NOT do this for the System Volume Information folder on your Windows drive (C:). As we said earlier, it contains data for many other system components besides System Restore and could make Windows unstable or even crash. Besides, if you delete it from C, the whole folder will simply be created again automatically.
You can however, safely remove the System Volume Information folder from other drives or partitions such as data drives or external USB/ESATA drives etc. External hard drives can in fact start filling up with restore points from be attached to other computers if they have System Restore enabled. The next issue is everything in System Volume Information, including the folder itself, has the System and Hidden attributes set meaning you can’t simply delete through Windows Explorer.
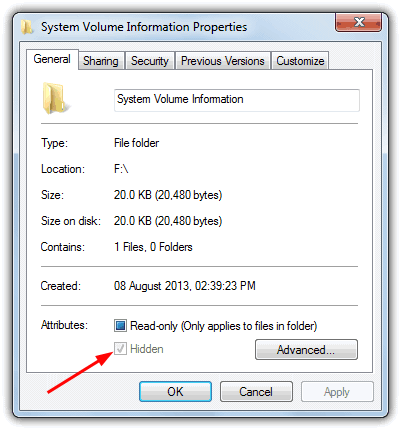
With the help of the Command Prompt, it’s only a few commands that need typing in to remove the whole folder and its contents. Assuming you have already taken ownership of the System Volume Information folder, which you need to do first, here are the commands to delete it from another partition other than C:
Attrib -s -h -r “{drive}:\System Volume Information” /S /D
RD “{drive}:\System Volume Information” /S
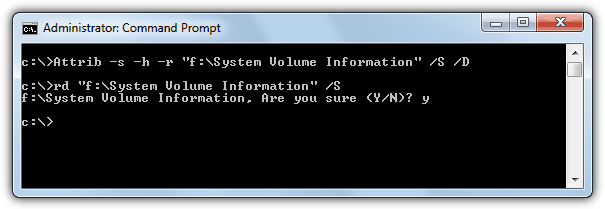
Press Y when asked for confirmation. This will completely delete the folder, make sure you have no windows open which are inside the folder before running the commands. You can use other tools to unhide and unsystem files and folders, have a read of our Reset System and Hidden Attributes article related to this subject.
The $Recycle.Bin and Recycler Folders
As you might expect from their names, $Recycle.bin and Recycler are connected with the Windows Recycle Bin. When you delete a file in Windows Explorer or My Computer etc, the file is stored in the Recycle Bin and not completely deleted from the system. These folders are the holding location for the file while it remains in the Recycle Bin. The file remains in there until you empty the Recycle Bin or restore the file back again. But there are 2 hidden folders we are talking about here and you will likely have only 1 of them, so what’s the difference?
The simple answer is the Recycler folder is found on systems running Windows NT, 2000 or XP with hard drives that are NTFS formatted. The $Recycle.bin folder is found on Windows Vista and above systems. These folders aren’t present though on storage media like flash drives, memory cards or network drives. If you have a dual boot system with XP and Vista or 7 for example, or an external hard drive that has been plugged into different operating systems, there might actually be one of each created on your drive.
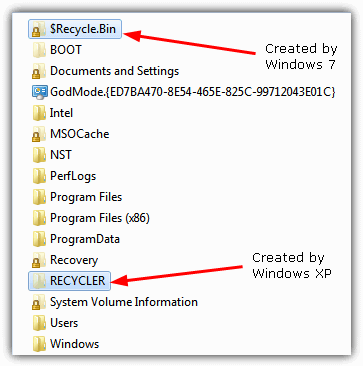
You can delete these folders without causing too much trouble to Windows and all you will lose is any files that are currently held in the Recycle Bin. In actual fact, the main folder itself will just get re-created again by Windows the next time a file is deleted so it can’t be removed permanently. The exception is if you delete Recycler for example and never connect the drive to an XP system, or vice versa.
The best solution is therefore to delete the folders inside of the main $Recycle.bin or Recycler folder as they won’t return and will delete all recycled content. This is a useful trick if for some reason Recycle Bin content has become corrupted as it won’t delete itself by emptying the bin normally. This will also delete Recycle Bin content for all users not just the current user.
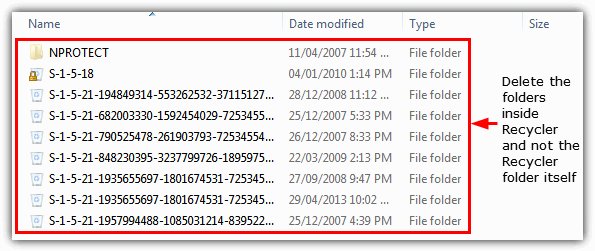
If you’re unable to delete files inside the Recycle folder, you can use a number of tools such as Unlocker to unlock and delete files that are being used. Doing this is not something you need to do very often, only if you suspect there has been a problem deleting Recycle Bin content or receive any Recycle Bin related errors.



User forum
68 messages